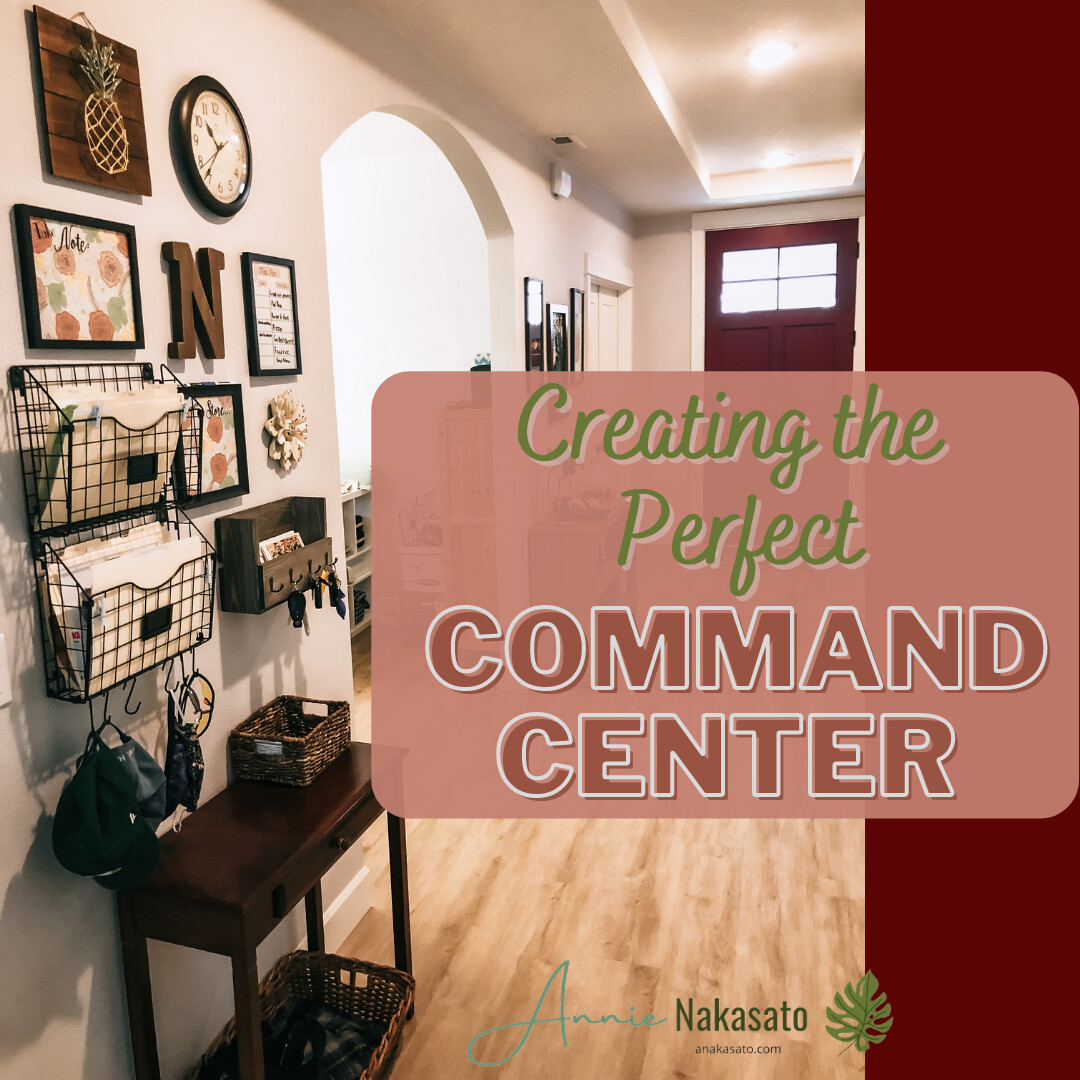
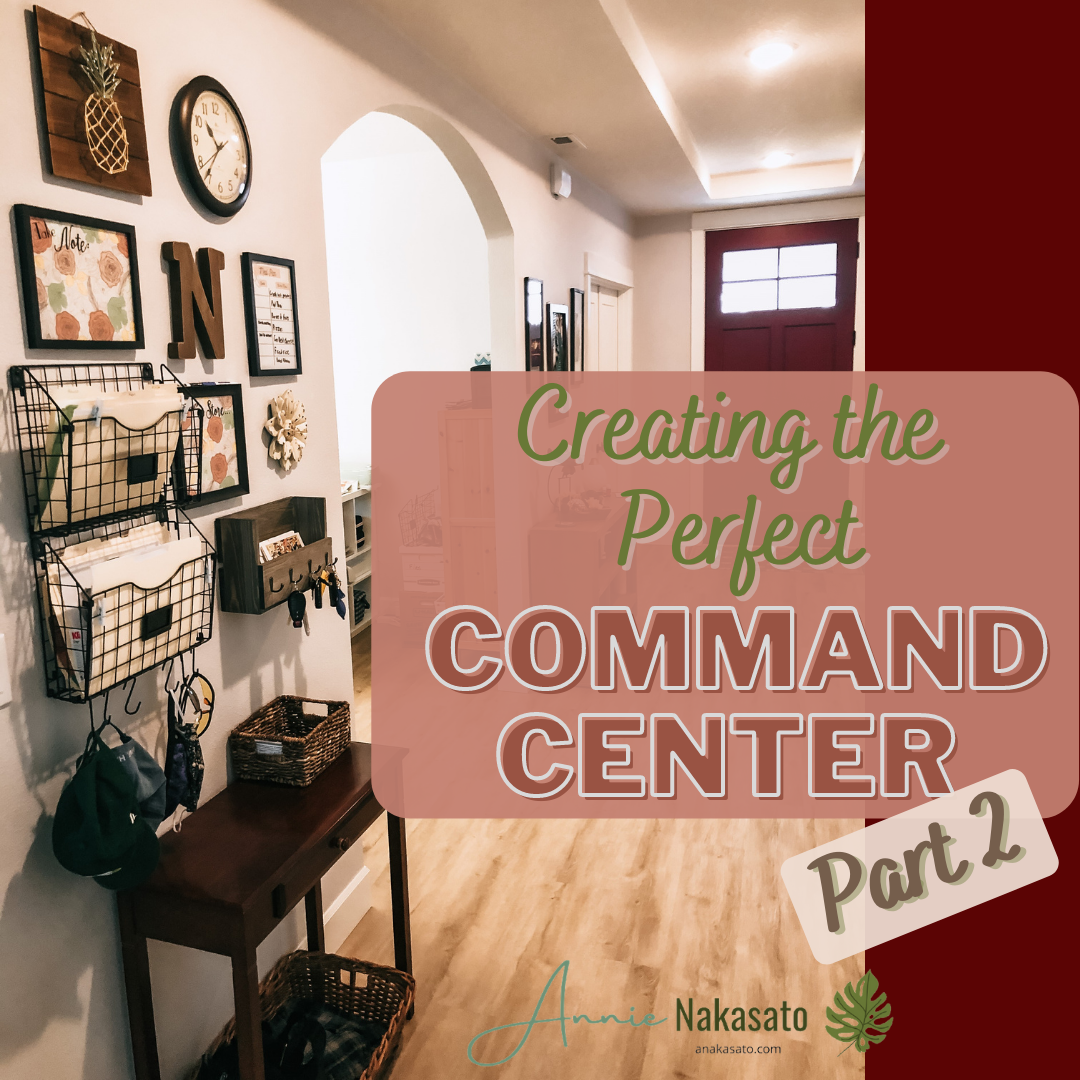
In part one of this series, I explained my family's need for a command center, my planning process and what items I chose for my wall as well as how I chose the layout. (If you missed it, you can catch up here.) In part two, I will go through how I actually hung the elements for my wall and how it is working for us.
The Installation:
When the layout on the floor met my approval, I used scrap paper and newspaper/grocery ads to mock up my template. I traced each item on the floor and cut out a matching paper shape to hang on the wall with painter’s tape. By doing this, I was able to better visualize the final product. I made a few tweaks at this point to avoid using the level too frequently and adjust spacing. This was where I realized that one of the frames was going to be harder to write on because of its height. I was much happier to deal with that adjustment before I had made holes in the walls (or needed to grab a stool every time I wanted to write on it).
With my wall template hanging for a bit, I was ready to install our family command center. I started with the trickiest parts that would need wall anchors for stability. Then I moved on to the easier elements.
 The paper organizer needed wall anchors and to be completely level to the ground. I held up the organizer to the wall and marked on my paper template where the holes needed to be. I checked my paper for level before doing anything else. Because I needed to drill two holes, I decided to make pilot holes in the wall with a small nail. This meant that I could remove the paper before actually drilling. I have drilled through the paper in the past and it works fine for one hole. I was worried about the paper twisting with the drill and thus moving the mark for the second hole. Wall anchors are my nemesis, so I was sweating this a little bit. I don’t like making huge holes in brand new walls. As it turned out, I didn’t need to worry at all. Plus, one of my pilot holes revealed a stud in just the right spot, so I only needed one actual wall anchor.
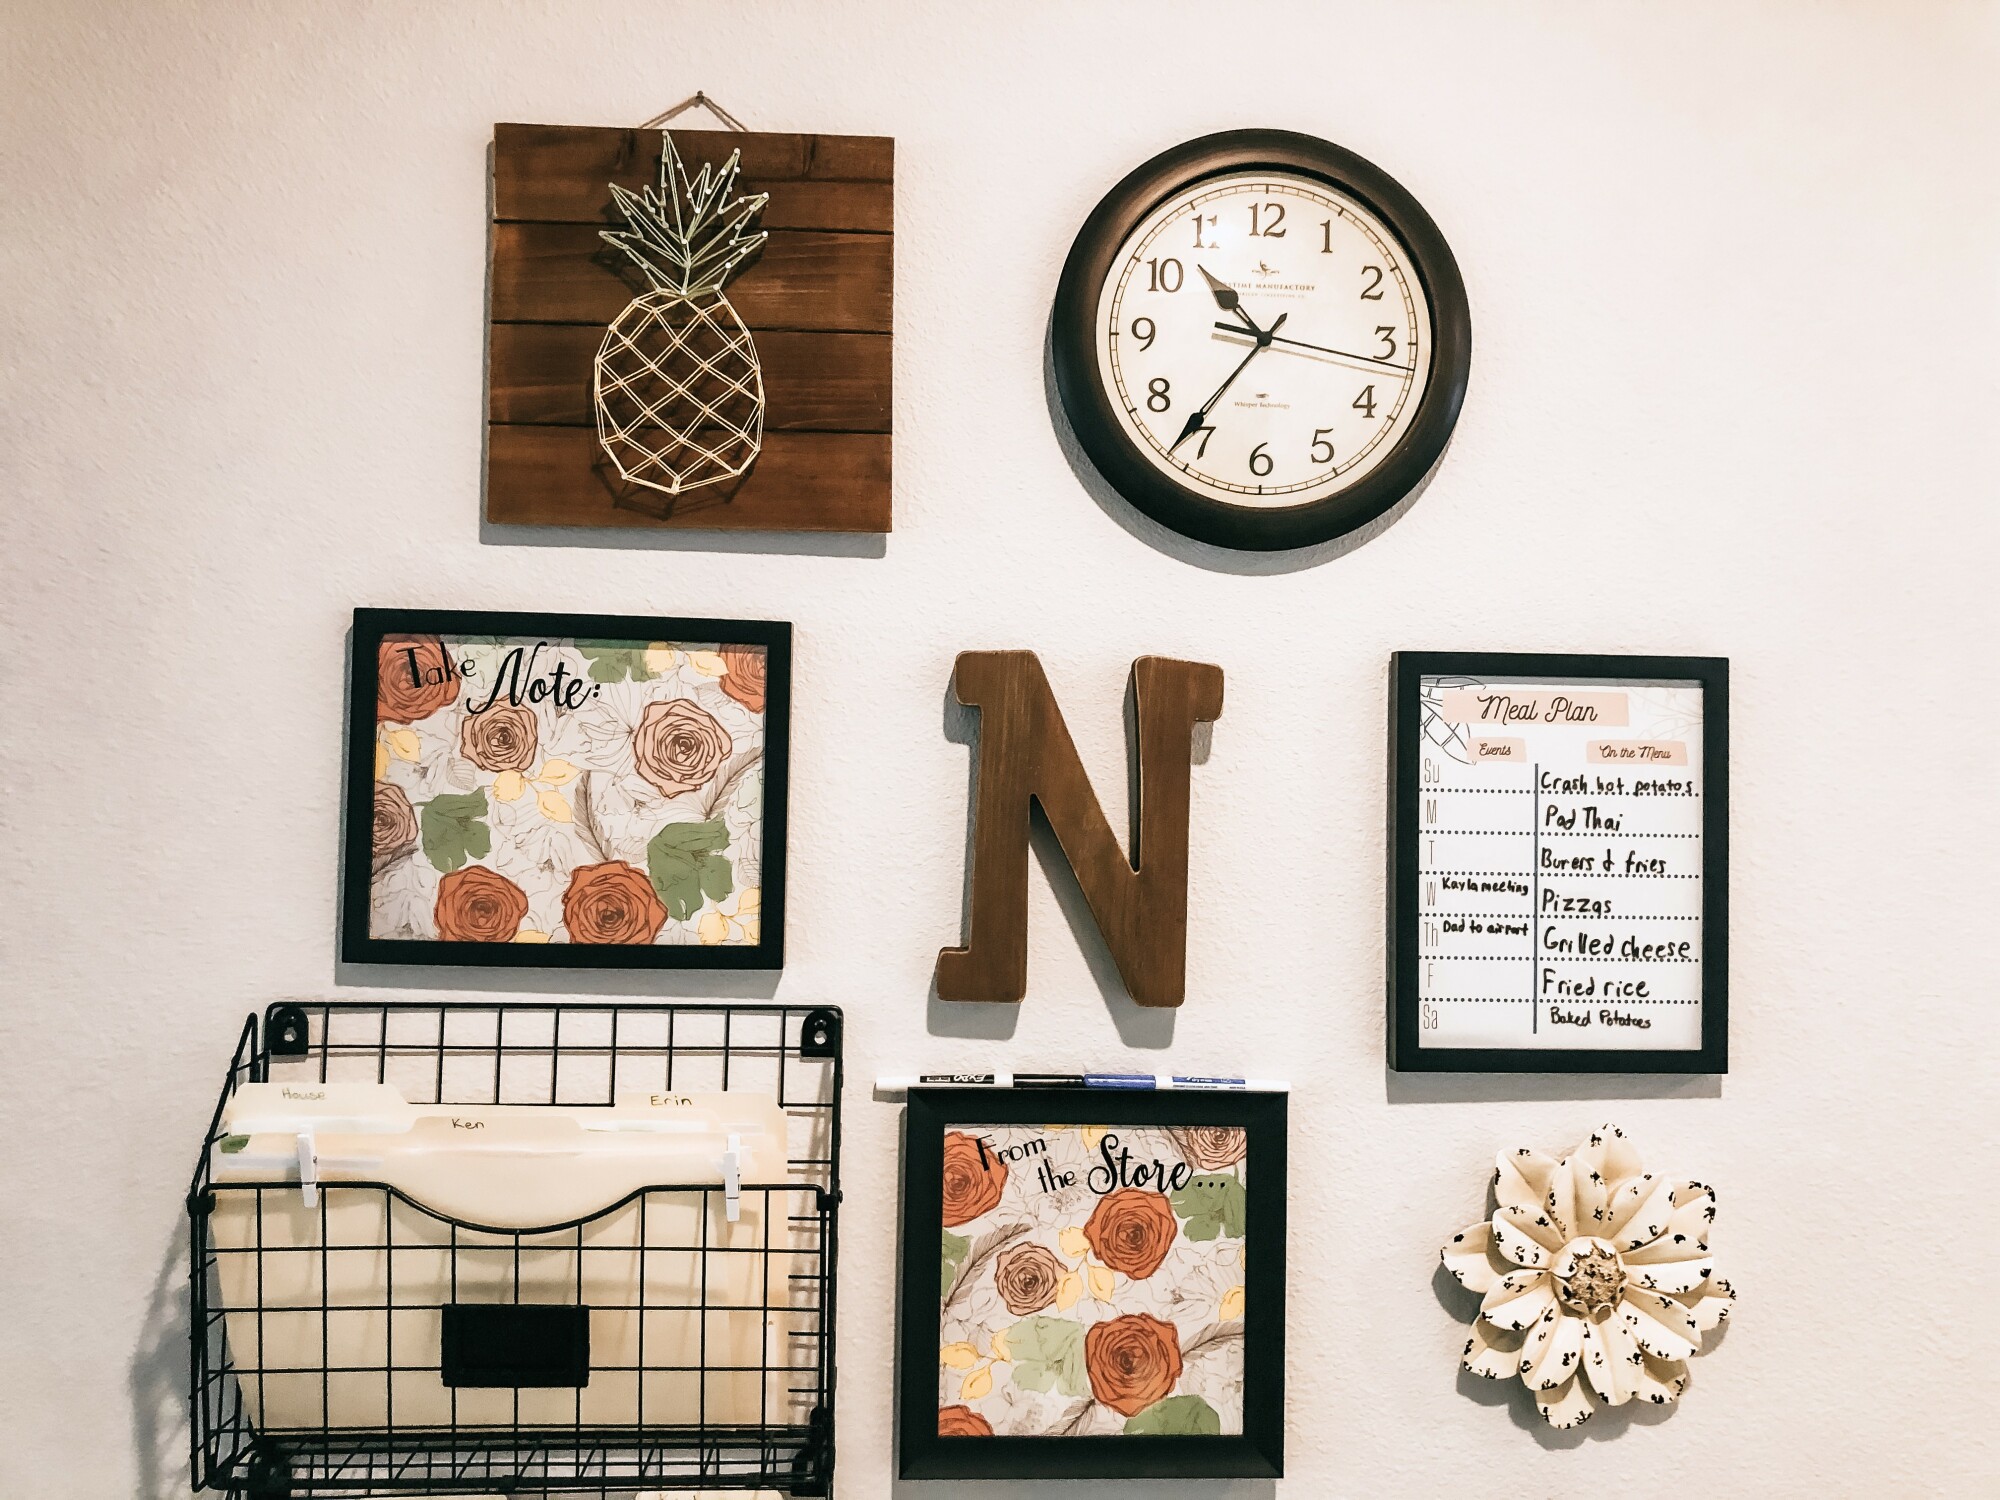
Then I moved on to the key hook/mail organizer. This would also need secure anchors because of the weight. Marking the holes was a little more difficult because it hangs from keyholes on the back that are not flush with the top. I had to measure down from the top of my template to get the holes where I wanted them. After many years of struggling to get the holes just the right distance from each other, I used my painter’s tape trick. I put the painters tape on the back of whatever I am hanging and mark the hole spots on the tape. Then, I hang the tape on the wall and use a level to check that the tape is placed correctly.
The other elements I could use a simple nail or command velcro to attach. I love to use command velcro strips because they are so easy to adjust if you later realize you want to make a small adjustment. No extra holes in the wall is always a bonus for me!
How it’s going:
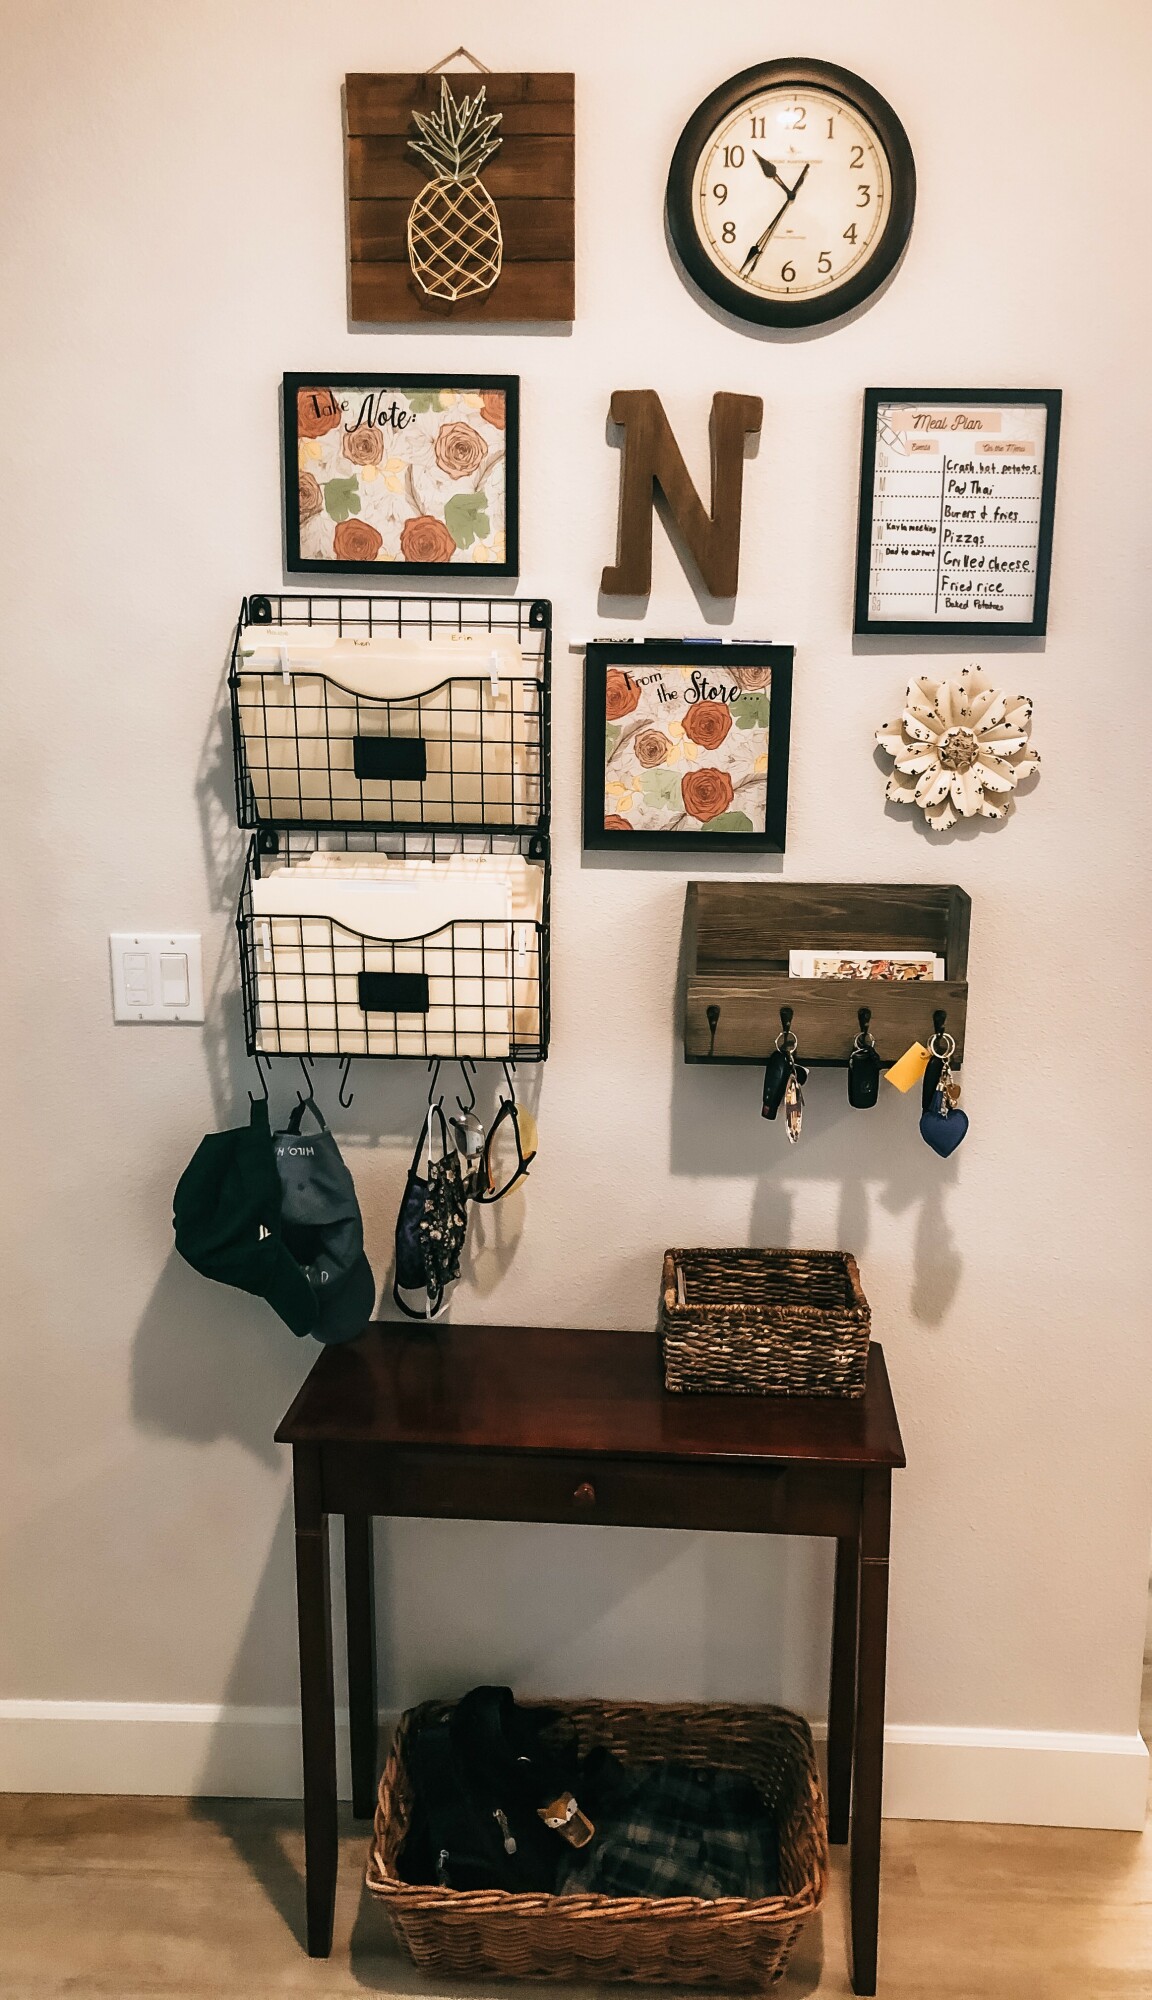 We are loving our Family Command Center. If I am slow to put up the meal plan for the week, one of my girls will take it off the wall and fill it in for me. The shopping list is my favorite thing to use during the week. I used to try to have a running list, but that paper would often go missing. Now, I don’t have to worry about that. I love to say, “add it to the list!” It is great to be able to see that list as I grab my keys when I am headed out the door. If I happen to be making a grocery stop mid-week, I can pick those things up. Or, they end up on my regular weekly shopping list.
The extra white board is a fantastic place to list upcoming events. I used it to write down my daughter’s new work hours because it took me a while to adjust to the different times. (I think she was glad I stopped asking her over and over.) It was also the perfect spot for the Wi-Fi passcode for visitors. My niece and nephew found it very quickly when they visited at Easter.
I originally hung the N with nails because there were nail holes on the back. I have since decided that a command velcro strip is actually better because it seems that the holes on the back of the letter are not actually level with each other. I had adjusted it by stuffing the hole with a wad of paper to move down where the nail sits on one side so it is more level to the eye. This is the kind of lighter weight decor that would work better with velcro so you can make those adjustments more easily.
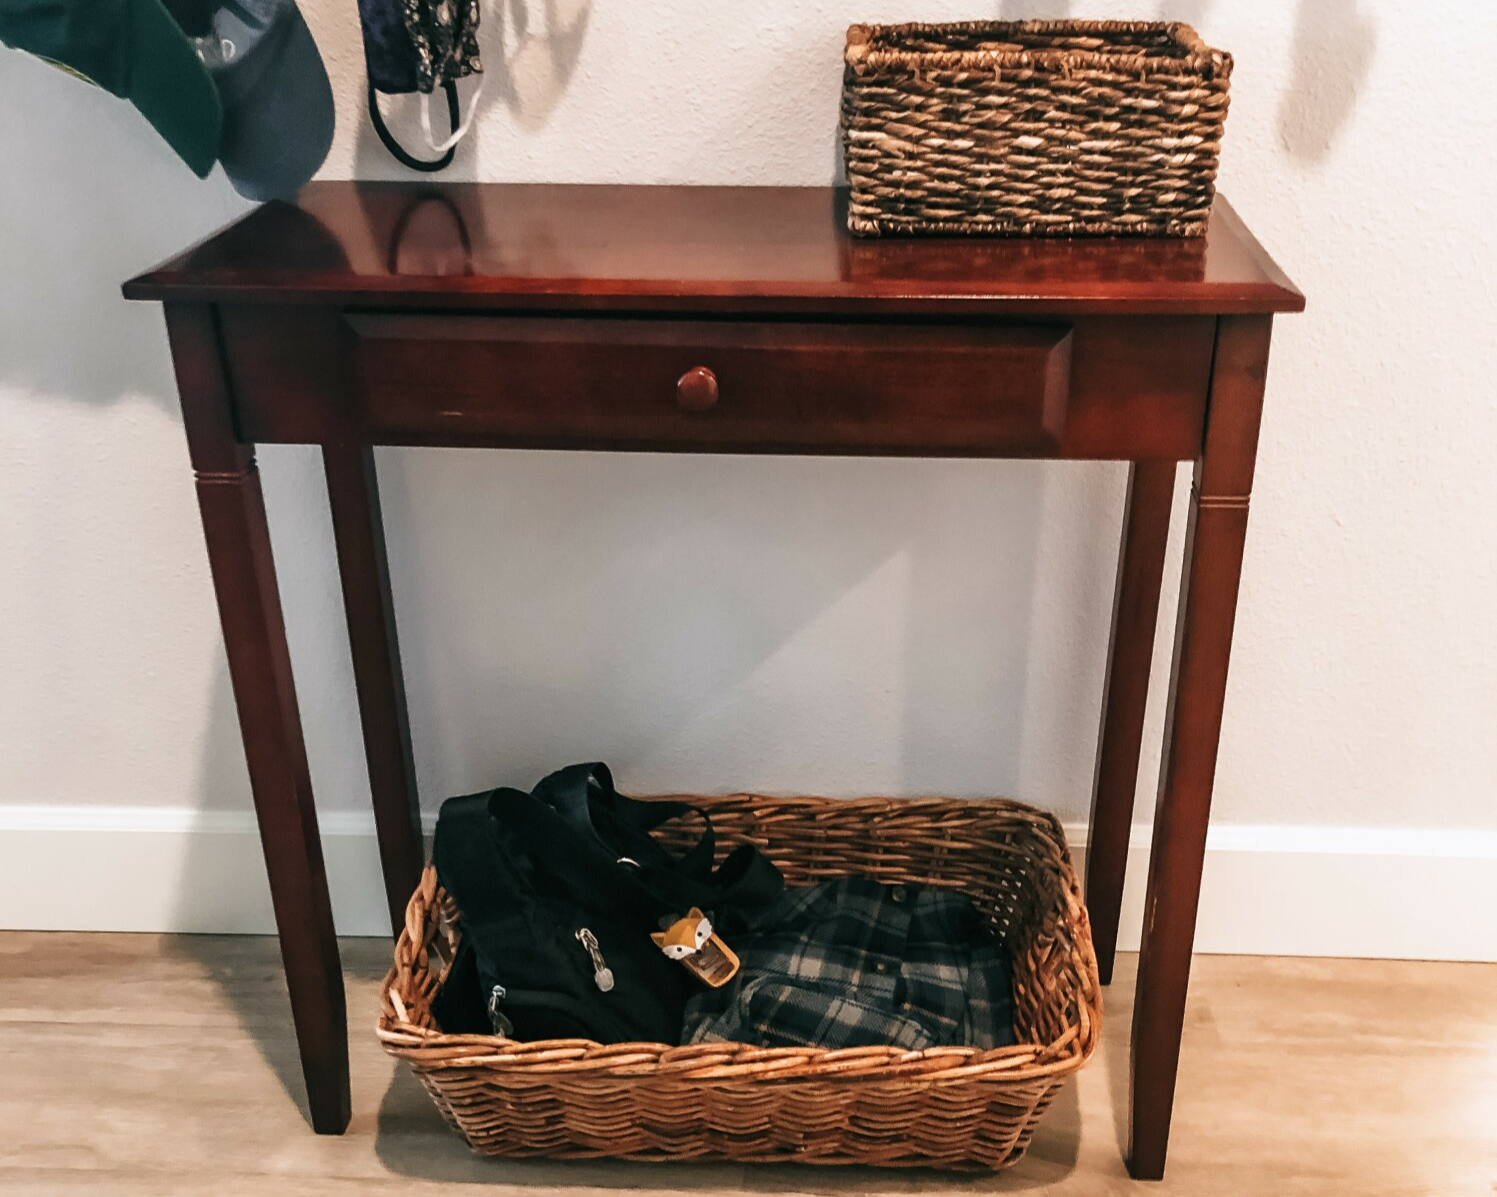 For now, the purses are great in the existing basket. I may need to get something taller if the puppy decides to start chewing on the purse straps. For now she’s just sniffing around them. Ideally, that’s all she’ll do, but she’s a puppy and is starting to get a little more bold every day.
In the paper organizers, I have a folder for each family member (including the dog, of course!), one for house receipts/paperwork and another for coupons. I love to use coupons, but I always had a hard time remembering where I put them in order to actually use them in the store. Now, it is easy to just flip through the folder from time to time and get rid of the expired ones.
I love having a launching pad for all of us in one spot. Our house runs more smoothly when everyone knows where to look for information and we don’t have to hunt for keys or sunglasses. Everything has a place. It has been in place for two months and it is working well for our family.
What is something you wish was in your family command center? Tell me in the comments below.
There are some simple changes you can make today that will create a better world for you and for your children. You can get my FREE guide to living more sustainably called How a Normal Person Can Be Semi-Crunchy. You don’t have to wear Birkenstocks, live off-grid in a yurt and produce zero waste to make a difference, but that is totally an option.
Want to subscribe to my blog so you don't miss a thing? Click here and I'll shoot you an email whenever a new blog post lands.
When we moved into this house, we were not sure where our “drop zone” would be. You know, the place where everyone drops their keys, purses, hats, etc. when they arrive home. I thought it may be the laundry room, right off the entrance from the garage. It took about two weeks, but I found the actual “perfect spot.” It is right at the end of the entry hallway, where the hall from the garage meets the living spaces and just before you enter the great room.
In this two part series, I will go over the planning phase and the execution phase of the project. This week, I will explain the process of planning our family command center. Next week, I will share how it all came together and how it is working for us.

At the outset of the project, I knew that I wanted to hang a set of hooks for our keys and designate a place for purses. Plus, there needed to be a spot for my husband’s basket for his wallet and sunglasses. Those were our absolute must haves.
Then, I went to Pinterest. I found endless configurations of “drop zones” or “command centers” on there. Talk about overwhelm! I liked this part of one and that part of another. Nothing was “just right” for our family. As I started looking, I found some common elements that I loved and other things that we just did not prioritize enough to give up the wall space. I wanted it to be mostly functional with a dash of charm.
Some common elements of command centers:
Key hooks
Schedules
Clock
Calendar

White board for notes
Weekly Meal plans
Paper sorter
Mail sorter
Organizer for important documents
Supply holders
Chore lists
Backpack hooks
Purse basket
Jacket hooks
The list could go on and on. Pretty quickly, I discovered the must haves for us. I made a list.
File holders for mail, coupons, etc. (See mine here.)

Dry erase picture frame for shopping list
Key hooks (See mine here.)
Place for Ken’s basket
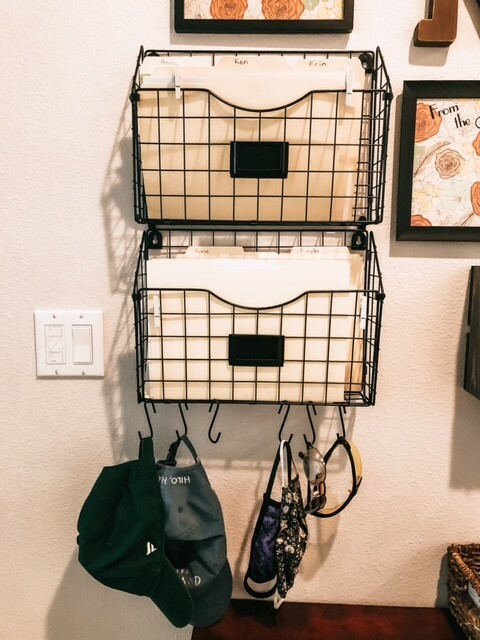
Hat hooks
Basket for purses
Clock
Weekly menu frame
Dry Erase picture frame for notes/dates to remember
Decor
Noticeably missing from the list was a calendar. In our family, we manage a shared electronic calendar. I also love my paper planner that lives on my desk. Things for the current week end up on the Weekly Meal Planner because they often impact the meals that I plan. I felt like a big calendar in this space would be more work that I would not keep up with, plus it allowed for me to use the space for other things.
 The fun part for me was looking for things to repurpose on our Command Center wall. I was looking all over for a shelf to hold Ken’s basket, but we had a small side table that fits that purpose well and didn’t have an assigned spot yet in our home. The space under the table was perfect for our purses. I repurposed a basket to contain them. We used to have that basket by the door to hold shoes when the girls were little.
I collected things from around the house into one area that I thought would work well in the space. This included some decor pieces that I love, but had yet to find a perfect home for them. I did much searching on Amazon and in some local thrift shops for the pieces I needed to purchase. These file holders worked great for size and I loved that they came with some hooks to hang off the bottom. This allowed a spot for Ken’s hats to hang, rather than sit on flat surfaces.
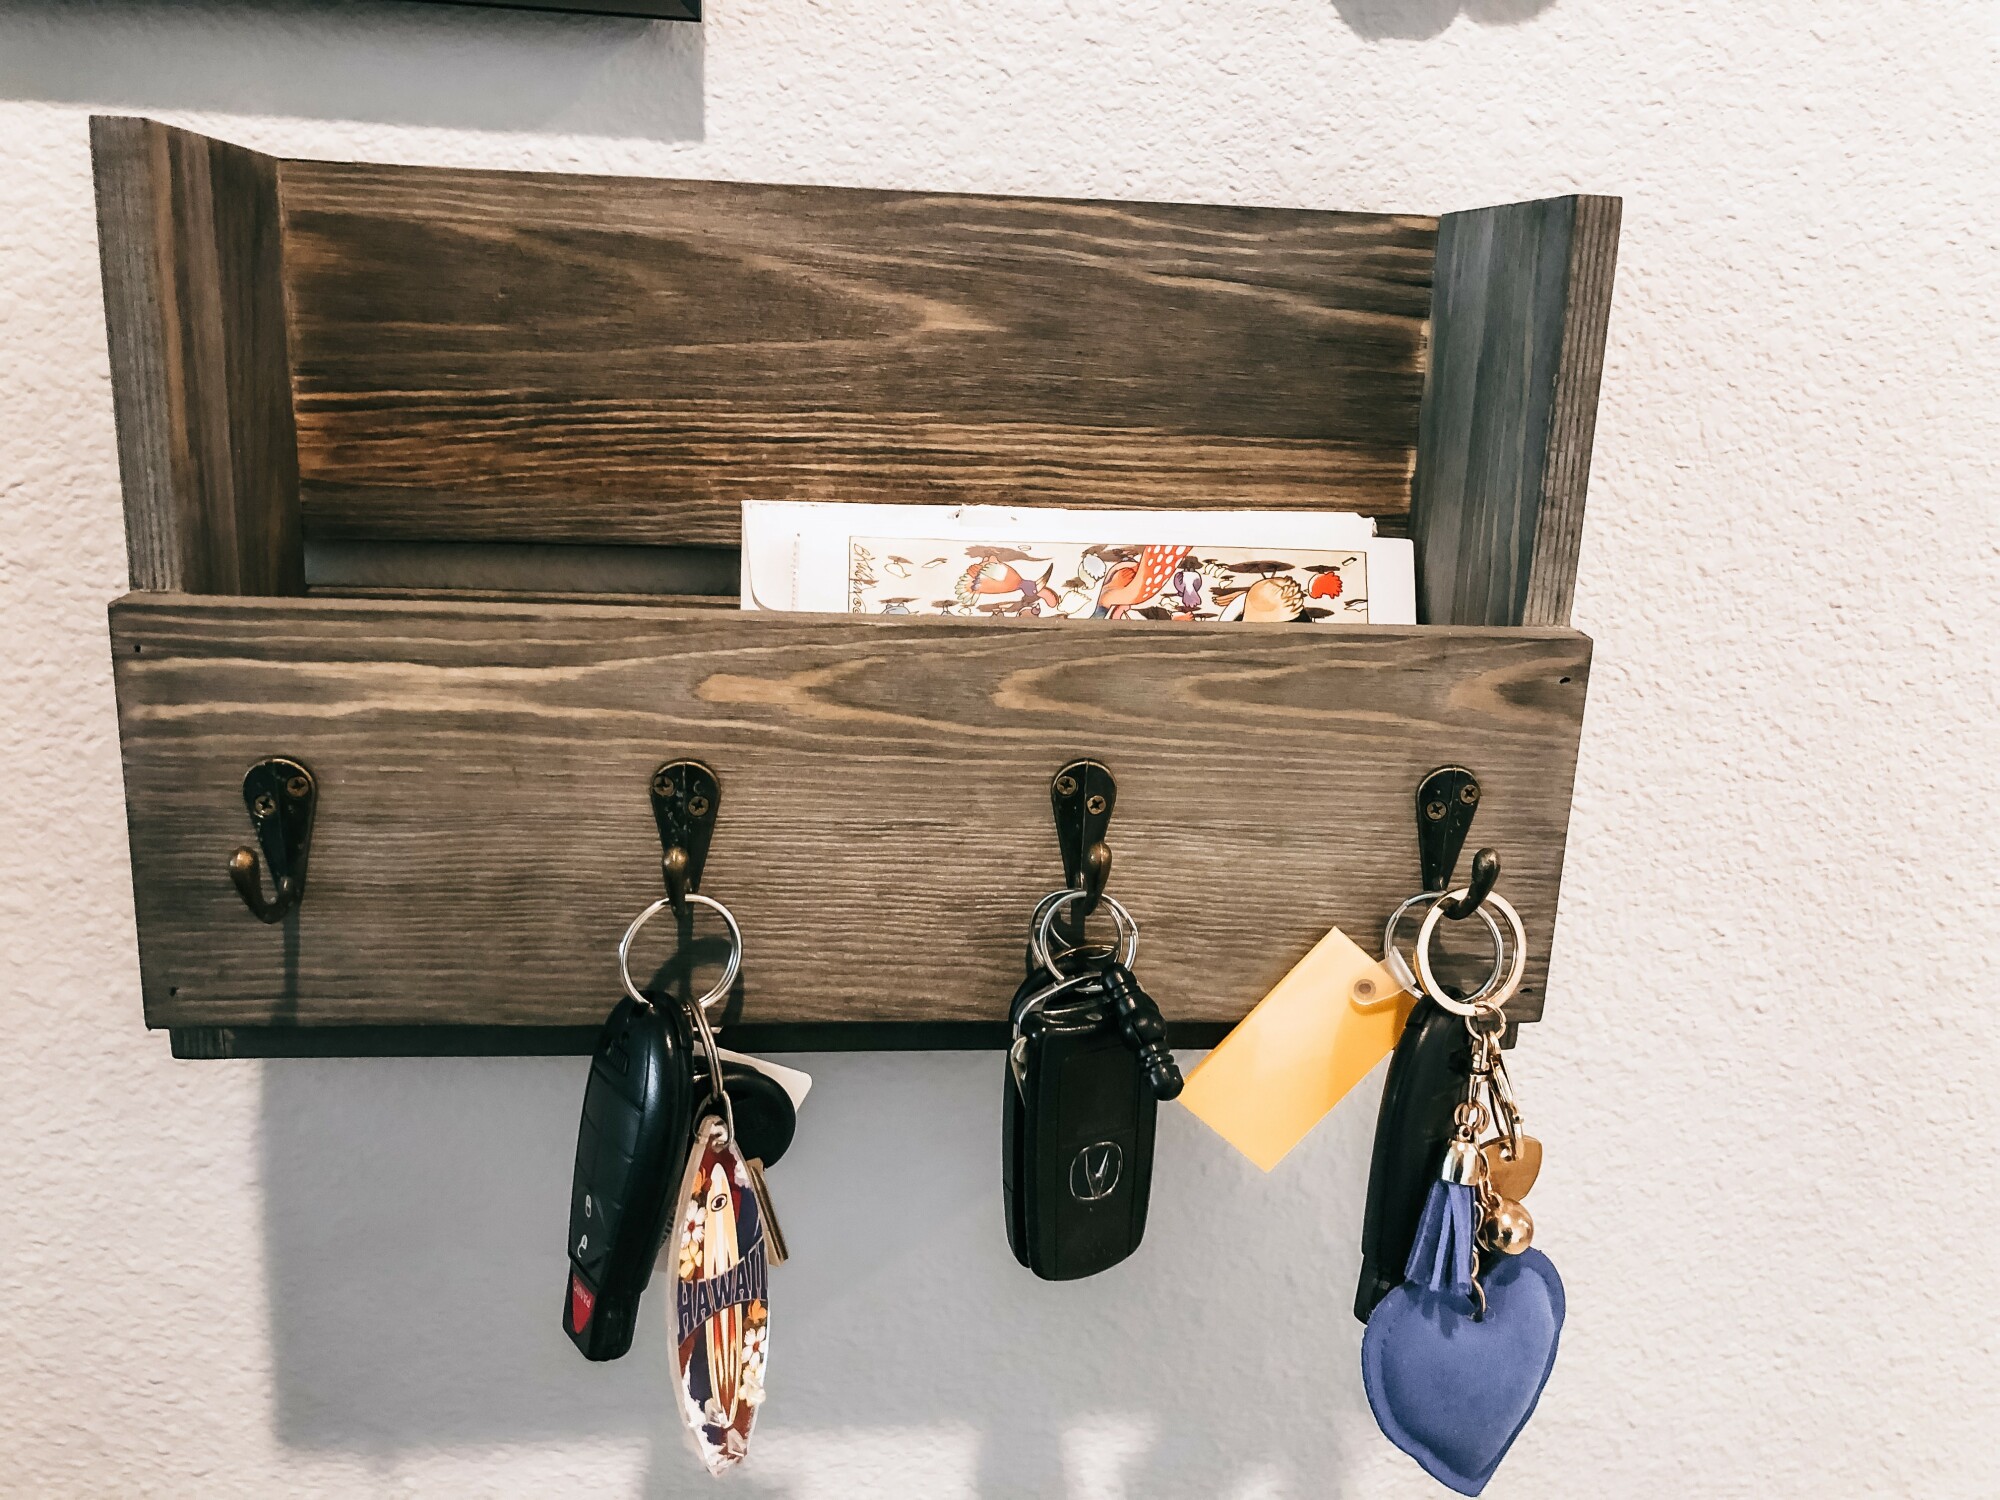 I was debating about the key hooks because we already had a simple multi key hook that we had used in the past. It looked kind of lost with all the other things, so I looked for an improvement to what we had done before. When I saw this one, I knew I had found the perfect one. The color coordinates well with our floor color. It has not only hooks, but a space for incoming or outgoing mail as well. If there is something that I need to take with me when I go out, I’ll put it there. I also use it for mail that comes for my husband when he’s not here, so it doesn’t get lost in a pile somewhere.
We have a weekly meal planner that had another temporary home. I never thought to put it in the command center until I saw similar ones in examples on Pinterest. I created this one myself and have it available free for you. If you missed my post about meal planning, you can find it here.
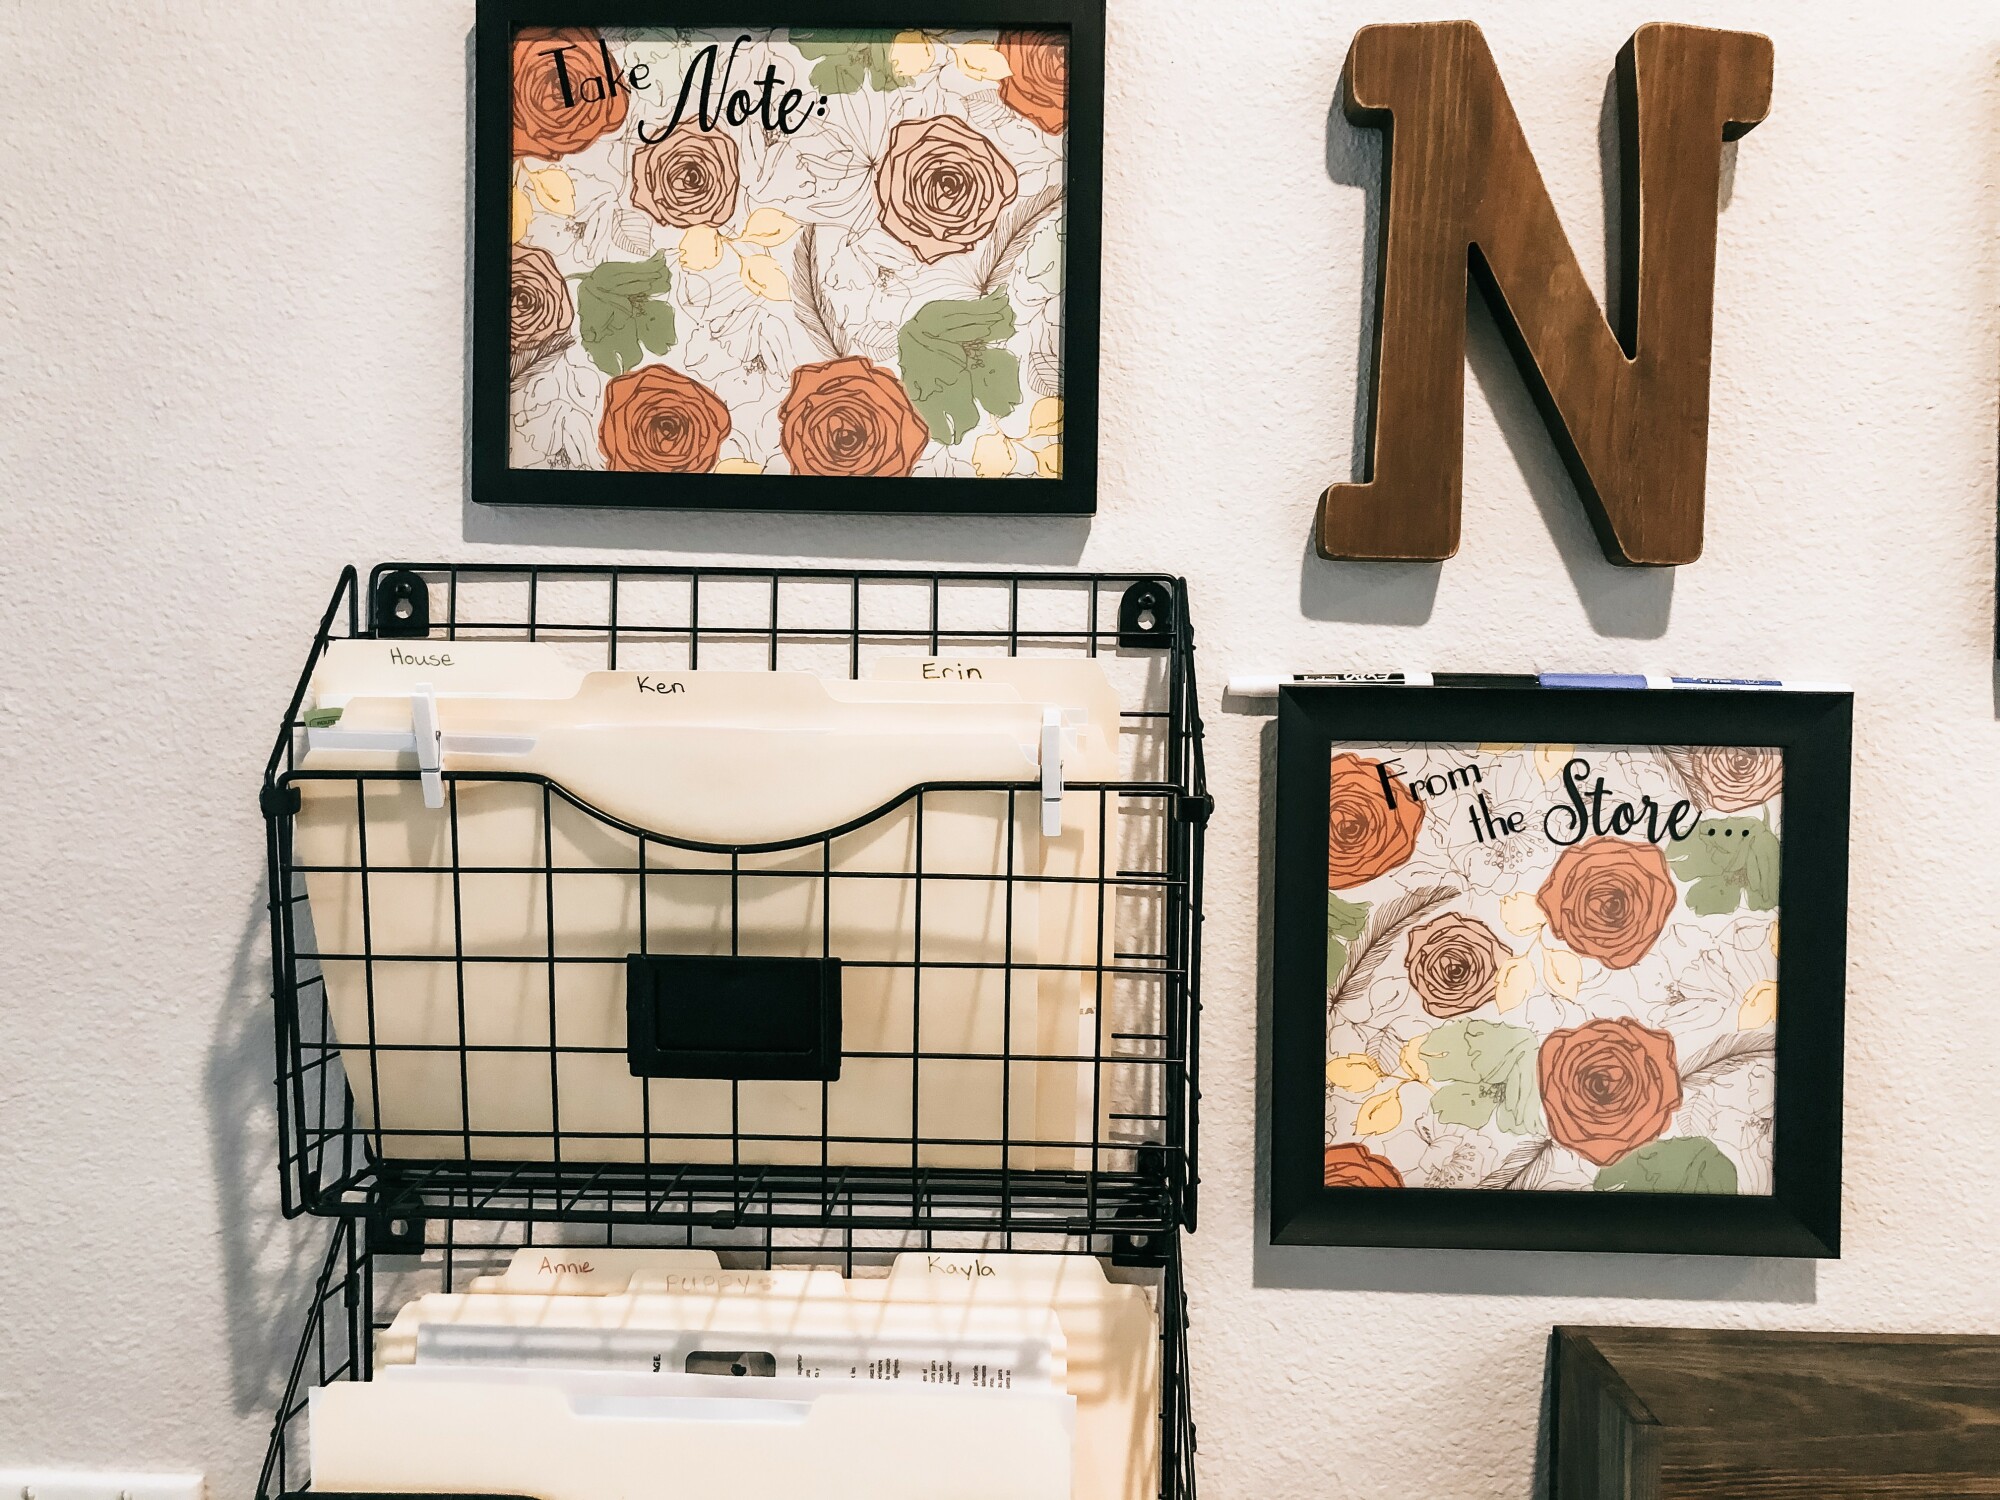 I purchased two matching black frames at a local store (after searching in vain for unused ones in the closet) to serve as white boards. I just needed to put plain or patterned paper inside for the background. Glass works great for white boards and is usually a lot less expensive than white boards. I love that you can put a template behind the glass if you want, like I did with the meal planner. This would work great for a list of chores to complete if you want that on your command center. We needed a place to have a running shopping list as things come to mind when we are in the kitchen.
The clock and decor items I already had on hand, so they were no added expense.
How I chose the layout:
As I acquired items for the command center, I put them all together in one area. Once I had everything, I started tinkering with layouts on the floor. I had measured the width of my space and marked that on the floor with painter’s tape so I could design within those limits. I arranged and rearranged elements over and over. I swapped out several decor items until I came to an arrangement I loved.
Some things to consider…
How high will things hang? I am known to be a little vertically challenged, so I knew that if I were to hang any of the white board elements too high, I’d need a stool to write on them or change them out, so I had to keep that in mind. I wanted function to be the primary focus.
Plan for clearance. If you have hooks, how much space do you need below them for clearance? I literally “hung” hats on the hooks in my floor layout to see how it would all fit together. Do you have a lamp or taller decor items on a table that you need to consider?
Is it visually appealing? I like to use a variety of shapes in my design. I like the circular shape of the clock and flower to balance out the sharp corners on the square and rectangular elements in my command center. You may prefer a more uniform design with all one type of shape or material. That is the beauty of designing your own. You get to be in charge of what your end result will look like. As I was arranging, I took care to balance out the colors as well. I didn’t want the two natural wood elements to be lined up or clustered on one side of the design.
How precise will installation need to be for you to be happy? I know that if I have rectangular elements next to each other, I am going to be annoyed if they don’t hang straight in relation to each other. I also know that if there are two picture frames at the same level, I will have to measure and get out the level to line them up properly. To avoid those pitfalls, I intentionally designed things to be offset from each other. Where there were two identical frames in the same row, I turned one sideways, so they would not have to be hung equally.
Next week, I’ll detail how it all came together and how it works for us now. (Click here to go right to part 2.)
Want to subscribe to my blog so you don't miss a thing? Click here and I'll shoot you an email whenever a new blog post lands.
 Moving is never dull. With a local move, we were able to get most of our things moved ourselves, with the help of local family members. God bless them! The big stuff with big stairs from the other house required the help of amazing local movers.
Amazingly, 3 days after the movers left, we were socked in with snow surrounding us. We are ever grateful that we chose to move in the week we did. The little rain we endured during our move weekend was nothing compared to the week that followed.
 We are filling our days with projects around here in our new home. I am unpacking in fits and starts. We are loving our gorgeous new home. It is amazing in almost every way…..except for storage. We are just getting started with some great storage solutions and I’m sure they will evolve even more as we live in the space even longer.
My office/craft room is in the “formal dining room” of this home because we are just not those people right now. I am slowly adding storage pieces here because there is no closet or built in shelves to hide all my crap treasures for crafting. As I add more solutions, I can unpack more things into their forever home. It is beginning to fill out and I love it! I always dreamed of having my own space for all the things and I don’t even mind my hubby stealing my comfy chair to work on his laptop when I’m at my computer.
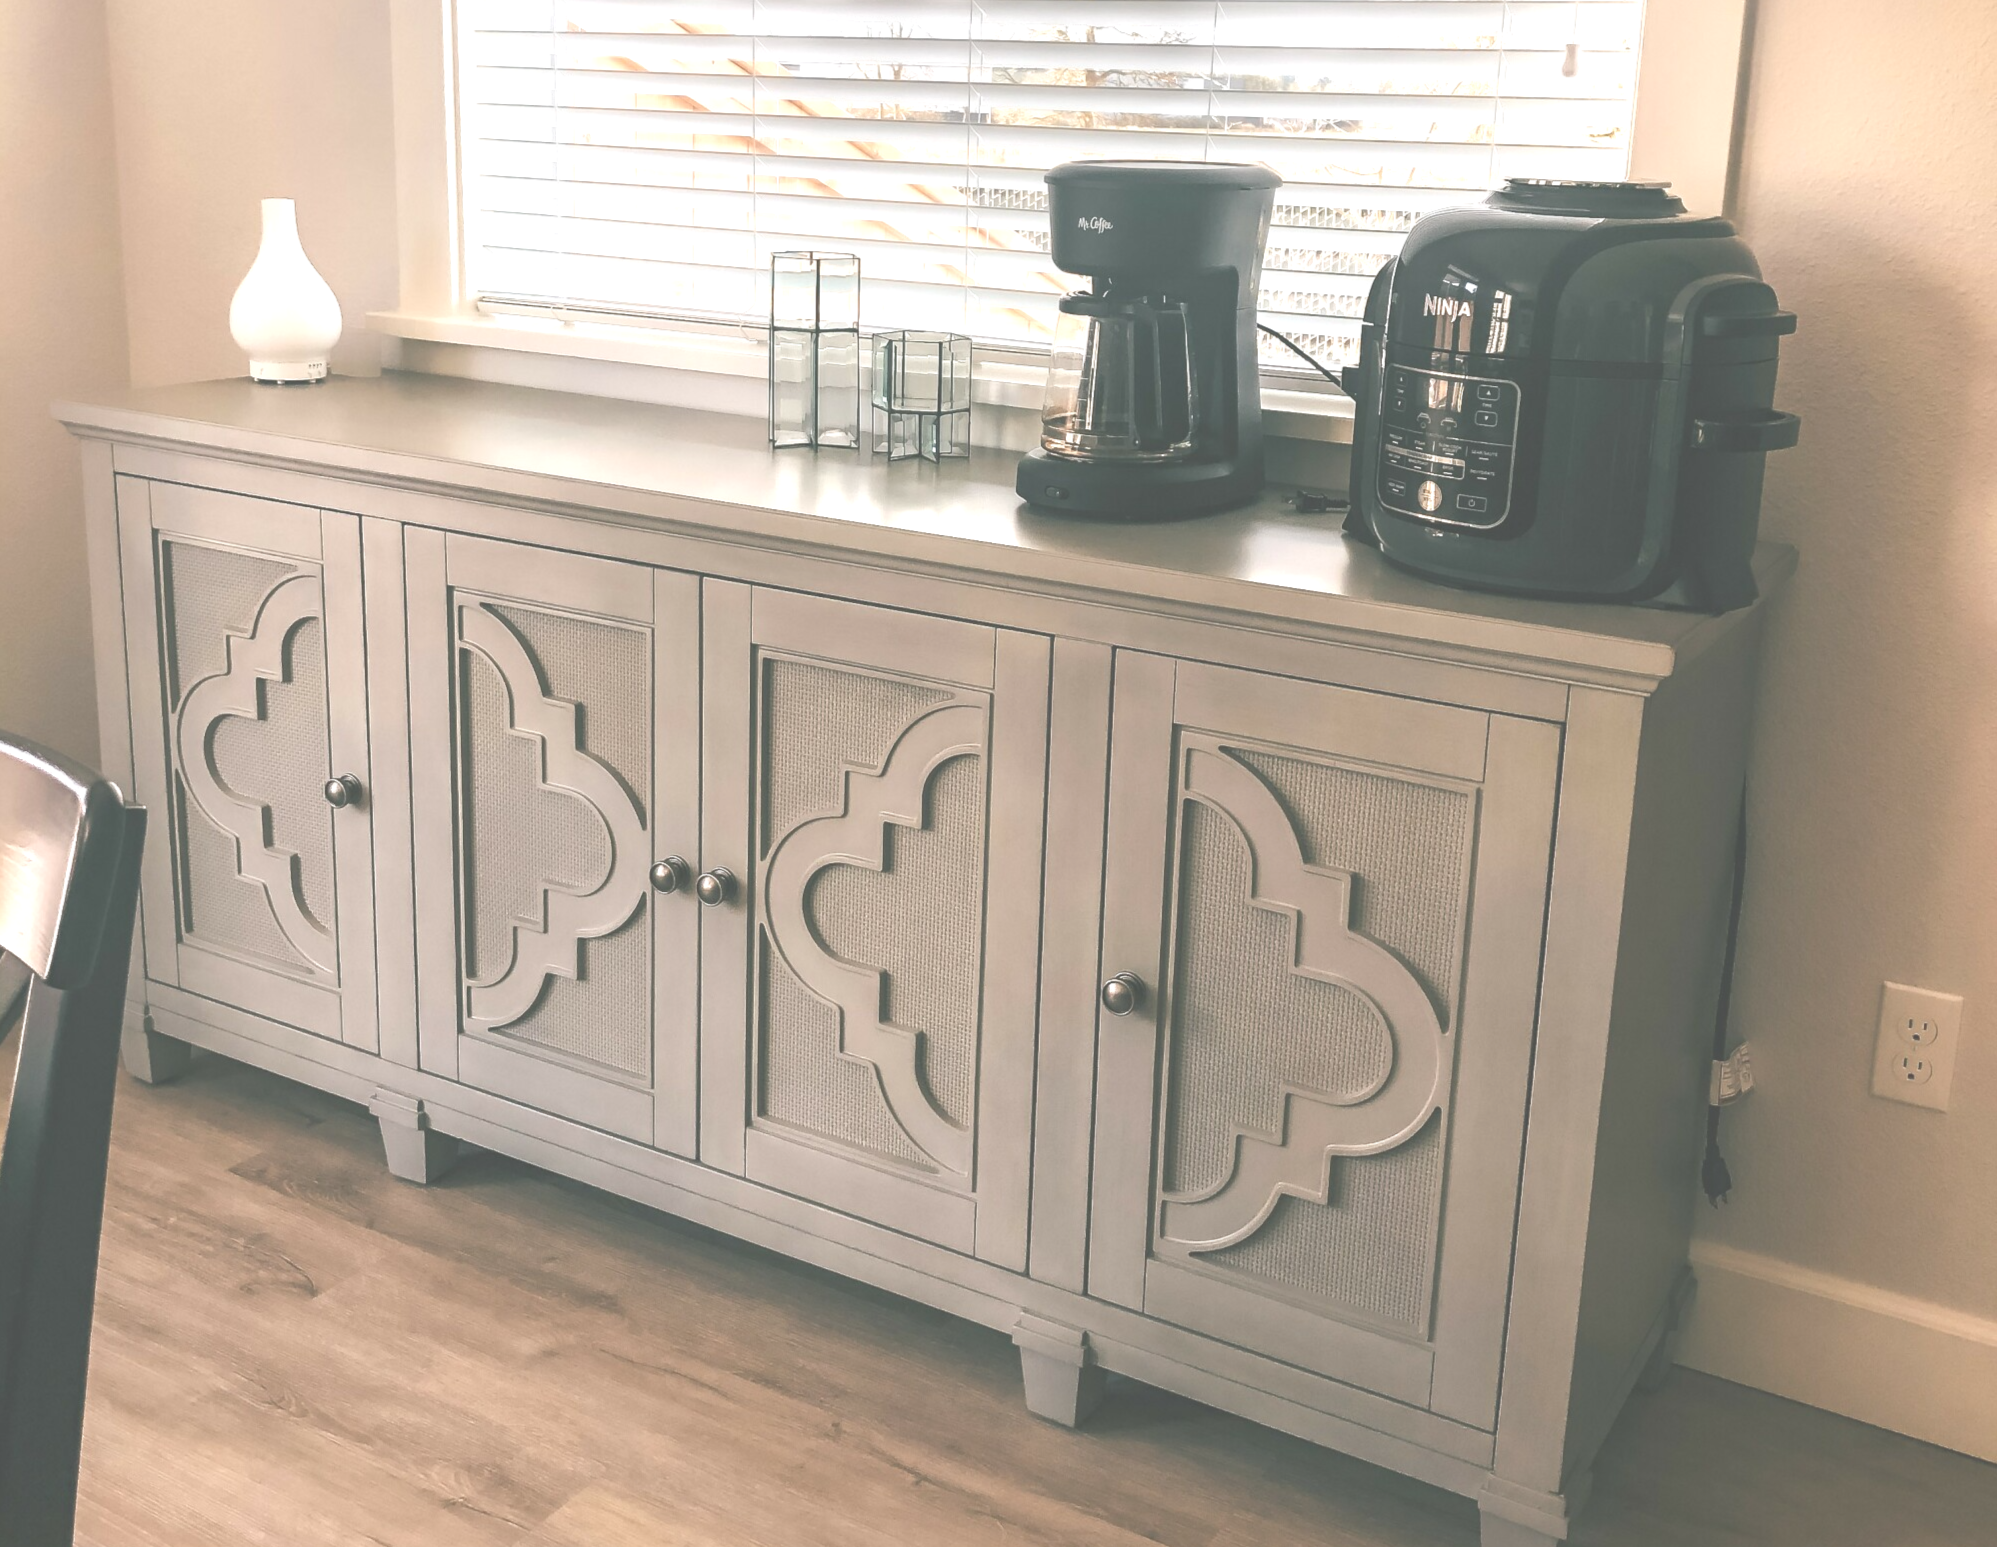
We have “just enough” counter space in the kitchen for what we need, but that means that we need other places to put things like the coffee pot, electric kettle rice cooker and pressure cooker that we use daily or every other day. Enter this gorgeous hutch from Costco which was delivered yesterday. It is the extension of my kitchen cabinets and counter that I didn’t even know I needed. We are expecting a kitchen cart delivery in the next day or so to tuck between the hutch and our kitchen counter that will actually house the cooking electrics. We also added an over the door “spice rack” for the inside of our pantry door because this family of four is just not accustomed to a tiny pantry. It holds everything from spices to oils to syrup to ramen to sprinkles.
We also added a cabinet from IKEA with glass doors on top for pretty glasses to go right next to my wine fridge in my office. Yes, I have a wine fridge in my office and I think it’s the perfect spot! I kind of feel like I’m in an old timey movie and I can offer a beverage while making a high powered deal. Ha! The bottom of the cabinet has solid doors that hide some overflow from the tiny pantry.
I honestly have not even tackled my closet yet. My clothing needs are quite simple right now, so I have out what I need and there is no need for much variety. I’ll get there eventually, but it’s not a priority.
I’m hoping this week to dig into more boxes with decor items to give our space a little more of a personal touch. I have to say, I’ve loved the simplicity of things around here for a couple of weeks.
I’m also working on a family command center and will share that with you soon. It has taken a few weeks to see just where my family drops their things when we come home. Now, I have a plan to make it more functional and fabulous. I’ll share the details soon!
I’m just ready for the box piles to dwindle down and not have as many projects looming. We are loving life over here and can’t wait to share pictures of it all.
Share with me your favorite storage hacks for your spaces. I’m dying to know what works for you.
I am using my Yearly Planner to keep track of all of the appointments and deliveries for all of our projects and it is saving me from having post-it notes all over the place. I can’t seem to remember what day of the week it is anymore. Grab your own download of the Yearly Planner here.
Want to subscribe to my blog so you don't miss a thing? Click here and I'll shoot you an email whenever a new blog post lands.
According to Harvard Health, ”for something to be creative it has to be novel or original and be useful or adaptive to some portion of the population.”
When I create something, I am problem solving along the way. Through solving the problems that come along with creation, I am activating the reward center in my brain and getting a burst of dopamine in the process. Generally, I don’t even realize it at the time because I am so focused on the creative process, but science tells us that it is there.
The tendency these days is to consume. We consume the social media feeds we scroll through. We consume the television programs or movies we watch. We consume take out food and package deliveries.
What are you creating these days?
 I love to craft things. I often see products online and think, “I could make that!” I am a sucker for a step by step tutorial. Do they all turn out fabulously? No way! I do, however, gain experience and skills along the way. The beauty of crafting is that I can take what I have learned and use it going forward into the next project. I can refine my technique or use smarter tools. Sometimes that experience tells me that, no, I cannot make that cool thing myself. LOL!
I have been knitting a scarf lately that is almost finished. That is kind of a miracle because knitting is something that I do when I find myself sitting still with nothing to do with my hands. That doesn’t happen too often lately, but I’m making progress little by little.
A newer form of creativity for me has been drawing/painting with an Apple Pencil on my iPad. I love being able to draw something and have the ability to push undo if it is not the stroke I was hoping for. There are so many layers I can add to my drawings to improve them too. There is just something about learning a new craft that gets me so excited to make more.
I got a Cricut for Christmas from my amazing family and I am so excited to make all the things. I dabbled a little and made an ornament commemorating the year, a little sign with our names on it, the cover of my journal and turned a whiteboard into a perpetual calendar for my daughter. This is only the beginning! When we move into our new house, there will be a dedicated space for all my crafting and creating, so I can up my creating game.
Now, I lean towards physical crafts that end up all around my home. You may be thinking, that’s totally not me. No worries there! You may create things and not even realize it. Check out this list:
Writing: This can take the form of journaling, letter writing, blogging, crafting emails or lesson plans or social media posts.
Decorating: Rearranging things to improve the aesthetic is also creating.
Music: Singing or playing an instrument.
Photography: You don’t even need fancy equipment these days with how technology has improved our phone cameras.
Cooking or Baking: Using a recipe or not, you are creating something.
Gardening: Indoor or outdoor, planting, tending, pruning is also creative.
- Building: You are creating when you build towers or Legos with your kids.
All of that is creating! You are putting something out into the world that wasn’t there before. This is how we leave our mark on the world!
My goal each day is to create something new. That keeps my brain firing that dopamine and leads to a happier life.
What is your favorite form of creative outlet? I’m not sure I could narrow it down to just one, so you can share as many as you like in the comments below.
Did you know I just launched a journal? It is a pdf download that you can get today to start my easy journaling system. Check out all the information here!
Want to subscribe to my blog so you don't miss a thing? Click here and I'll shoot you an email whenever a new blog post lands.
Are you a bath or a shower person? I am usually a shower person for the day to day, but I looooove me a good soak in the bath. Baths give me time to relax, recharge and just block out all the noise. (All the noise, noise, noise, NOISE! --for all my Grinch fans out there)
I used to fill my tub with all kinds of bubble bath and crazy concoctions to try and get that spa-like zen that I so desired. Now, I know that many of those concoctions were actually working against me with their artificial fragrances and yucky ingredients. So, I still take baths, but now my concoctions are homemade and actually have benefits for my whole body.
Setting the Stage:
The first key for me is setting the stage. When the kids were little, I would wait until I had them asleep or I would rely on my partner to be on point for all kid related issues. Bath time was not to be interrupted! In preparation for my bath, I would also give it a quick wipe down. I feel like this was kind of like tricking myself into cleaning that big ole tub, but whatever! I didn’t want to be soaking with all the dust and hair that had accumulated. I once lit candles, but now I start up my battery operated ones. I love to have a diffuser running on my bathroom counter with a little eucalyptus and lavender in it. Ahhhh, I’m almost to zen.
Epsom Salts:
Then I mix up my Epsom salts to put in the water. I had heard of Epsom salts before, but I never knew why people used them. Here’s the deal….Epsom is actually a magnesium sulfate that has a similar chemical structure to salt. When dissolved in warm water, the magnesium offers many benefits to the body. Magnesium helps your body produce melatonin which helps you get a better night’s rest. Magnesium has also helped improve moods with an increase of serotonin. Epsom salts help relax muscles, reduce muscle soreness and relieves muscle cramps. Whether it is for emotional or physical reasons, adding Epsom salts to your bath has inherent benefits.
Essential Oils:
When I use Epsom salts, I like to kick things up a notch and include essential oils. By adding the oils to my Epsom salts, the oils have a chance to disperse throughout the bath water, rather than just float on top like an oil slick. (Nobody wants that!) I take about a half cup of Epsom salts and add 4-8 drops of essential oil. After stirring or shaking in a jar, I pour the Epsom salt and oil mixture into my filling tub. Not only do I experience the benefits of the essential oils aromatically as the scent fills the room, I also get the topical benefits as well.
Favorite Recipes:
I like to mix things up, kind of like a mad scientist, with my Epsom salts. I like to mix something that has great physical benefits with something that helps with my emotional needs. Afterall, my baths are to both relax my body and my mind. When I first started out, I would rely on recipes though, so I’m going to share two of my favorites with you.
Chill Out Dude!
½ cup Epsom salts
3 drops of Peace and Calming essential oil
3 drops of PanAway
Happy Mama
½ cup Epsom salts
2 drops Bergamot
2 drops Northern Lights Black Spruce
2 drops Frankincense
Start your tub running warm water while you mix up your salts.
Put the Epsom salts into a small bowl or little mason jar. Add the essential oils from the recipe of your choice.
Mix the oils into the Epsom salts by stirring or shaking in the jar.
You want to pour the mixture in a tub that is about half way full. This allows the flowing water to help with mixing the bath salts throughout the tub.
Let the tub finish filling and then enjoy your relaxing oasis.
Not all essential oils are created equally. If you want to know what I use, send me a message and I can fill you in on the only oils I trust for my family.
Interested in increasing your overall wellness? I created a free guide to kickstarting a healthy school year. It is perfect whether you are a teacher, student or any kind of human. Check it out over here.
Want to subscribe to my blog so you don't miss a thing? Click here and I'll shoot you an email whenever a new blog post lands.
Want to subscribe to my blog so you don't miss a thing? Click here and I'll shoot you an email whenever a new blog post lands.