
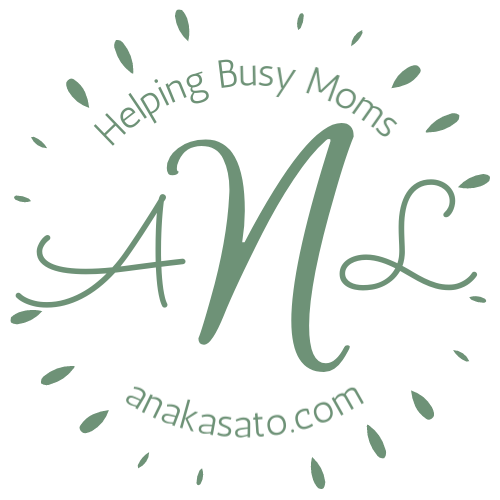
When we moved into this house, we were not sure where our “drop zone” would be. You know, the place where everyone drops their keys, purses, hats, etc. when they arrive home. I thought it may be the laundry room, right off the entrance from the garage. It took about two weeks, but I found the actual “perfect spot.” It is right at the end of the entry hallway, where the hall from the garage meets the living spaces and just before you enter the great room.
In this two part series, I will go over the planning phase and the execution phase of the project. This week, I will explain the process of planning our family command center. Next week, I will share how it all came together and how it is working for us.

At the outset of the project, I knew that I wanted to hang a set of hooks for our keys and designate a place for purses. Plus, there needed to be a spot for my husband’s basket for his wallet and sunglasses. Those were our absolute must haves.
Then, I went to Pinterest. I found endless configurations of “drop zones” or “command centers” on there. Talk about overwhelm! I liked this part of one and that part of another. Nothing was “just right” for our family. As I started looking, I found some common elements that I loved and other things that we just did not prioritize enough to give up the wall space. I wanted it to be mostly functional with a dash of charm.
Some common elements of command centers:
Key hooks
Schedules
Clock
Calendar

White board for notes
Weekly Meal plans
Paper sorter
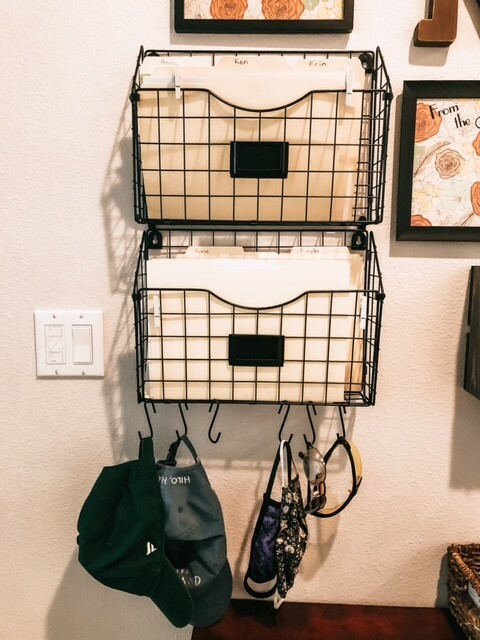
Mail sorter
Organizer for important documents
Supply holders
Chore lists
Backpack hooks
Purse basket
Jacket hooks
The list could go on and on. Pretty quickly, I discovered the must haves for us. I made a list.
File holders for mail, coupons, etc. (See mine here.)

Dry erase picture frame for shopping list
Key hooks (See mine here.)
Place for Ken’s basket
Hat hooks
Basket for purses
Clock
Weekly menu frame
Dry Erase picture frame for notes/dates to remember
Decor
Noticeably missing from the list was a calendar. In our family, we manage a shared electronic calendar. I also love my paper planner that lives on my desk. Things for the current week end up on the Weekly Meal Planner because they often impact the meals that I plan. I felt like a big calendar in this space would be more work that I would not keep up with, plus it allowed for me to use the space for other things.
 The fun part for me was looking for things to repurpose on our Command Center wall. I was looking all over for a shelf to hold Ken’s basket, but we had a small side table that fits that purpose well and didn’t have an assigned spot yet in our home. The space under the table was perfect for our purses. I repurposed a basket to contain them. We used to have that basket by the door to hold shoes when the girls were little.
I collected things from around the house into one area that I thought would work well in the space. This included some decor pieces that I love, but had yet to find a perfect home for them. I did much searching on Amazon and in some local thrift shops for the pieces I needed to purchase. These file holders worked great for size and I loved that they came with some hooks to hang off the bottom. This allowed a spot for Ken’s hats to hang, rather than sit on flat surfaces.
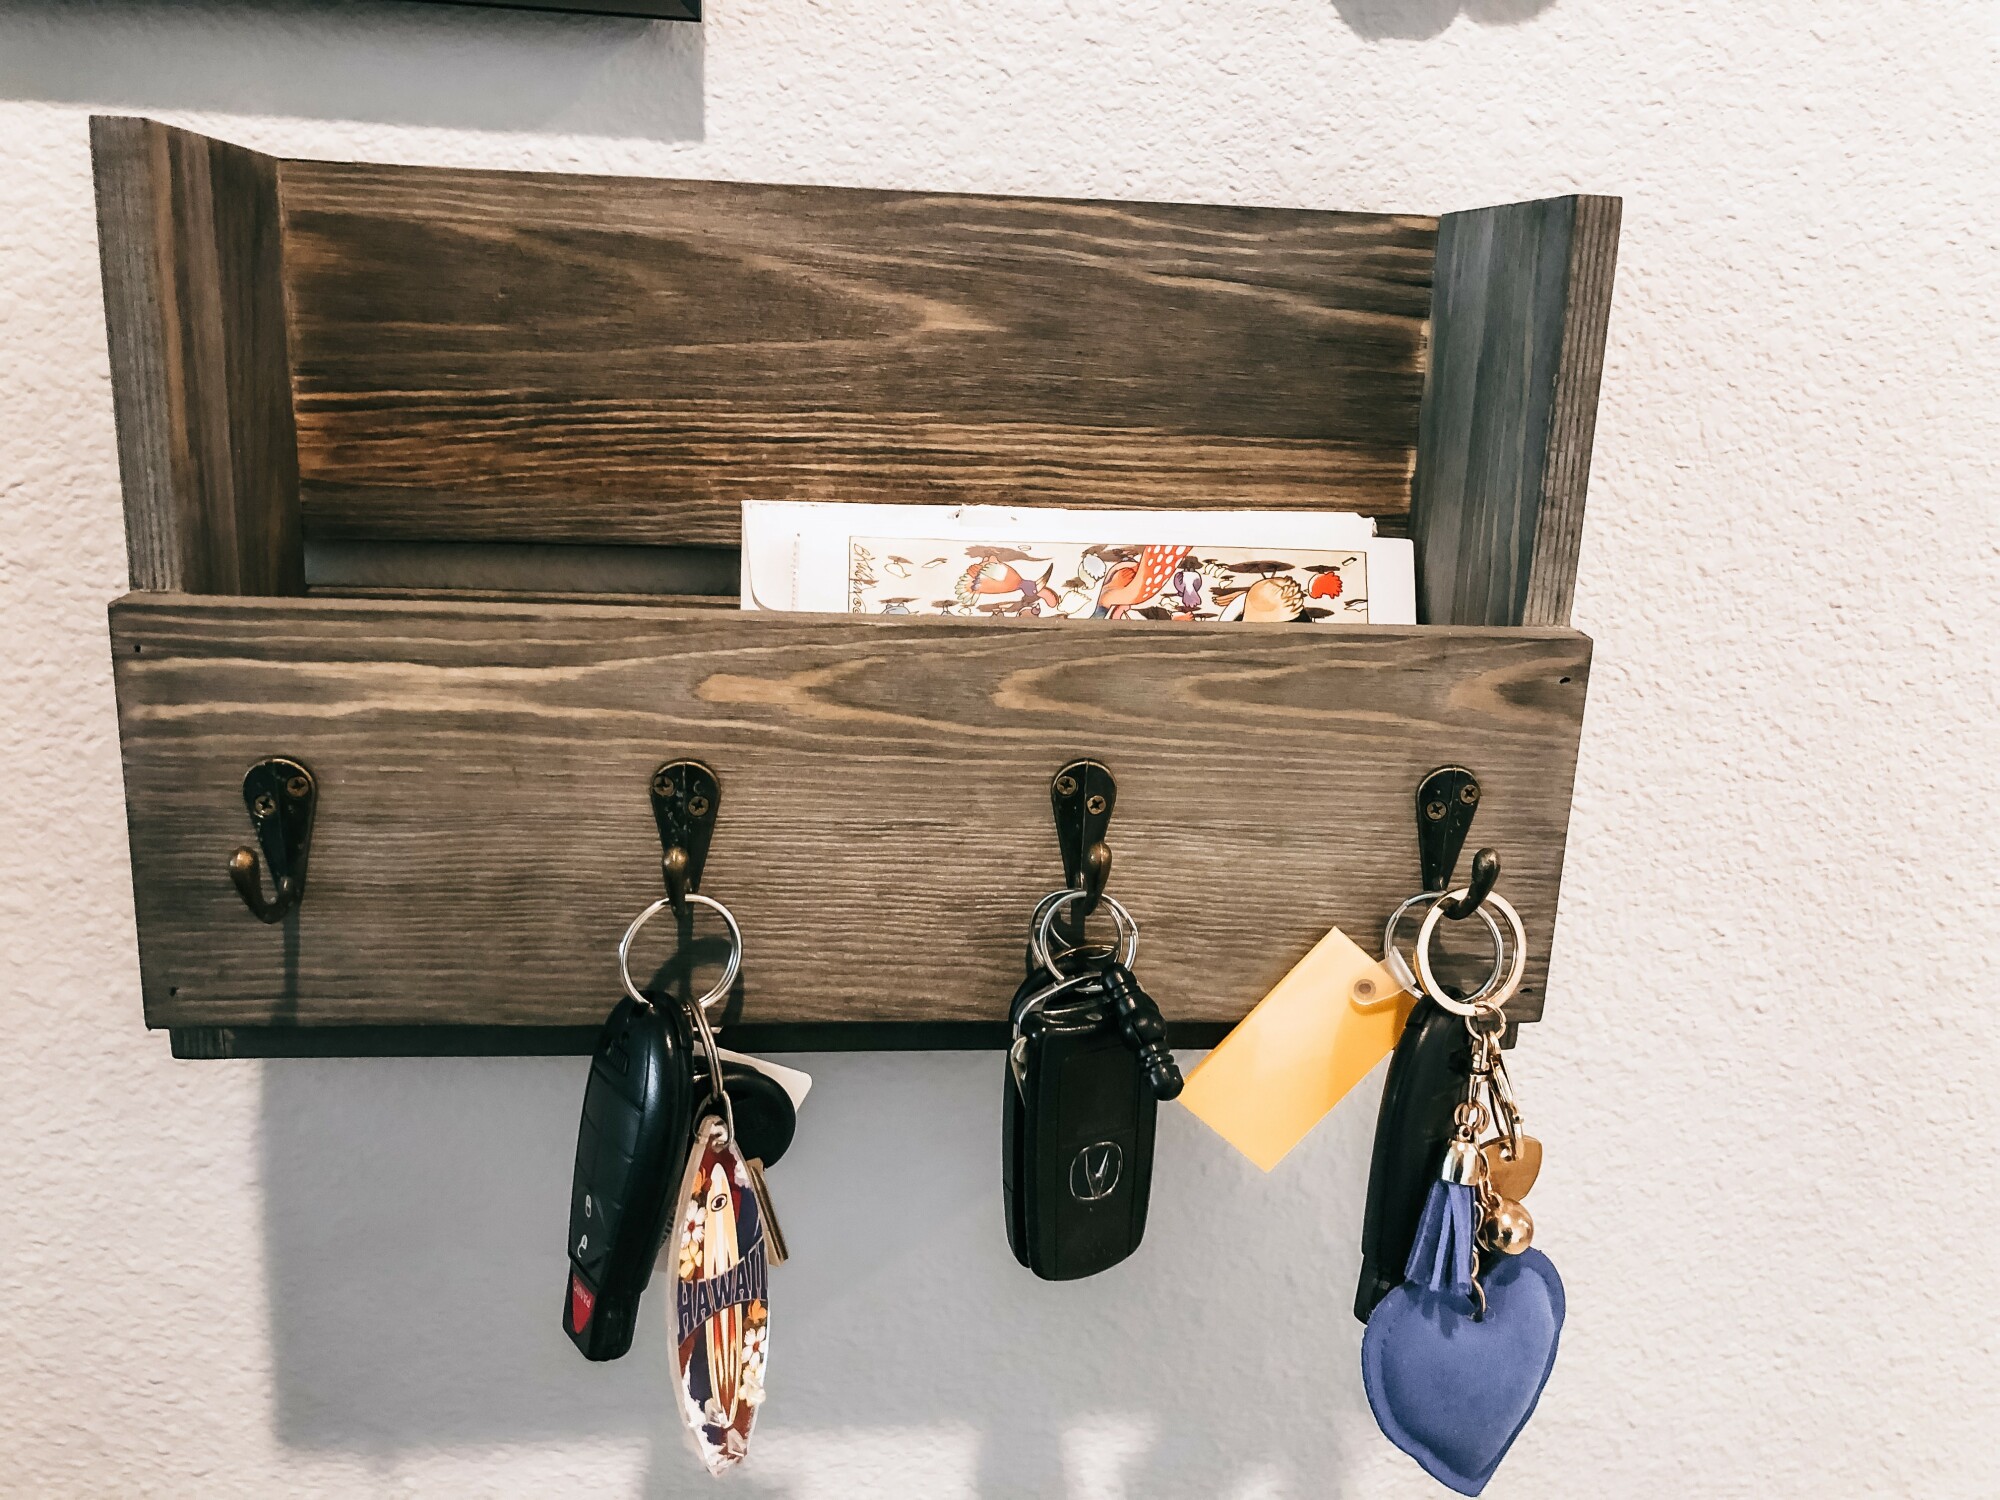 I was debating about the key hooks because we already had a simple multi key hook that we had used in the past. It looked kind of lost with all the other things, so I looked for an improvement to what we had done before. When I saw this one, I knew I had found the perfect one. The color coordinates well with our floor color. It has not only hooks, but a space for incoming or outgoing mail as well. If there is something that I need to take with me when I go out, I’ll put it there. I also use it for mail that comes for my husband when he’s not here, so it doesn’t get lost in a pile somewhere.
We have a weekly meal planner that had another temporary home. I never thought to put it in the command center until I saw similar ones in examples on Pinterest. I created this one myself and have it available free for you. If you missed my post about meal planning, you can find it here.
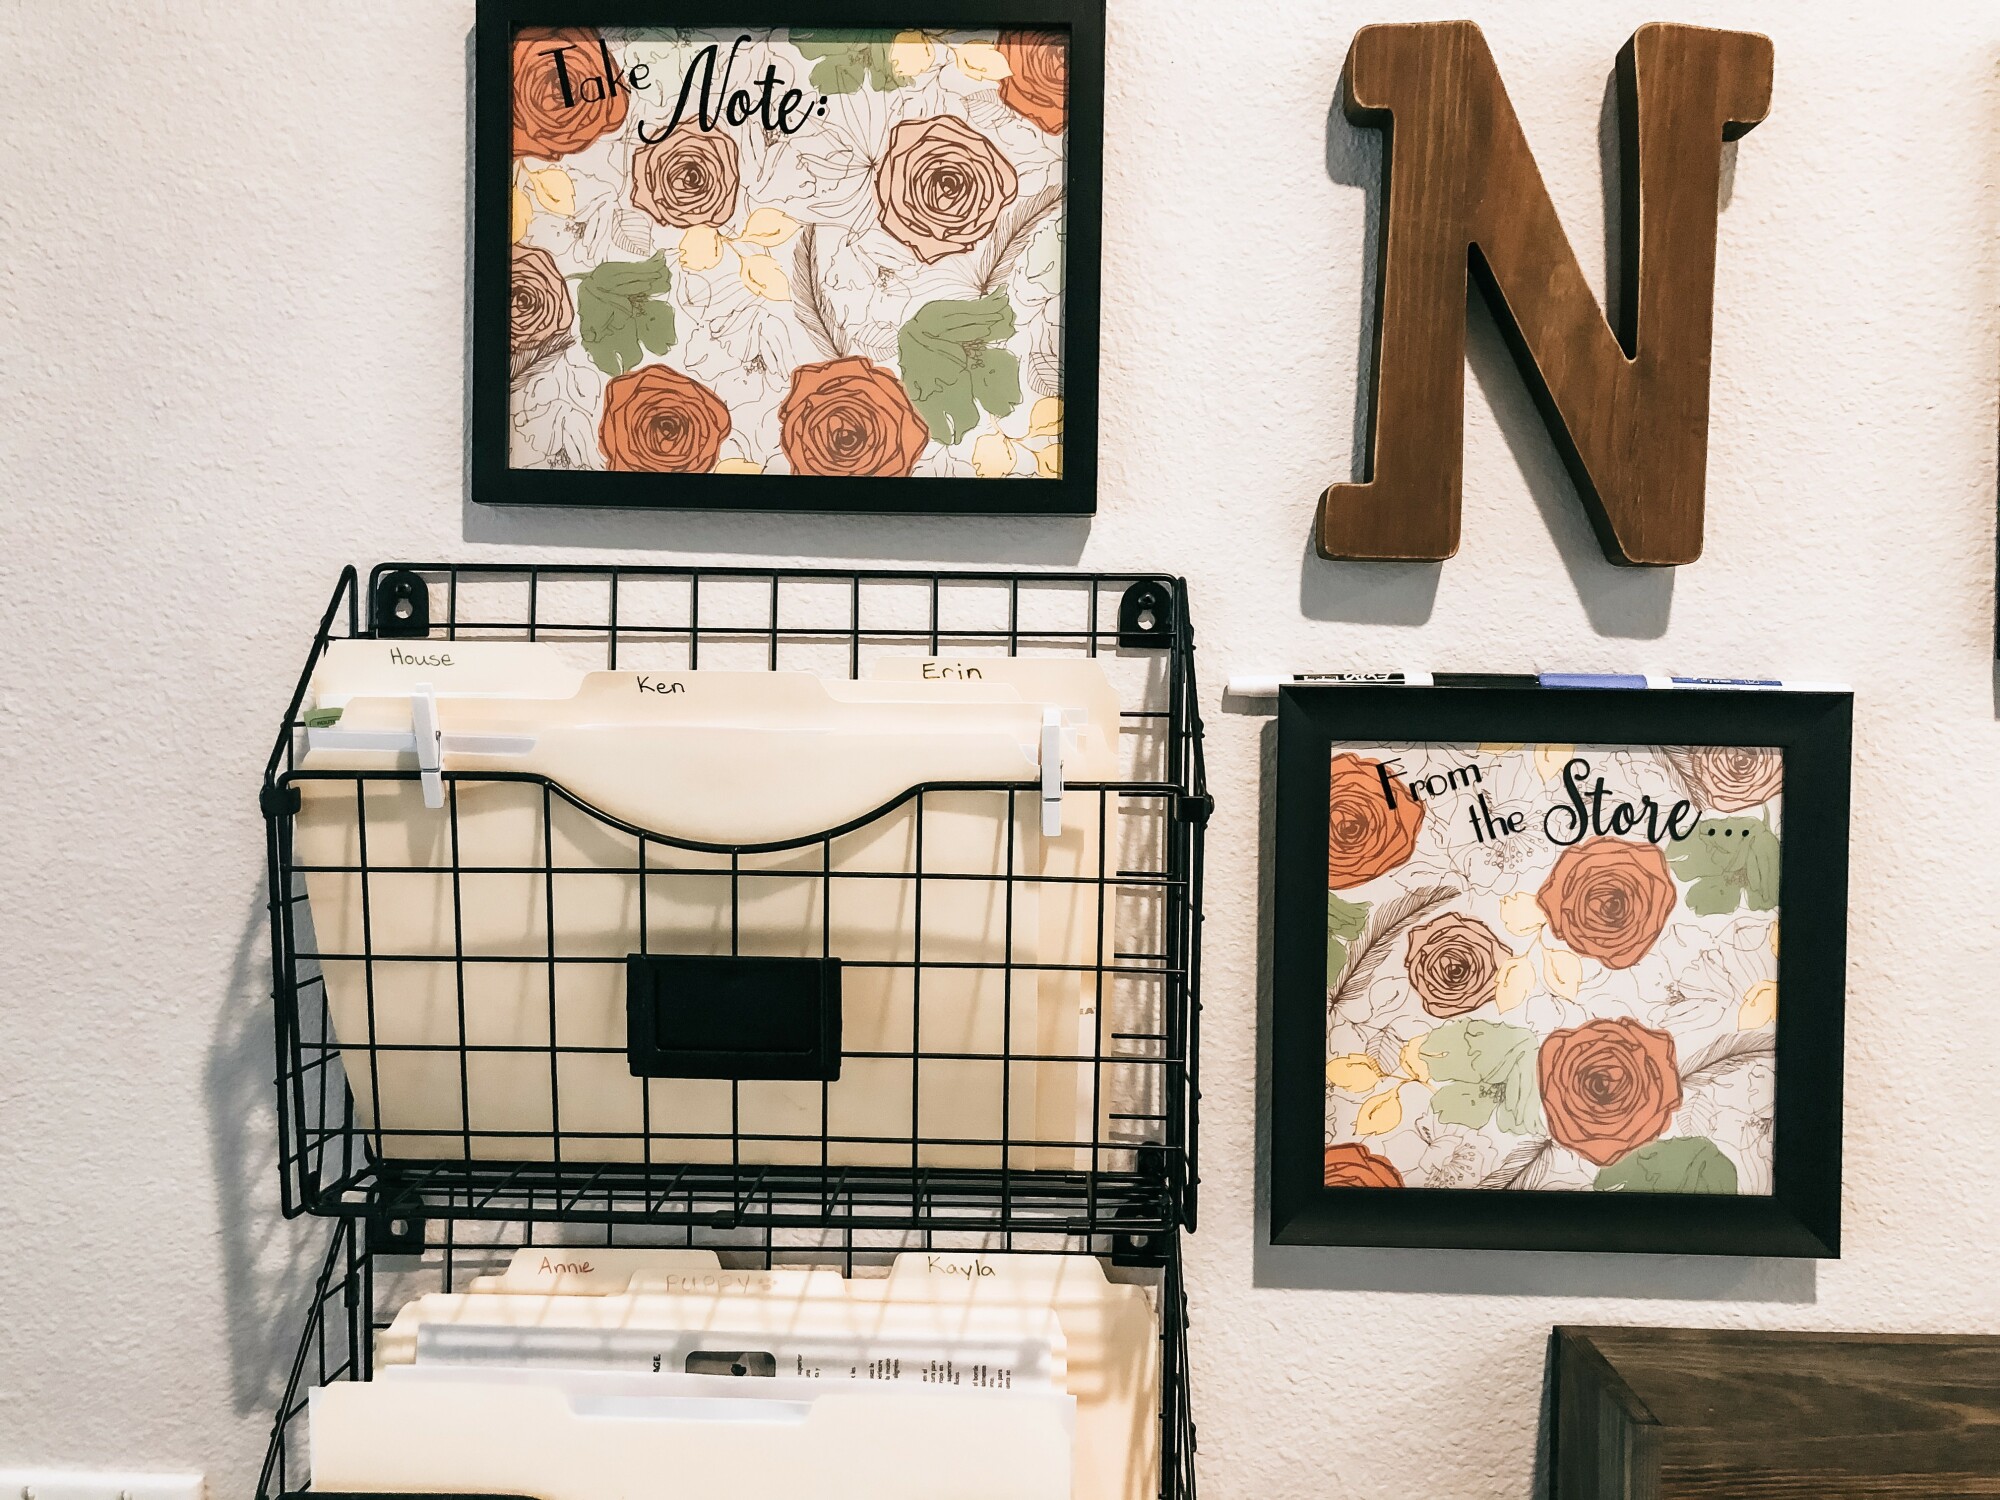 I purchased two matching black frames at a local store (after searching in vain for unused ones in the closet) to serve as white boards. I just needed to put plain or patterned paper inside for the background. Glass works great for white boards and is usually a lot less expensive than white boards. I love that you can put a template behind the glass if you want, like I did with the meal planner. This would work great for a list of chores to complete if you want that on your command center. We needed a place to have a running shopping list as things come to mind when we are in the kitchen.
The clock and decor items I already had on hand, so they were no added expense.
How I chose the layout:
As I acquired items for the command center, I put them all together in one area. Once I had everything, I started tinkering with layouts on the floor. I had measured the width of my space and marked that on the floor with painter’s tape so I could design within those limits. I arranged and rearranged elements over and over. I swapped out several decor items until I came to an arrangement I loved.
Some things to consider…
How high will things hang? I am known to be a little vertically challenged, so I knew that if I were to hang any of the white board elements too high, I’d need a stool to write on them or change them out, so I had to keep that in mind. I wanted function to be the primary focus.
Plan for clearance. If you have hooks, how much space do you need below them for clearance? I literally “hung” hats on the hooks in my floor layout to see how it would all fit together. Do you have a lamp or taller decor items on a table that you need to consider?
Is it visually appealing? I like to use a variety of shapes in my design. I like the circular shape of the clock and flower to balance out the sharp corners on the square and rectangular elements in my command center. You may prefer a more uniform design with all one type of shape or material. That is the beauty of designing your own. You get to be in charge of what your end result will look like. As I was arranging, I took care to balance out the colors as well. I didn’t want the two natural wood elements to be lined up or clustered on one side of the design.
How precise will installation need to be for you to be happy? I know that if I have rectangular elements next to each other, I am going to be annoyed if they don’t hang straight in relation to each other. I also know that if there are two picture frames at the same level, I will have to measure and get out the level to line them up properly. To avoid those pitfalls, I intentionally designed things to be offset from each other. Where there were two identical frames in the same row, I turned one sideways, so they would not have to be hung equally.
Next week, I’ll detail how it all came together and how it works for us now. (Click here to go right to part 2.)
Want to subscribe to my blog so you don't miss a thing? Click here and I'll shoot you an email whenever a new blog post lands.


0 Comments