
My mint plant is growing like gangbusters in my backyard. If you know me, you know that it is growing despite me, not because of me. I planted a tiny starter mint in this pot and plopped it on my back patio. I watered it daily while it was getting established. It gets some residual spray from the sprinklers and even some rain water when the wind blows. Now, I just water the pot when it looks like it is starting to wilt. I have way more mint now than I really know what to do with.
My first thought with the mint was…. Mojitos! I love a great mojito and I have the tools to make them at home. Grab my favorite muddler here. So, I got some rum and limes and I was in business. There are many, many recipes for mojitos, so I’ll share my favorite one here.
Homemade Mojitos
 Ingredients
- 6-8 mint leaves
- Juice from one lime plus slices for garnish
- Splash of simple syrup
- 2 ounces rum (omit to make a mocktail)
- Lemon lime soda or sparkling water
My favorite is to do about half soda and half lime sparkling water. That way I get a touch of sweetness without too much added sugar.
Depending on the day, I’ll add some fresh mango to my cocktail shaker before I muddle the mint. Delicious! Another fun option is to add in about ¼ cup of pineapple juice before adding the sparkling water and you will have a pineapple mojito. So many amazing options!!
I have discovered that this works well as a mocktail as well. I can get the refreshing taste without the alcohol. Hello day drinking on a hot summer day without the repercussions!
**Special note if you are not accustomed to cocktail shakers: Do not be tempted to put the carbonated water in the shaker. It only sounds like a good idea until you realize you are basically shaking up a can of soda. You can thank me later! (Unless of course you want to deep clean your kitchen including the ceiling. You do you!)
So, this got me thinking about what else I could make as a mocktail that would taste just as delicious. This time of year lends itself to plentiful fresh fruit and herbs. Capitalizing on all that freshness, is the way to build any recipe.
Here’s a few recipes I found that sounded great on the interwebs…
Blueberry Mint Mocktail, Grapefruit Rosemary Mocktail, Mimosa Mocktail
Which of these recipes sounds like a winner to you? Share in the comments below.
Want to subscribe to my blog so you don't miss a thing? Click here and I'll shoot you an email whenever a new blog post lands.
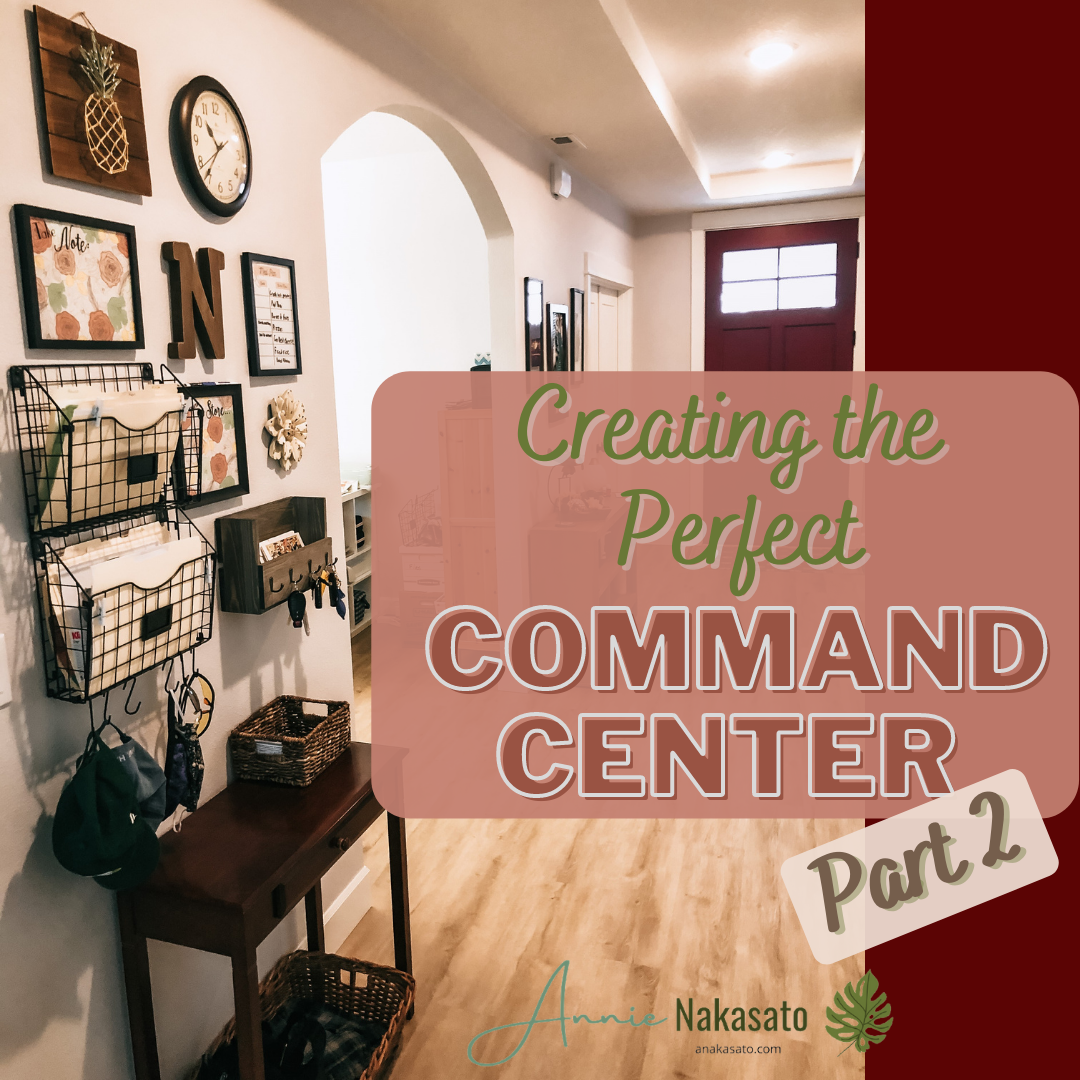
In part one of this series, I explained my family's need for a command center, my planning process and what items I chose for my wall as well as how I chose the layout. (If you missed it, you can catch up here.) In part two, I will go through how I actually hung the elements for my wall and how it is working for us.
The Installation:
When the layout on the floor met my approval, I used scrap paper and newspaper/grocery ads to mock up my template. I traced each item on the floor and cut out a matching paper shape to hang on the wall with painter’s tape. By doing this, I was able to better visualize the final product. I made a few tweaks at this point to avoid using the level too frequently and adjust spacing. This was where I realized that one of the frames was going to be harder to write on because of its height. I was much happier to deal with that adjustment before I had made holes in the walls (or needed to grab a stool every time I wanted to write on it).
With my wall template hanging for a bit, I was ready to install our family command center. I started with the trickiest parts that would need wall anchors for stability. Then I moved on to the easier elements.
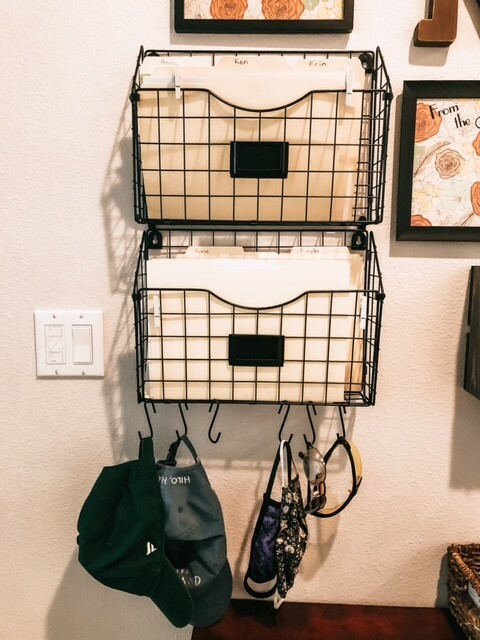
 The paper organizer needed wall anchors and to be completely level to the ground. I held up the organizer to the wall and marked on my paper template where the holes needed to be. I checked my paper for level before doing anything else. Because I needed to drill two holes, I decided to make pilot holes in the wall with a small nail. This meant that I could remove the paper before actually drilling. I have drilled through the paper in the past and it works fine for one hole. I was worried about the paper twisting with the drill and thus moving the mark for the second hole. Wall anchors are my nemesis, so I was sweating this a little bit. I don’t like making huge holes in brand new walls. As it turned out, I didn’t need to worry at all. Plus, one of my pilot holes revealed a stud in just the right spot, so I only needed one actual wall anchor.
Then I moved on to the key hook/mail organizer. This would also need secure anchors because of the weight. Marking the holes was a little more difficult because it hangs from keyholes on the back that are not flush with the top. I had to measure down from the top of my template to get the holes where I wanted them. After many years of struggling to get the holes just the right distance from each other, I used my painter’s tape trick. I put the painters tape on the back of whatever I am hanging and mark the hole spots on the tape. Then, I hang the tape on the wall and use a level to check that the tape is placed correctly.
The other elements I could use a simple nail or command velcro to attach. I love to use command velcro strips because they are so easy to adjust if you later realize you want to make a small adjustment. No extra holes in the wall is always a bonus for me!
How it’s going:
 We are loving our Family Command Center. If I am slow to put up the meal plan for the week, one of my girls will take it off the wall and fill it in for me. The shopping list is my favorite thing to use during the week. I used to try to have a running list, but that paper would often go missing. Now, I don’t have to worry about that. I love to say, “add it to the list!” It is great to be able to see that list as I grab my keys when I am headed out the door. If I happen to be making a grocery stop mid-week, I can pick those things up. Or, they end up on my regular weekly shopping list.
The extra white board is a fantastic place to list upcoming events. I used it to write down my daughter’s new work hours because it took me a while to adjust to the different times. (I think she was glad I stopped asking her over and over.) It was also the perfect spot for the Wi-Fi passcode for visitors. My niece and nephew found it very quickly when they visited at Easter.
I originally hung the N with nails because there were nail holes on the back. I have since decided that a command velcro strip is actually better because it seems that the holes on the back of the letter are not actually level with each other. I had adjusted it by stuffing the hole with a wad of paper to move down where the nail sits on one side so it is more level to the eye. This is the kind of lighter weight decor that would work better with velcro so you can make those adjustments more easily.
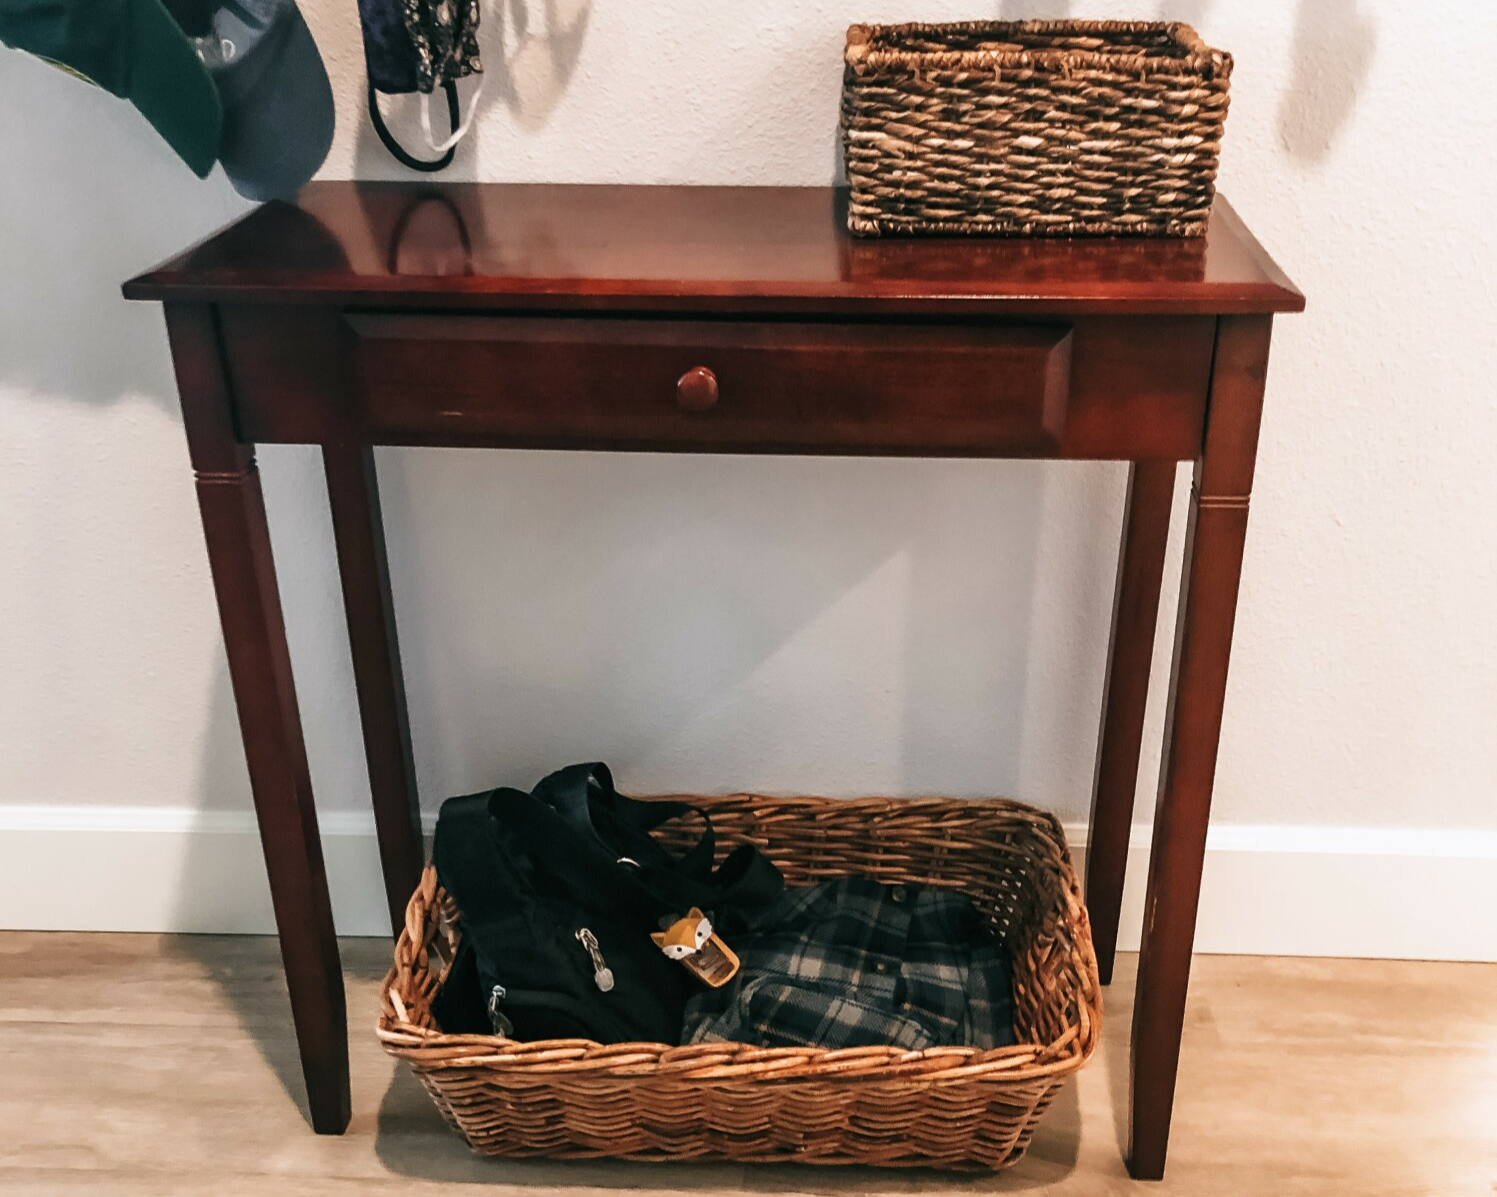 For now, the purses are great in the existing basket. I may need to get something taller if the puppy decides to start chewing on the purse straps. For now she’s just sniffing around them. Ideally, that’s all she’ll do, but she’s a puppy and is starting to get a little more bold every day.
In the paper organizers, I have a folder for each family member (including the dog, of course!), one for house receipts/paperwork and another for coupons. I love to use coupons, but I always had a hard time remembering where I put them in order to actually use them in the store. Now, it is easy to just flip through the folder from time to time and get rid of the expired ones.
I love having a launching pad for all of us in one spot. Our house runs more smoothly when everyone knows where to look for information and we don’t have to hunt for keys or sunglasses. Everything has a place. It has been in place for two months and it is working well for our family.
What is something you wish was in your family command center? Tell me in the comments below.
There are some simple changes you can make today that will create a better world for you and for your children. You can get my FREE guide to living more sustainably called How a Normal Person Can Be Semi-Crunchy. You don’t have to wear Birkenstocks, live off-grid in a yurt and produce zero waste to make a difference, but that is totally an option.
Want to subscribe to my blog so you don't miss a thing? Click here and I'll shoot you an email whenever a new blog post lands.
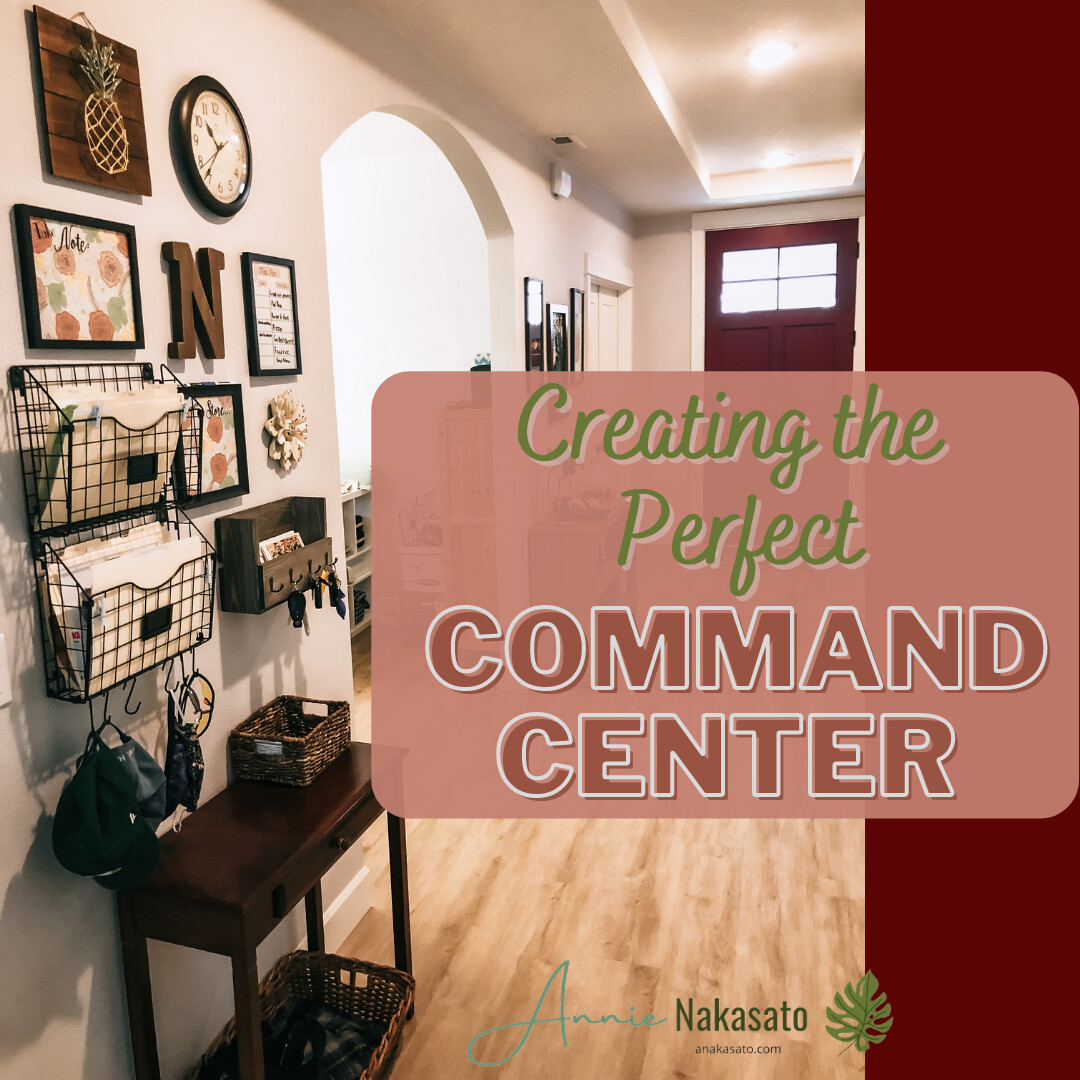
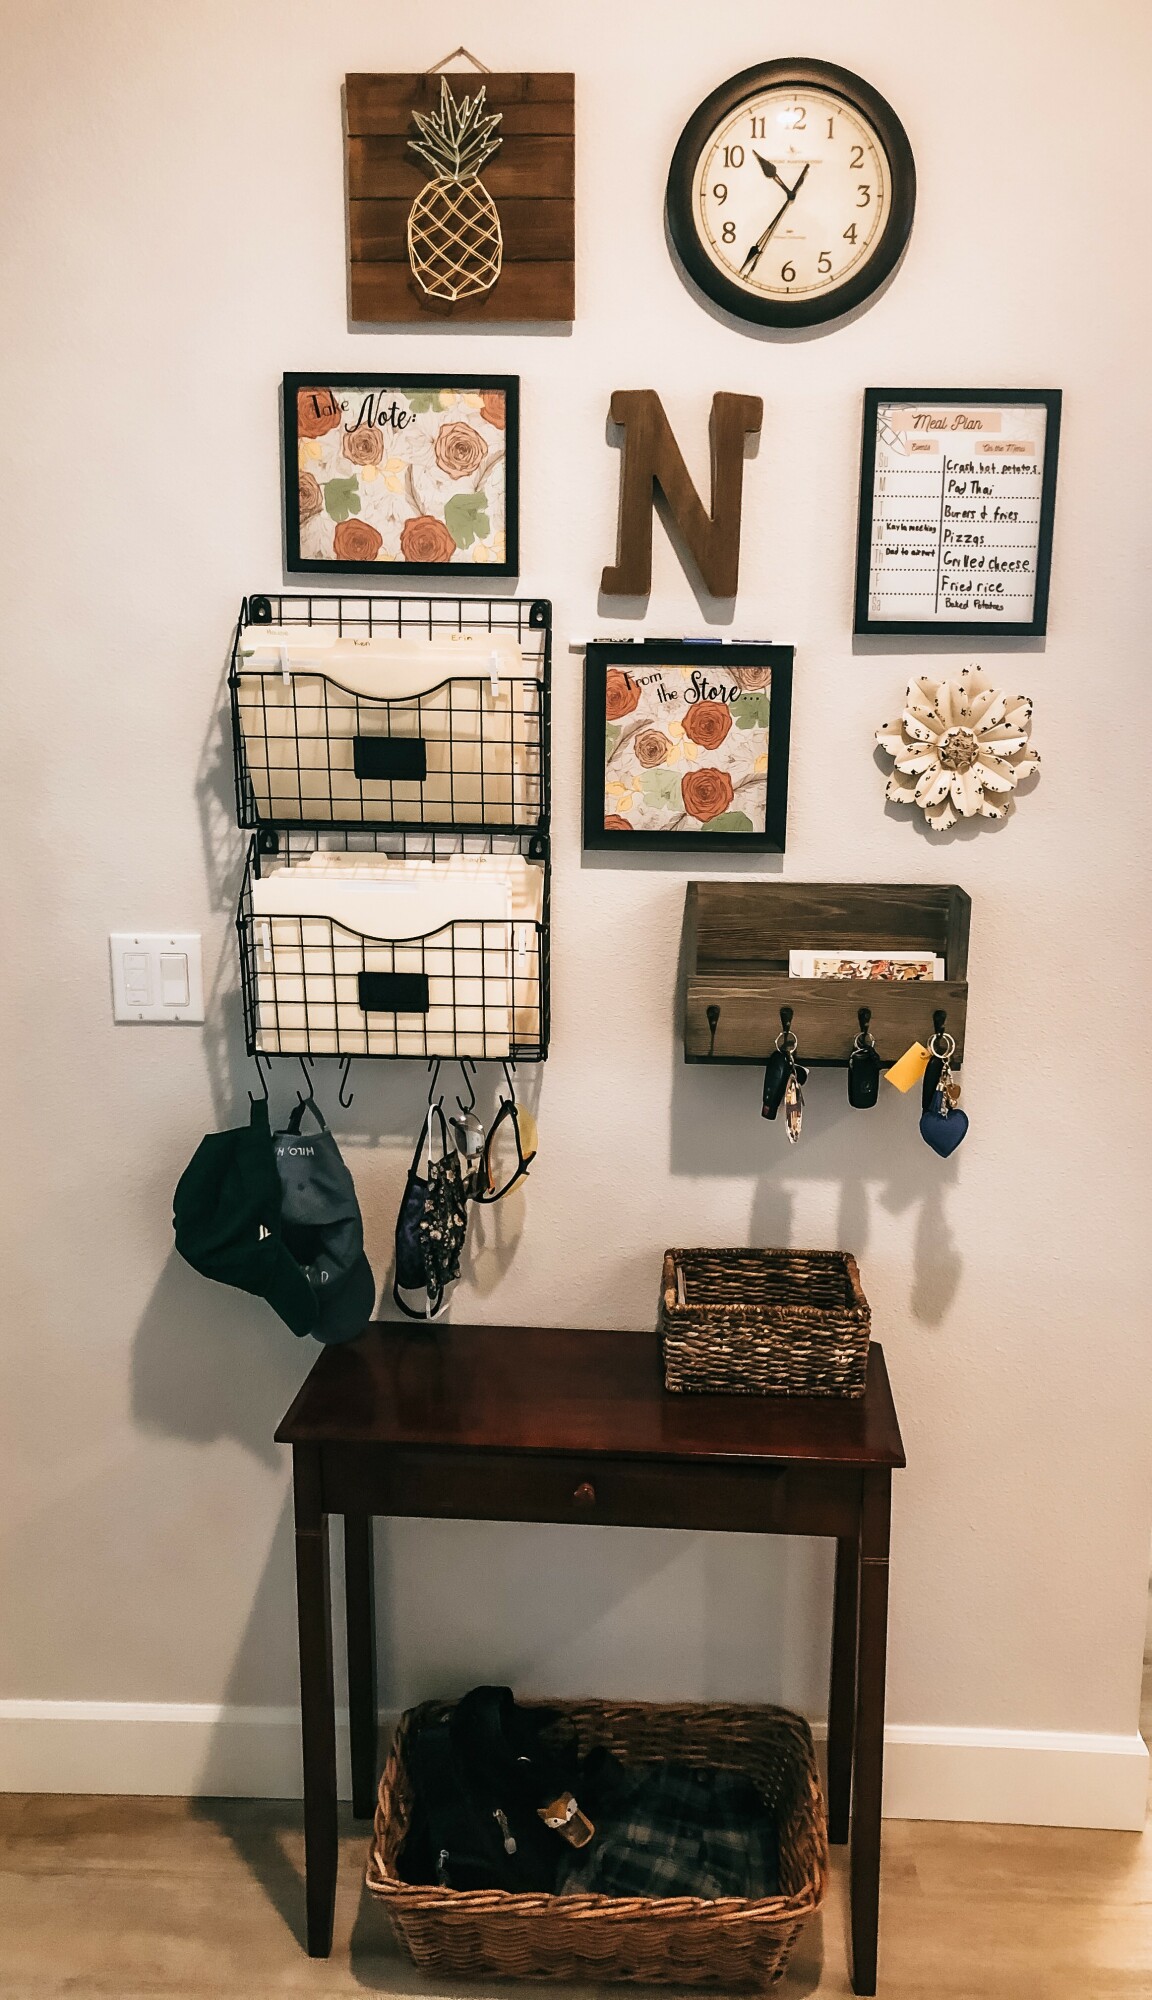
When we moved into this house, we were not sure where our “drop zone” would be. You know, the place where everyone drops their keys, purses, hats, etc. when they arrive home. I thought it may be the laundry room, right off the entrance from the garage. It took about two weeks, but I found the actual “perfect spot.” It is right at the end of the entry hallway, where the hall from the garage meets the living spaces and just before you enter the great room.
In this two part series, I will go over the planning phase and the execution phase of the project. This week, I will explain the process of planning our family command center. Next week, I will share how it all came together and how it is working for us.

At the outset of the project, I knew that I wanted to hang a set of hooks for our keys and designate a place for purses. Plus, there needed to be a spot for my husband’s basket for his wallet and sunglasses. Those were our absolute must haves.
Then, I went to Pinterest. I found endless configurations of “drop zones” or “command centers” on there. Talk about overwhelm! I liked this part of one and that part of another. Nothing was “just right” for our family. As I started looking, I found some common elements that I loved and other things that we just did not prioritize enough to give up the wall space. I wanted it to be mostly functional with a dash of charm.
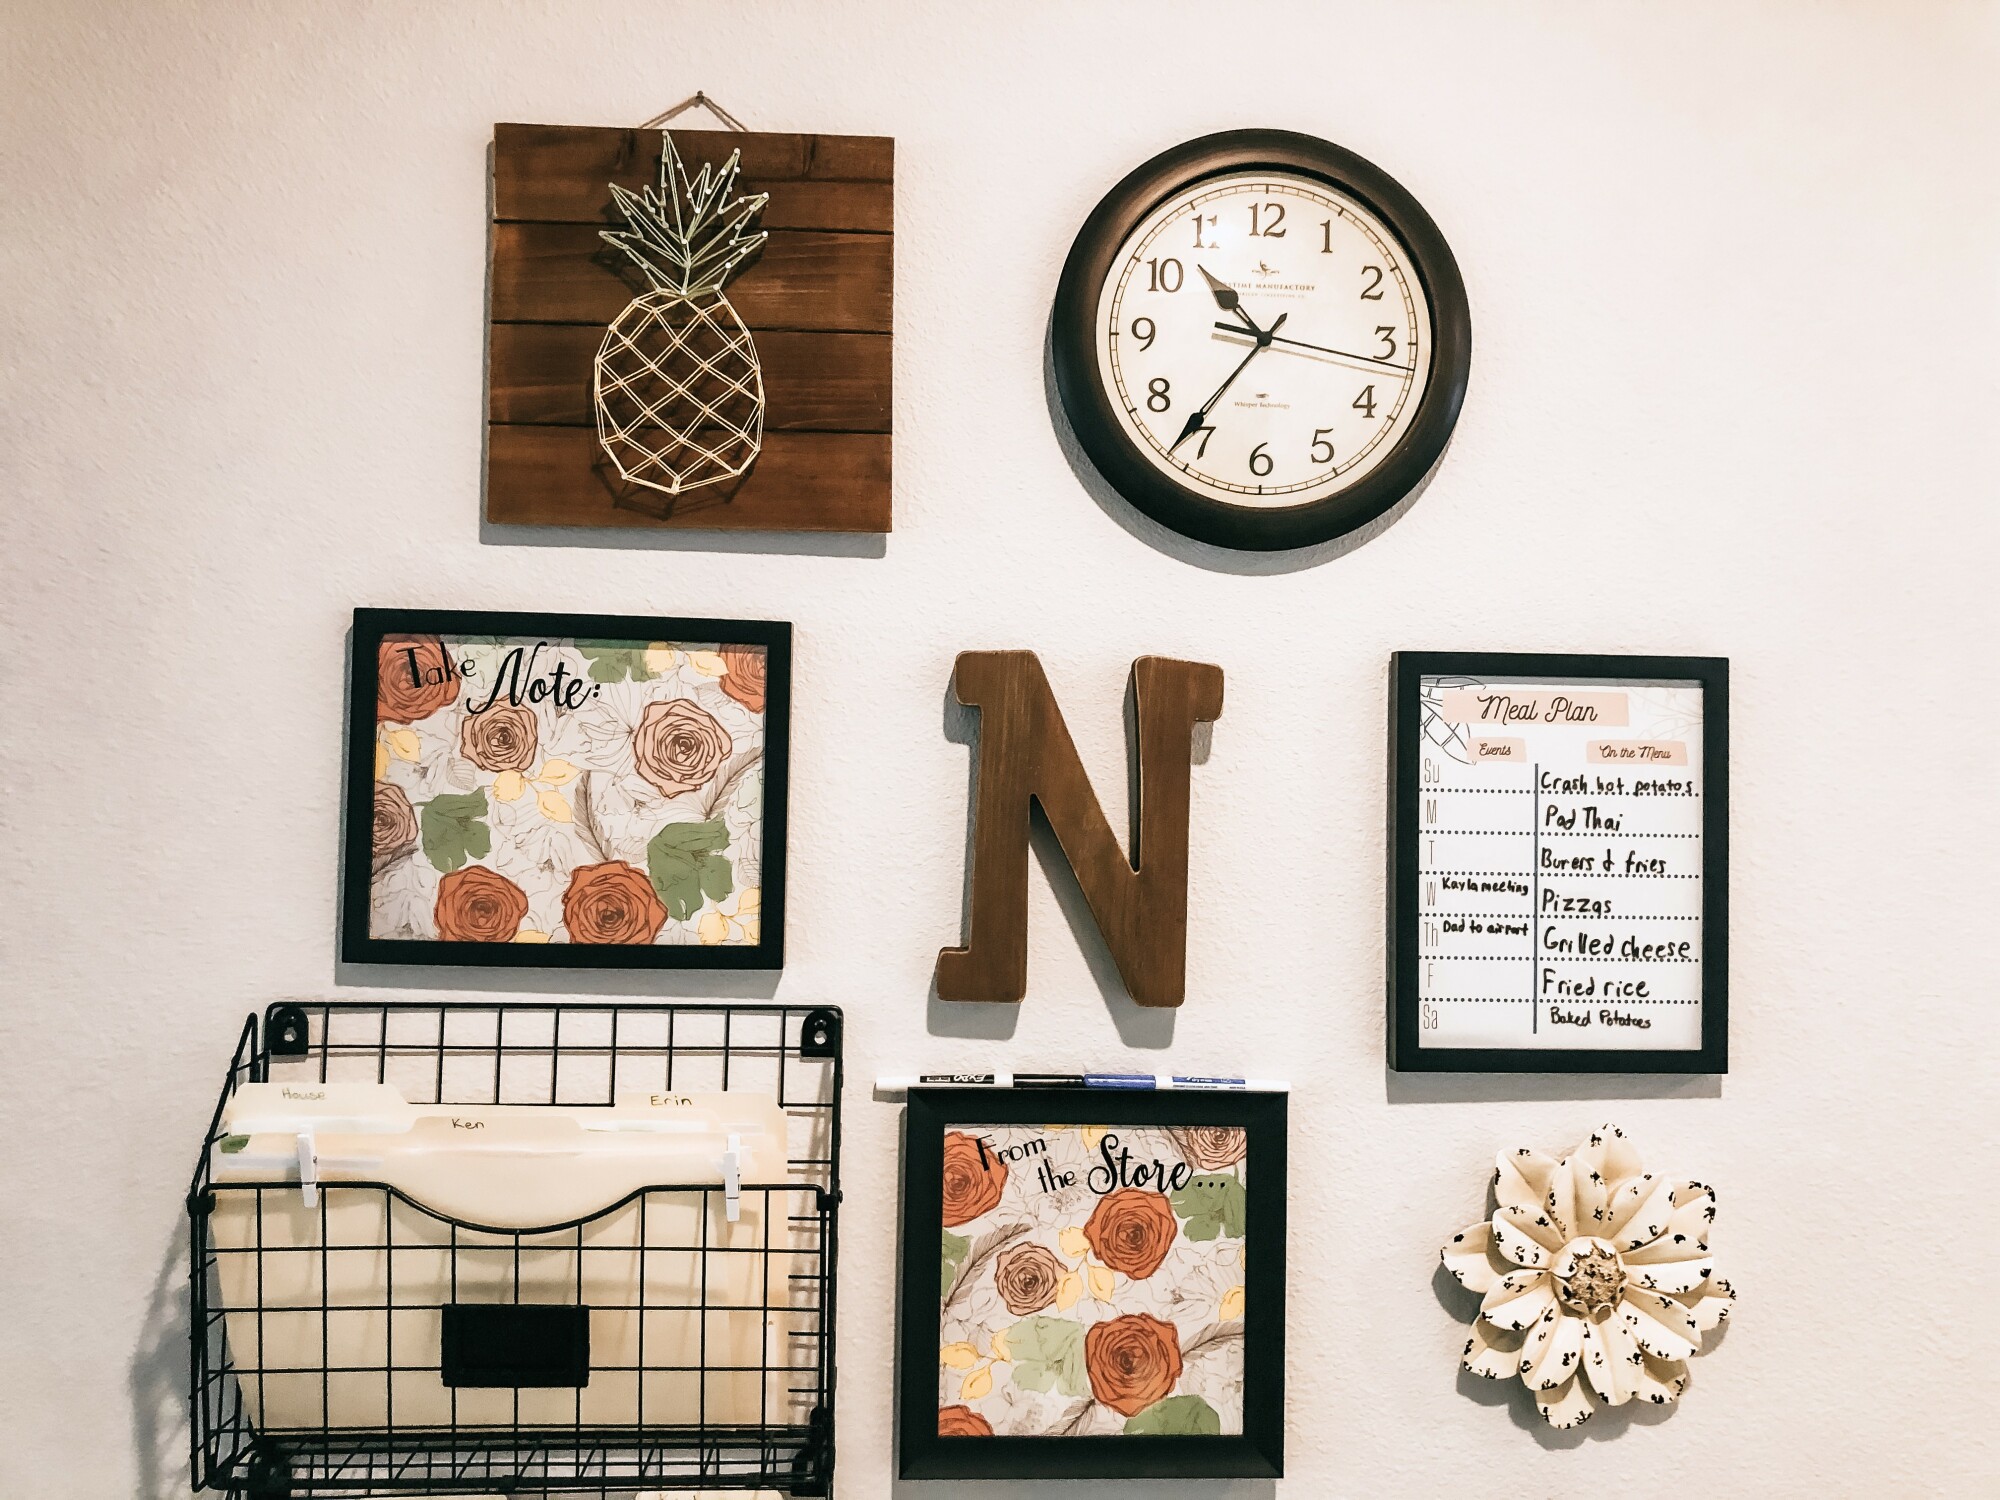
Some common elements of command centers:
Key hooks
Schedules
Clock
Calendar

White board for notes
Weekly Meal plans
Paper sorter
Mail sorter
Organizer for important documents
Supply holders
Chore lists
Backpack hooks
Purse basket
Jacket hooks
The list could go on and on. Pretty quickly, I discovered the must haves for us. I made a list.
File holders for mail, coupons, etc. (See mine here.)

Dry erase picture frame for shopping list
Key hooks (See mine here.)
Place for Ken’s basket
Hat hooks
Basket for purses
Clock
Weekly menu frame
Dry Erase picture frame for notes/dates to remember
Decor
Noticeably missing from the list was a calendar. In our family, we manage a shared electronic calendar. I also love my paper planner that lives on my desk. Things for the current week end up on the Weekly Meal Planner because they often impact the meals that I plan. I felt like a big calendar in this space would be more work that I would not keep up with, plus it allowed for me to use the space for other things.
 The fun part for me was looking for things to repurpose on our Command Center wall. I was looking all over for a shelf to hold Ken’s basket, but we had a small side table that fits that purpose well and didn’t have an assigned spot yet in our home. The space under the table was perfect for our purses. I repurposed a basket to contain them. We used to have that basket by the door to hold shoes when the girls were little.
I collected things from around the house into one area that I thought would work well in the space. This included some decor pieces that I love, but had yet to find a perfect home for them. I did much searching on Amazon and in some local thrift shops for the pieces I needed to purchase. These file holders worked great for size and I loved that they came with some hooks to hang off the bottom. This allowed a spot for Ken’s hats to hang, rather than sit on flat surfaces.
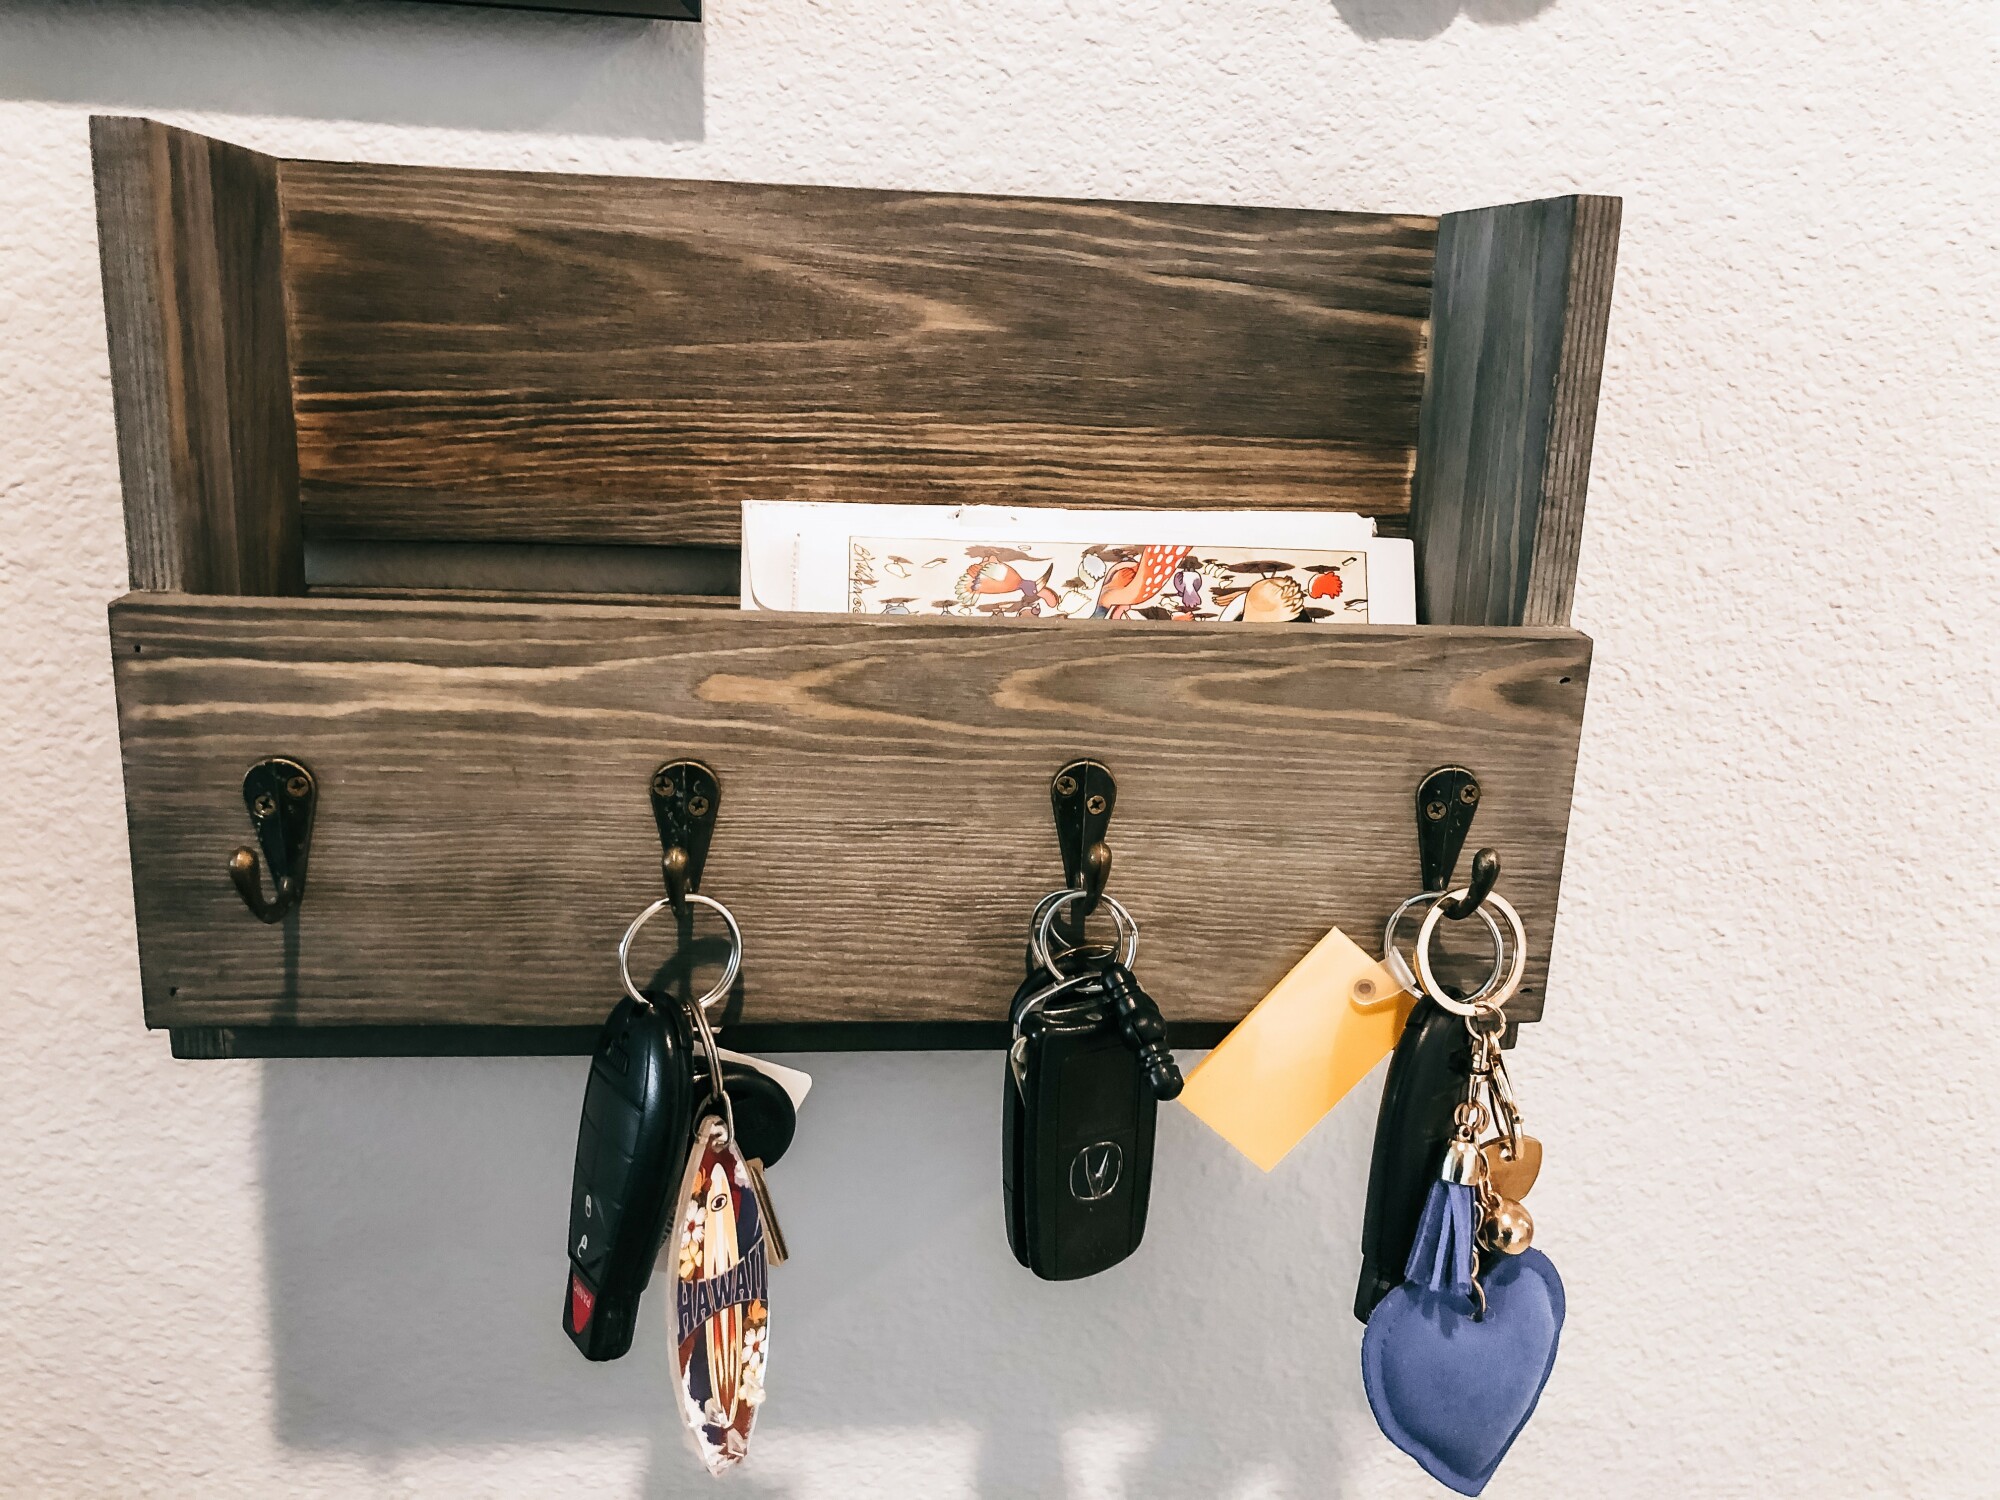 I was debating about the key hooks because we already had a simple multi key hook that we had used in the past. It looked kind of lost with all the other things, so I looked for an improvement to what we had done before. When I saw this one, I knew I had found the perfect one. The color coordinates well with our floor color. It has not only hooks, but a space for incoming or outgoing mail as well. If there is something that I need to take with me when I go out, I’ll put it there. I also use it for mail that comes for my husband when he’s not here, so it doesn’t get lost in a pile somewhere.
We have a weekly meal planner that had another temporary home. I never thought to put it in the command center until I saw similar ones in examples on Pinterest. I created this one myself and have it available free for you. If you missed my post about meal planning, you can find it here.
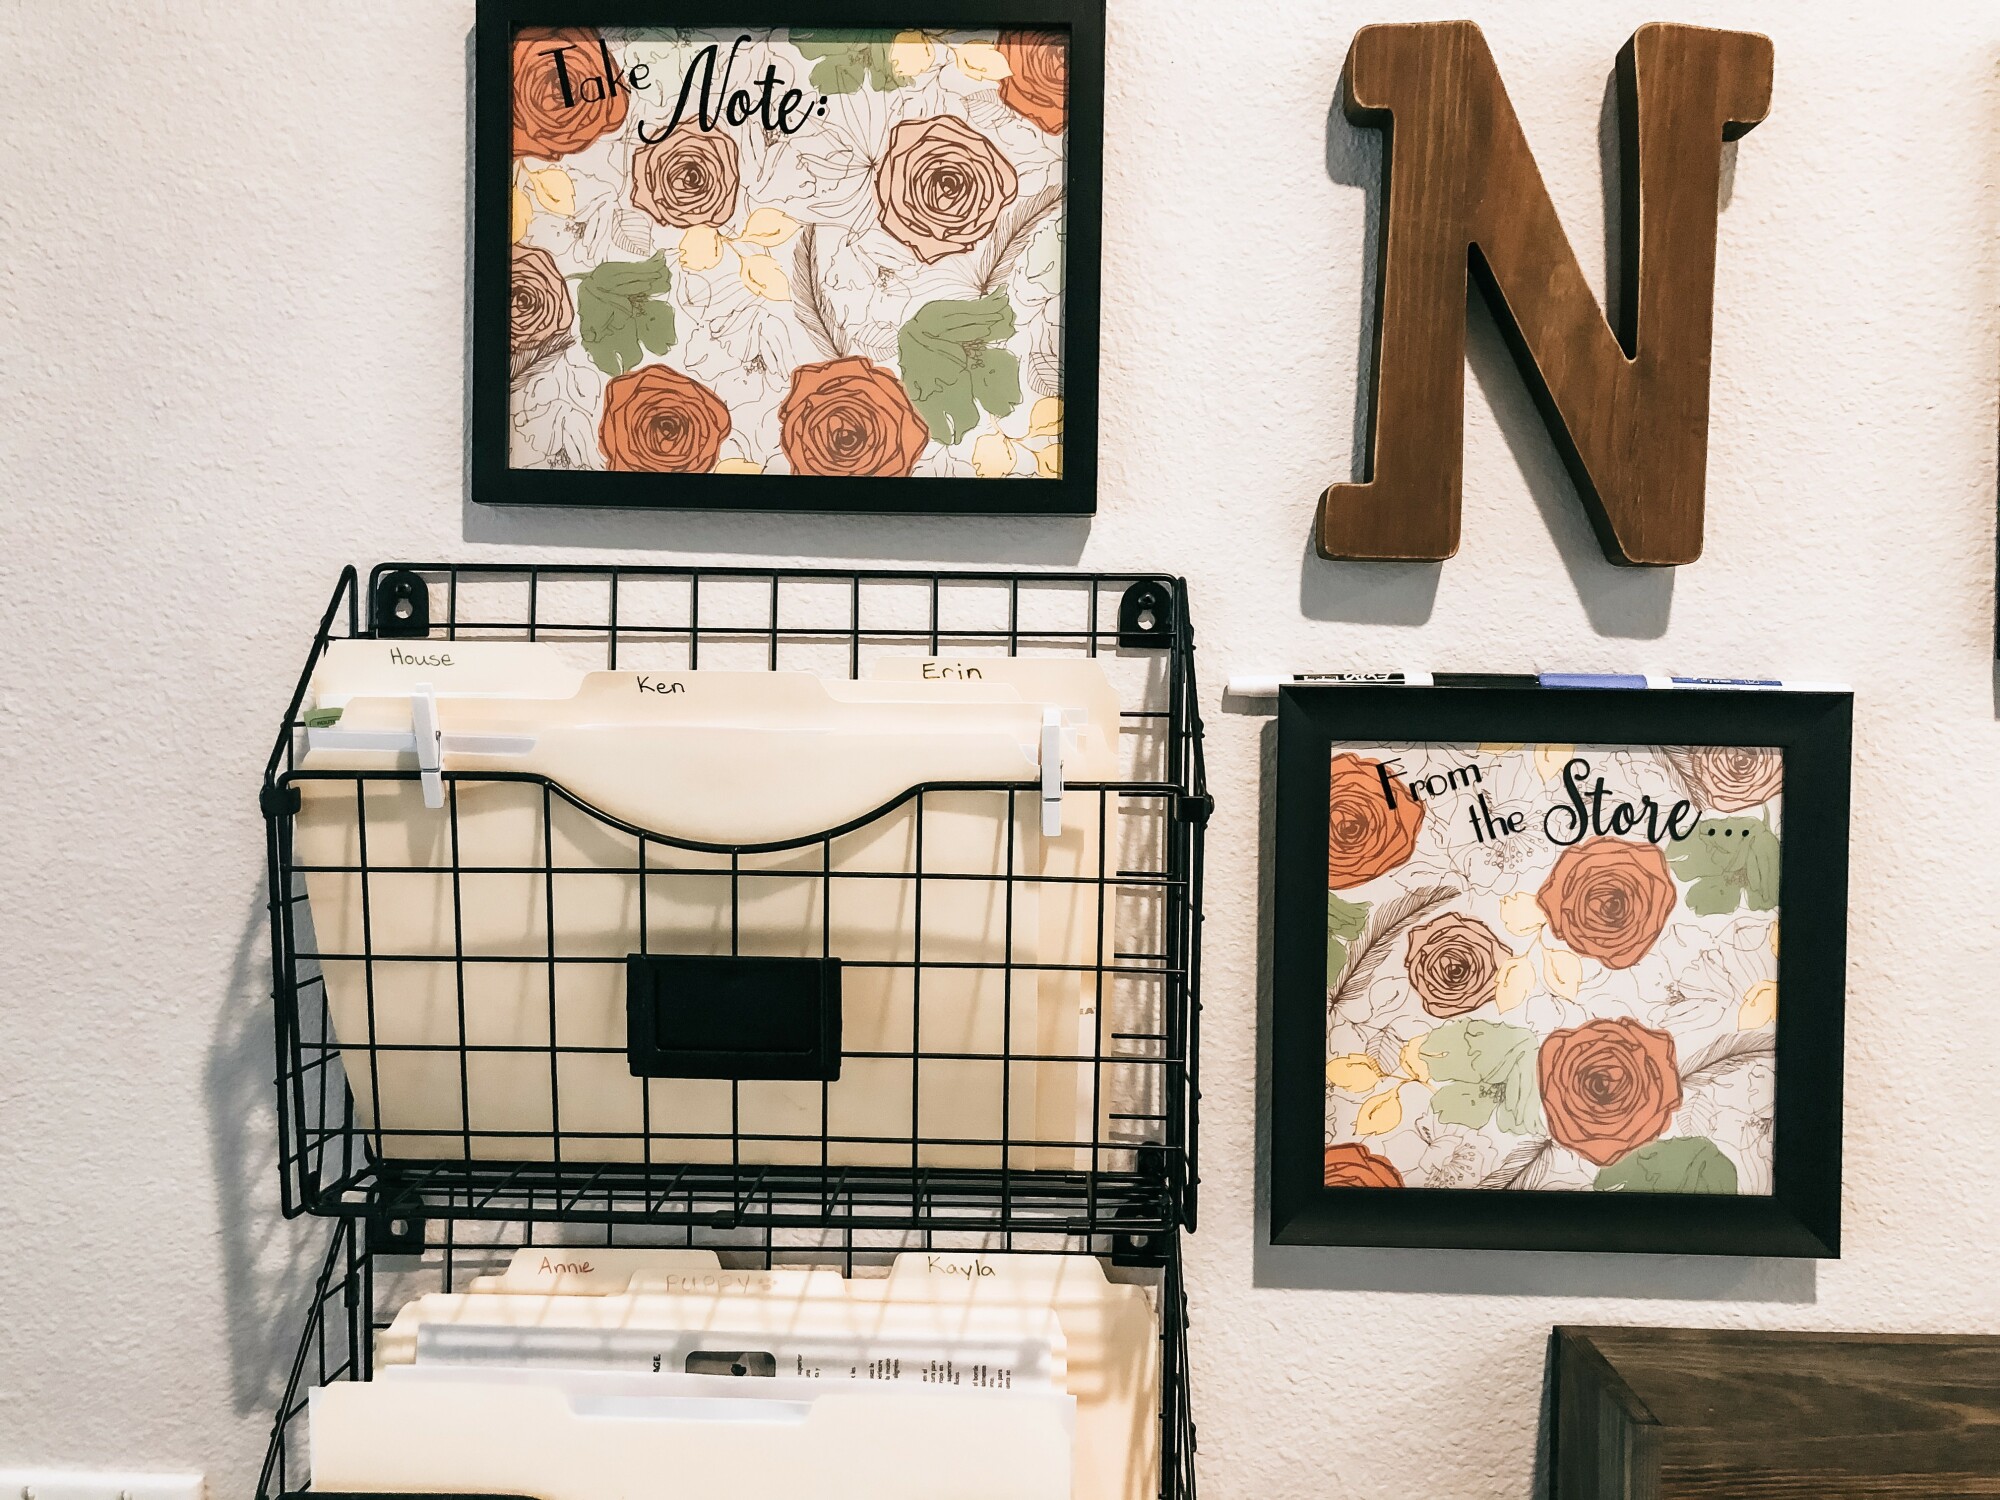 I purchased two matching black frames at a local store (after searching in vain for unused ones in the closet) to serve as white boards. I just needed to put plain or patterned paper inside for the background. Glass works great for white boards and is usually a lot less expensive than white boards. I love that you can put a template behind the glass if you want, like I did with the meal planner. This would work great for a list of chores to complete if you want that on your command center. We needed a place to have a running shopping list as things come to mind when we are in the kitchen.
The clock and decor items I already had on hand, so they were no added expense.
How I chose the layout:
As I acquired items for the command center, I put them all together in one area. Once I had everything, I started tinkering with layouts on the floor. I had measured the width of my space and marked that on the floor with painter’s tape so I could design within those limits. I arranged and rearranged elements over and over. I swapped out several decor items until I came to an arrangement I loved.
Some things to consider…
How high will things hang? I am known to be a little vertically challenged, so I knew that if I were to hang any of the white board elements too high, I’d need a stool to write on them or change them out, so I had to keep that in mind. I wanted function to be the primary focus.
Plan for clearance. If you have hooks, how much space do you need below them for clearance? I literally “hung” hats on the hooks in my floor layout to see how it would all fit together. Do you have a lamp or taller decor items on a table that you need to consider?
Is it visually appealing? I like to use a variety of shapes in my design. I like the circular shape of the clock and flower to balance out the sharp corners on the square and rectangular elements in my command center. You may prefer a more uniform design with all one type of shape or material. That is the beauty of designing your own. You get to be in charge of what your end result will look like. As I was arranging, I took care to balance out the colors as well. I didn’t want the two natural wood elements to be lined up or clustered on one side of the design.
How precise will installation need to be for you to be happy? I know that if I have rectangular elements next to each other, I am going to be annoyed if they don’t hang straight in relation to each other. I also know that if there are two picture frames at the same level, I will have to measure and get out the level to line them up properly. To avoid those pitfalls, I intentionally designed things to be offset from each other. Where there were two identical frames in the same row, I turned one sideways, so they would not have to be hung equally.
Next week, I’ll detail how it all came together and how it works for us now. (Click here to go right to part 2.)
Want to subscribe to my blog so you don't miss a thing? Click here and I'll shoot you an email whenever a new blog post lands.
 We have a new puppy!! Lilo is an adorable Yorkshire Terrier who is keeping us on our toes. Having her around is kind of like having a newborn and a toddler all at once.
She sleeps like a newborn….often and not always through the night, but she's getting better. We are very focused on her inputs and outputs. How much is she eating and drinking? How productive is she when we take her outside?
She is like a toddler that gets into everything. She explores her world with her mouth and tries to eat everything she finds. We have a baby gate up in the hall now so she doesn’t roam too far. We are busy exposing her to all of the new sights and sounds of her world. This includes getting her used to the sound of the vacuum and ice dispenser. She is not too sure about any of these things.
 She has been going on car rides too. We started this week with a quick drive around town with the whole family. Another day, we drove to a local drive through place to pick up some food. We even took a trip to go through the coffee drive through and she got her first puppaccino. It was almost bigger than she is, but she loved every lick that she could get. All of this meant that I felt comfortable taking her to the airport with me when I had to drop my husband off. Normally, I would have woken one of the teens to be on puppy watch, but this time, Lilo came with me. (Lucky teenagers got to sleep in!) She did great, even on the ride home when it was just her and me. She is still shivering with nerves when we go in the car, but she’s relaxing enough to lay down and try to rest. This will get easier the more we practice.
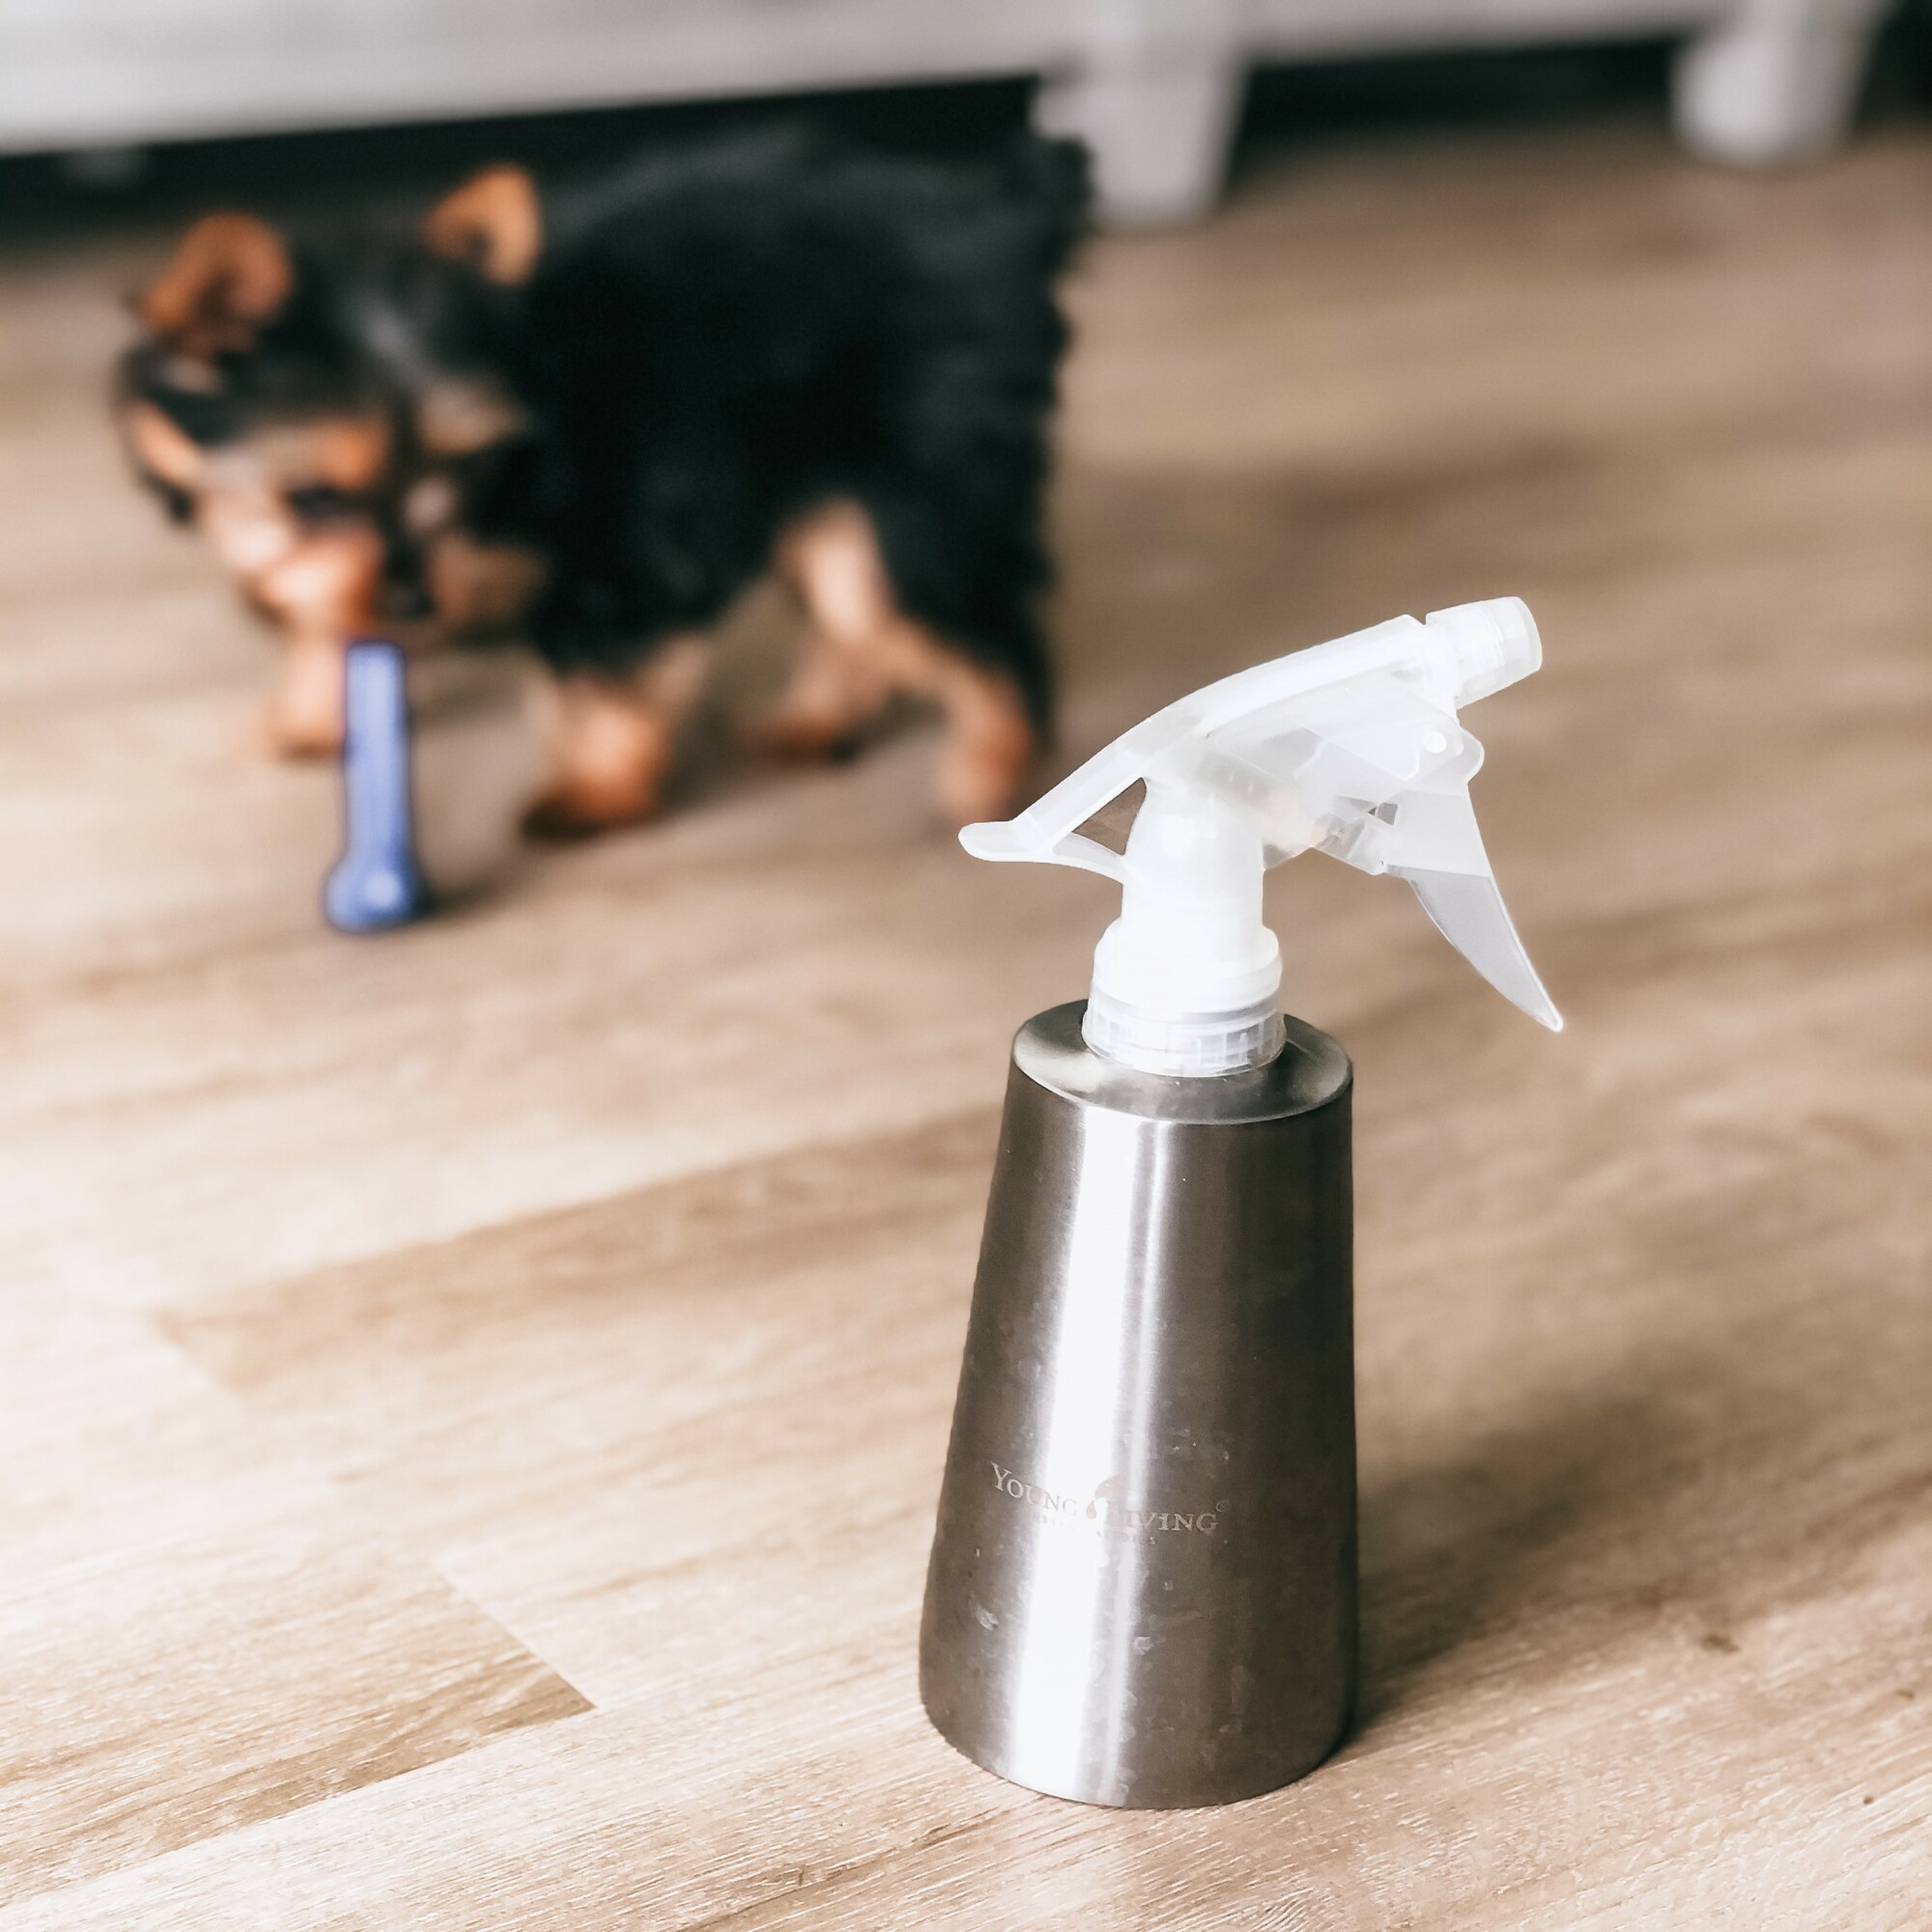 She is so smart and is learning all kinds of new things every day. Sometimes she even tries to train us and we have to resist those sweet puppy dog eyes. One of her funny quirks is that whenever she hears any spray bottle working, she comes running. I guess that on her first days home with us, we used that sprayer a lot cleaning up her little messes. It cracks me up when I’m in the kitchen cleaning up, she’ll stop playing to see what I’m doing with that sprayer. I don’t think she realizes yet that the sprayer is not directly related to all things puppy.
I am so relieved that we have a home that is safe for this sweet puppy. She is totally able to lick all the spots I clean up without fear of her consuming dangerous chemicals. It’s a good thing too, because I feel like I clean up all the time.
Having a puppy in the house is a lot like having a baby. She changes everything, but I would change nothing. She is the light of our lives and we are so blessed to be her family.
She is our first dog, so I am very open to any and all advice you may have. I'm sure I will add some updates that are puppy related in the future as she is now part of the family. Comment below with your favorite puppy or dog parent tip.
Want to subscribe to my blog so you don't miss a thing? Click here and I'll shoot you an email whenever a new blog post lands.
Who has time for sleep?
A better question is, “Can you really afford to not get enough sleep?”
 When we are sleep deprived, our abilities to concentrate, think clearly and process memories is greatly reduced. Lack of sleep has been tied to a higher risk of certain diseases and medical conditions like obesity, type 2 diabetes, high blood pressure, heart disease, stroke, poor mental health, and early death.
Are you getting enough sleep?
According to the American Academy of Sleep Medicine,
the ideal amount of sleep for adults is 7 hours or more for optimal health.
Now, genetics and other factors provide some variability in what is necessary for individuals, but doctors agree that getting more sleep, consistently, is important for our bodies to function properly as they were designed. Our bodies and minds need an opportunity to recharge so we can wake refreshed and alert.
That all sounds great, but is it realistic? I mean, with kids, work, chores, and wind down time, who really gets enough sleep? I have been quite guilty of spending most of my life getting less than the optimal amount of sleep. Here’s the thing though...if we get enough sleep, we are more productive in our waking hours and can actually get enough sleep in most cases.
Stick with me here.
If I actually get my seven hours of sleep that is recommended, I wake up less groggy. This means that I am able to sip my tea with a purpose and start my day faster than before. These added minutes may seem small, but they add up over the course of a whole day. I am more focused at my job, which means I can complete more tasks from my to do list in a shorter amount of time.
So, now that I understand the why, how do I accomplish this?
First, I may need to retrain my brain with some new routines. If your routine is to watch a series on Netflix, it can be hard to not just let it roll to the next episode. I am guilty of that way more times than I’d like to admit. I believe that true change starts with baby steps. Your goal is to get more sleep. Maybe the first thing you need to do is to actually set boundaries on your television watching. Maybe instead of watching endlessly, you start by checking the time on the clock when a new episode appears. This is the time to make a decision…..even if you really want to know what happens next.
For me, I know that if I am going to get up at 7:00 in the morning, I need to start my bedtime routine by 10:30. This allows me enough time to wind down, do what needs to be done and be in bed ready to sleep by 11:30. You may think that sounds like a long time, but that includes my whole routine, plus some book reading time. (I have to apply that same clock check when I am reading and get to a new chapter.)
Second, you need to build your nighttime routine that works for you. I have detailed mine over here, but what works for me may not work for you.
Try some of these strategies to get yourself into sleep mode:
Journaling - Some people find that journaling before bed allows their brains a chance to unload the thoughts we have that have a tendency to swirl in our heads as we try to fall asleep.
Reading - Escaping into a book for a few minutes before bed can be a great way to turn off the pressures of the day and prepare our bodies for sleep.
Put away your phone - The best thing to do at night is to plug in your phone in another room. For some of us that is not an option because we use it as an alarm. At the very least, put your phone on do not disturb. By doing this, you are not getting any of those notification dings or screen illuminations to pull you away from sleep mode. It is a slippery slope to “just check that notification” and pretty soon, you are scrolling through things that are not going to help you get to sleep. You can set favorite contacts to be able to break through in case of an emergency.
Turn down your thermostat - We sleep better in a room that is cooler than we keep it during the day. According to Sleepfoundation.org, the optimal temperature for sleeping is between 60-67 degrees. Setting your thermostat to 65 is a good starting point that you can adjust for your preferences. Cuddling up under the covers is much more comfortable if you are not overheating. I know that I surely toss and turn much more when I am too warm. I kick off those sheets and spend a ton of time just trying to get comfortable. When your bedroom is the right temperature for you, it is much easier to fall into dreamland.
Use a diffuser - Set the tone in your room with aromatherapy. I like to diffuse a calming blend around 30 minutes before I want to be asleep. My favorite blend is shared in my nighttime routine post here.
White noise - Do you need to have white noise in order to sleep? We always sleep with the television on low with a sleep timer so it will turn off. I know some people disagree with having a TV on at bedtime, but it works for us. You can use an app for white noise or get a noise machine like this one. We also keep a fan on which can be just the right amount of white noise, plus it keeps the temperature in our room down do it’s double duty.
Finally, you need to work on consistency. Check this list for things you are already doing. Then choose one thing to add. After a time of consistently doing that one thing, add another until you have built your own nighttime routine that works for you and helps you get great sleep. It will take time and won’t happen overnight. You can make meaningful change if you are persistent. Great sleep is worth it!
Which of these tips is the easiest for you to implement? Tell me in the comments below.
Looking for a great journal for jotting down your thoughts? Check out my Journaling Through the Year PDF download. It will get you started on the right foot.
Want to subscribe to my blog so you don't miss a thing? Click here and I'll shoot you an email whenever a new blog post lands.