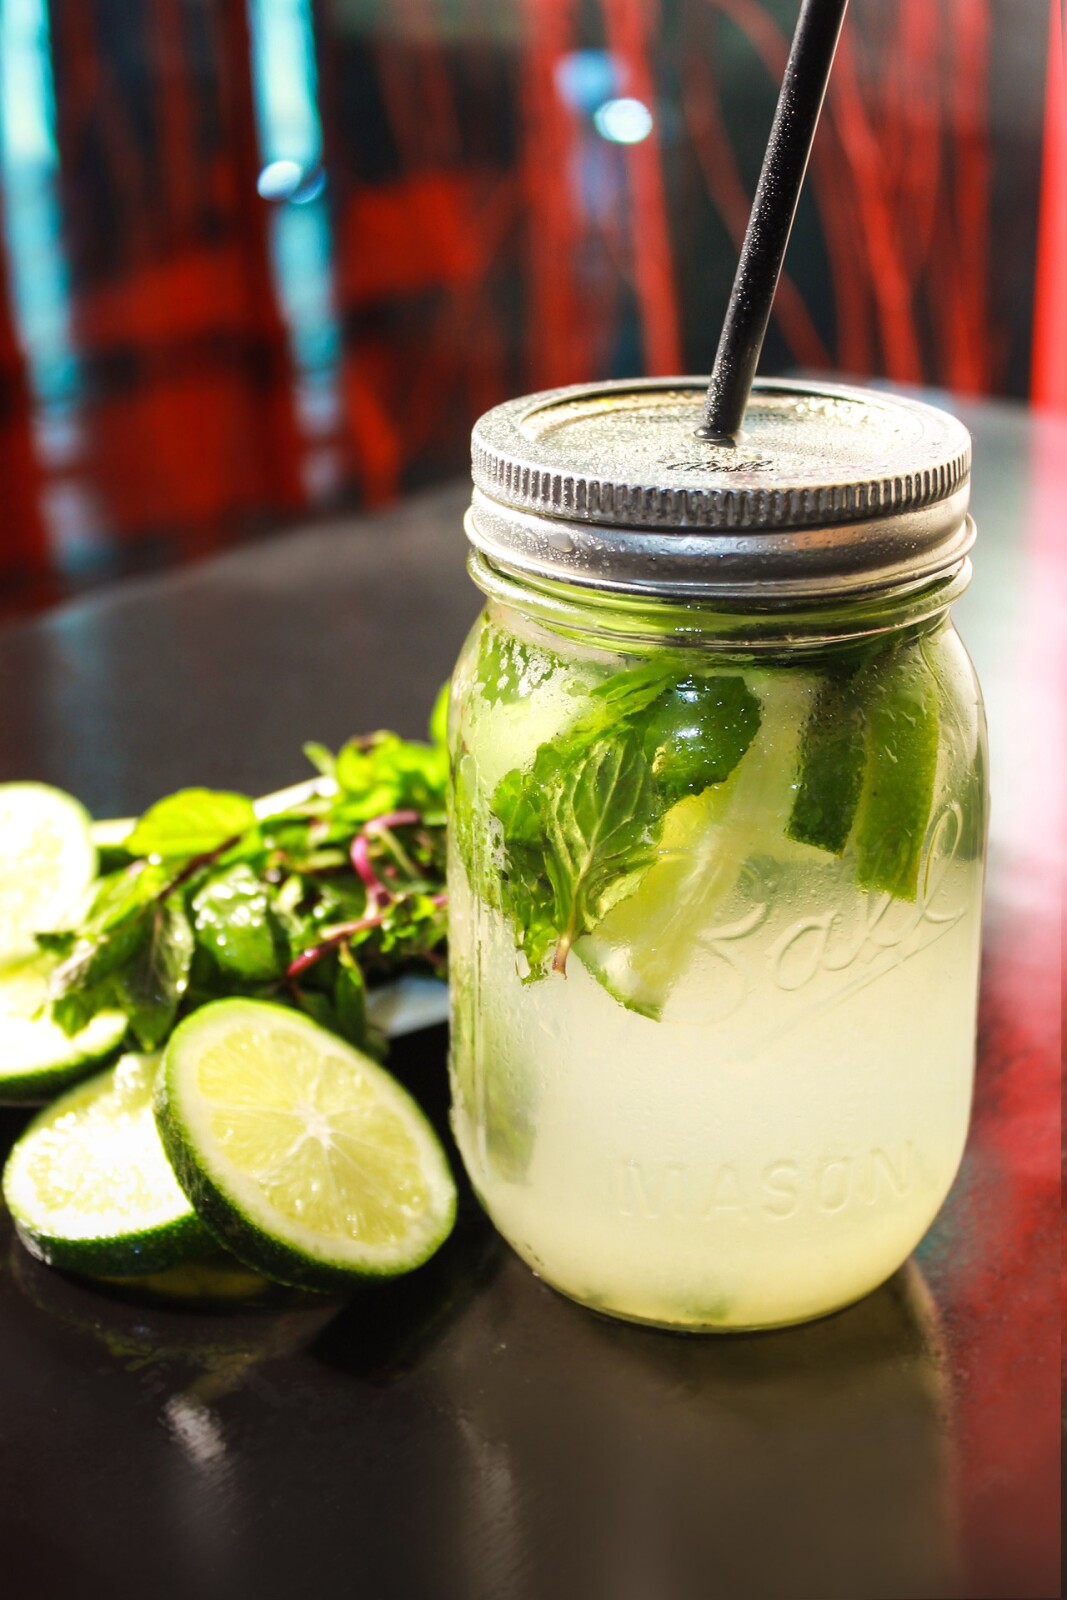

My mint plant is growing like gangbusters in my backyard. If you know me, you know that it is growing despite me, not because of me. I planted a tiny starter mint in this pot and plopped it on my back patio. I watered it daily while it was getting established. It gets some residual spray from the sprinklers and even some rain water when the wind blows. Now, I just water the pot when it looks like it is starting to wilt. I have way more mint now than I really know what to do with.
My first thought with the mint was…. Mojitos! I love a great mojito and I have the tools to make them at home. Grab my favorite muddler here. So, I got some rum and limes and I was in business. There are many, many recipes for mojitos, so I’ll share my favorite one here.
Homemade Mojitos
 Ingredients
- 6-8 mint leaves
- Juice from one lime plus slices for garnish
- Splash of simple syrup
- 2 ounces rum (omit to make a mocktail)
- Lemon lime soda or sparkling water
My favorite is to do about half soda and half lime sparkling water. That way I get a touch of sweetness without too much added sugar.
Depending on the day, I’ll add some fresh mango to my cocktail shaker before I muddle the mint. Delicious! Another fun option is to add in about ¼ cup of pineapple juice before adding the sparkling water and you will have a pineapple mojito. So many amazing options!!
I have discovered that this works well as a mocktail as well. I can get the refreshing taste without the alcohol. Hello day drinking on a hot summer day without the repercussions!
**Special note if you are not accustomed to cocktail shakers: Do not be tempted to put the carbonated water in the shaker. It only sounds like a good idea until you realize you are basically shaking up a can of soda. You can thank me later! (Unless of course you want to deep clean your kitchen including the ceiling. You do you!)
So, this got me thinking about what else I could make as a mocktail that would taste just as delicious. This time of year lends itself to plentiful fresh fruit and herbs. Capitalizing on all that freshness, is the way to build any recipe.
Here’s a few recipes I found that sounded great on the interwebs…
Blueberry Mint Mocktail, Grapefruit Rosemary Mocktail, Mimosa Mocktail
Which of these recipes sounds like a winner to you? Share in the comments below.
Want to subscribe to my blog so you don't miss a thing? Click here and I'll shoot you an email whenever a new blog post lands.
 I am a lazy mom. I admit it. I am all about looking for the easy button to manage keeping all of my humans alive. They need to be fed and I am in charge of that. Just because I am lazy doesn’t mean that I don’t care or place value on quality nutrition for my family. Enter these easy steps to make sure I get dinner on the table without too much fuss.
Make a plan. You will have a much harder time getting dinner on the table if you don’t know what is for dinner. Plan for your dinner early in the day so you can take away the guessing game later on. When you know what is for dinner, you can ensure you have everything on hand and eliminate frustration at dinner time. I go into detail about my meal planning strategy in this blog post where I share my favorite meal planning tool.
Take shortcuts when you can. Go ahead and grab that pre sliced or shredded cheese if it makes your life easier. Pre chopped veggies can save your life, or at least your fingers. I am horrible with onions. I have tried every trick in the book and my best success is when I use my Pampered Chef Chopper that I have had for years. It recently broke from 2 decades of use and had to do something until I can get a new one. I have found that my grocery store has pre-chopped onions in the produce section of the store. If I want to have more finely chopped onions, I can chop them a bit more, but my time working with those onions is a lot less than if I started from scratch.
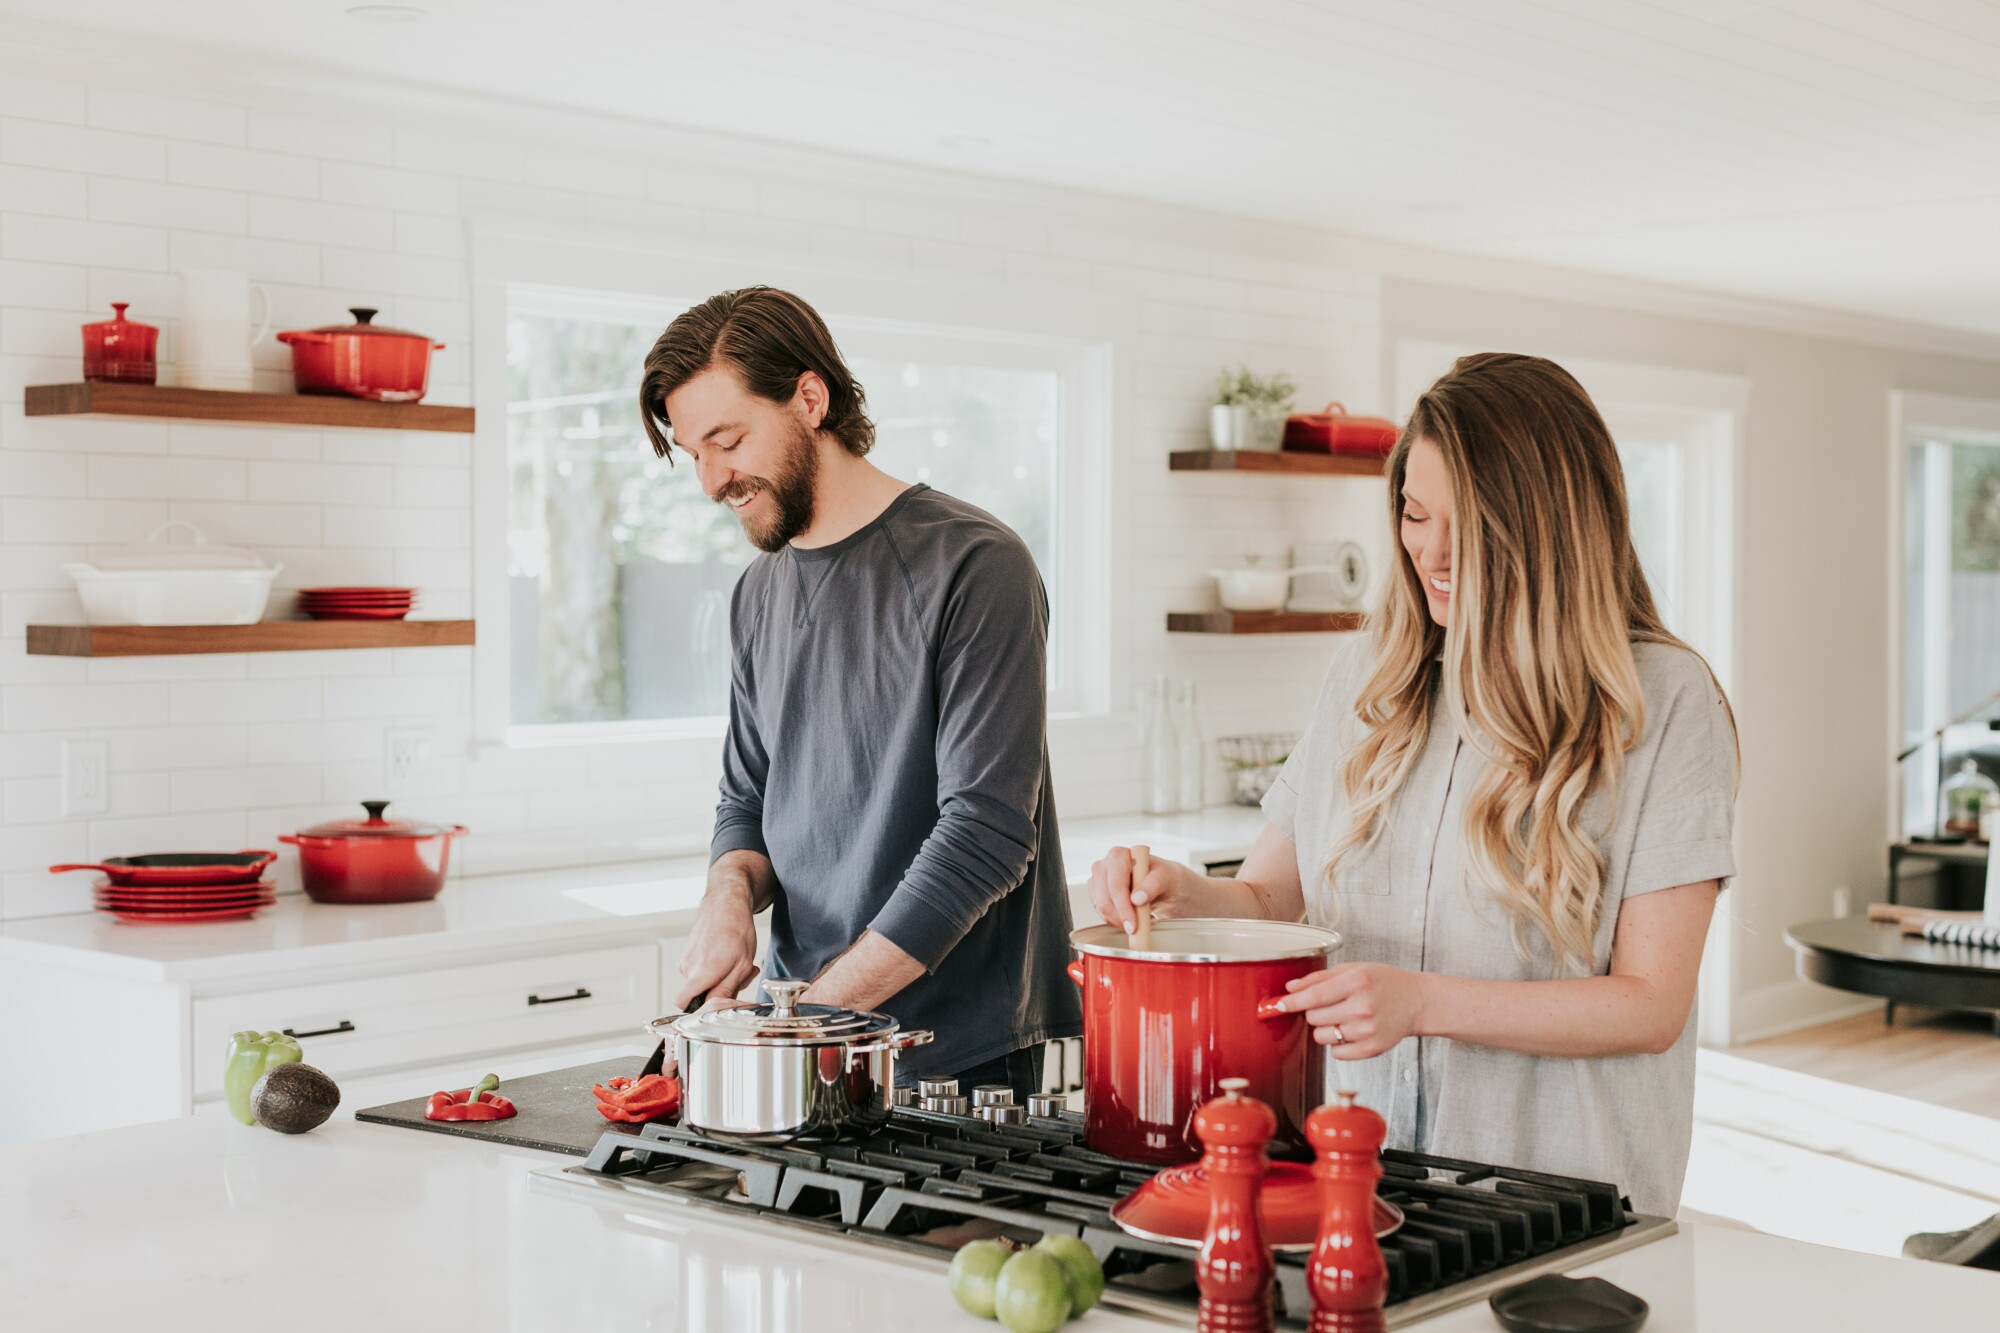 Get the family involved. When my husband sees that we are doing tacos for dinner, he will grab the ground beef and brown it for me. When we are doing something with rice, he will start the rice in the rice cooker ahead of time for me. This frees me up to focus on the more detailed aspects of cooking, like measuring out ingredients, and following the steps of a recipe. One of my daughters loves to organize things and is awesome at lining up my ingredients for me.
Pretend you are on a cooking show. You know how they have all their ingredients pre-measured and pre-chopped, ready to dump into the pan? You can do that too! I have a collection of small ramekins that serve me well in this endeavor. Why should we do this? For one, when you have all your ingredients lined up, you spend a lot less time going back and forth to the pantry or fridge when you are preparing a meal. It is so much easier to follow a recipe when you are able to just follow the directions without looking back at the ingredient list to double check if it was teaspoons or tablespoons. I literally line up all of my pre-measured ingredients in the order they fall in my recipe. Then I can just focus on making sure the pan is at the right temperature as I add my ingredients. I know that I have certainly overcooked things in the past because I was still chopping or measuring while the cooking was started. It just is not as efficient.
Be realistic. I have found that I can only handle cooking with a recipe maybe two nights during the work week. What do I make the other nights? I make things that are easy and don’t require looking something up. You know, your staple family favorites like, pasta or frozen nuggets and fries or tacos. I am not a natural cook, but I’m working to change that by trying out recipes from Pinterest. I get exhausted easily when I am doing new things. If I do too much of that, I get overwhelmed and start to dread cooking. That is not a recipe for success. So, I sprinkle in those more labor intensive meals along with my autopilot types of meals during the week. The idea is that my newer recipe meals will eventually become autopilot meals for me, but until they do, I am not going to stress over it.
You can do this! Make a plan, take shortcuts, get the family involved, pretend you are on a cooking show and be realistic.
Want to subscribe to my blog so you don't miss a thing? Click here and I'll shoot you an email whenever a new blog post lands.
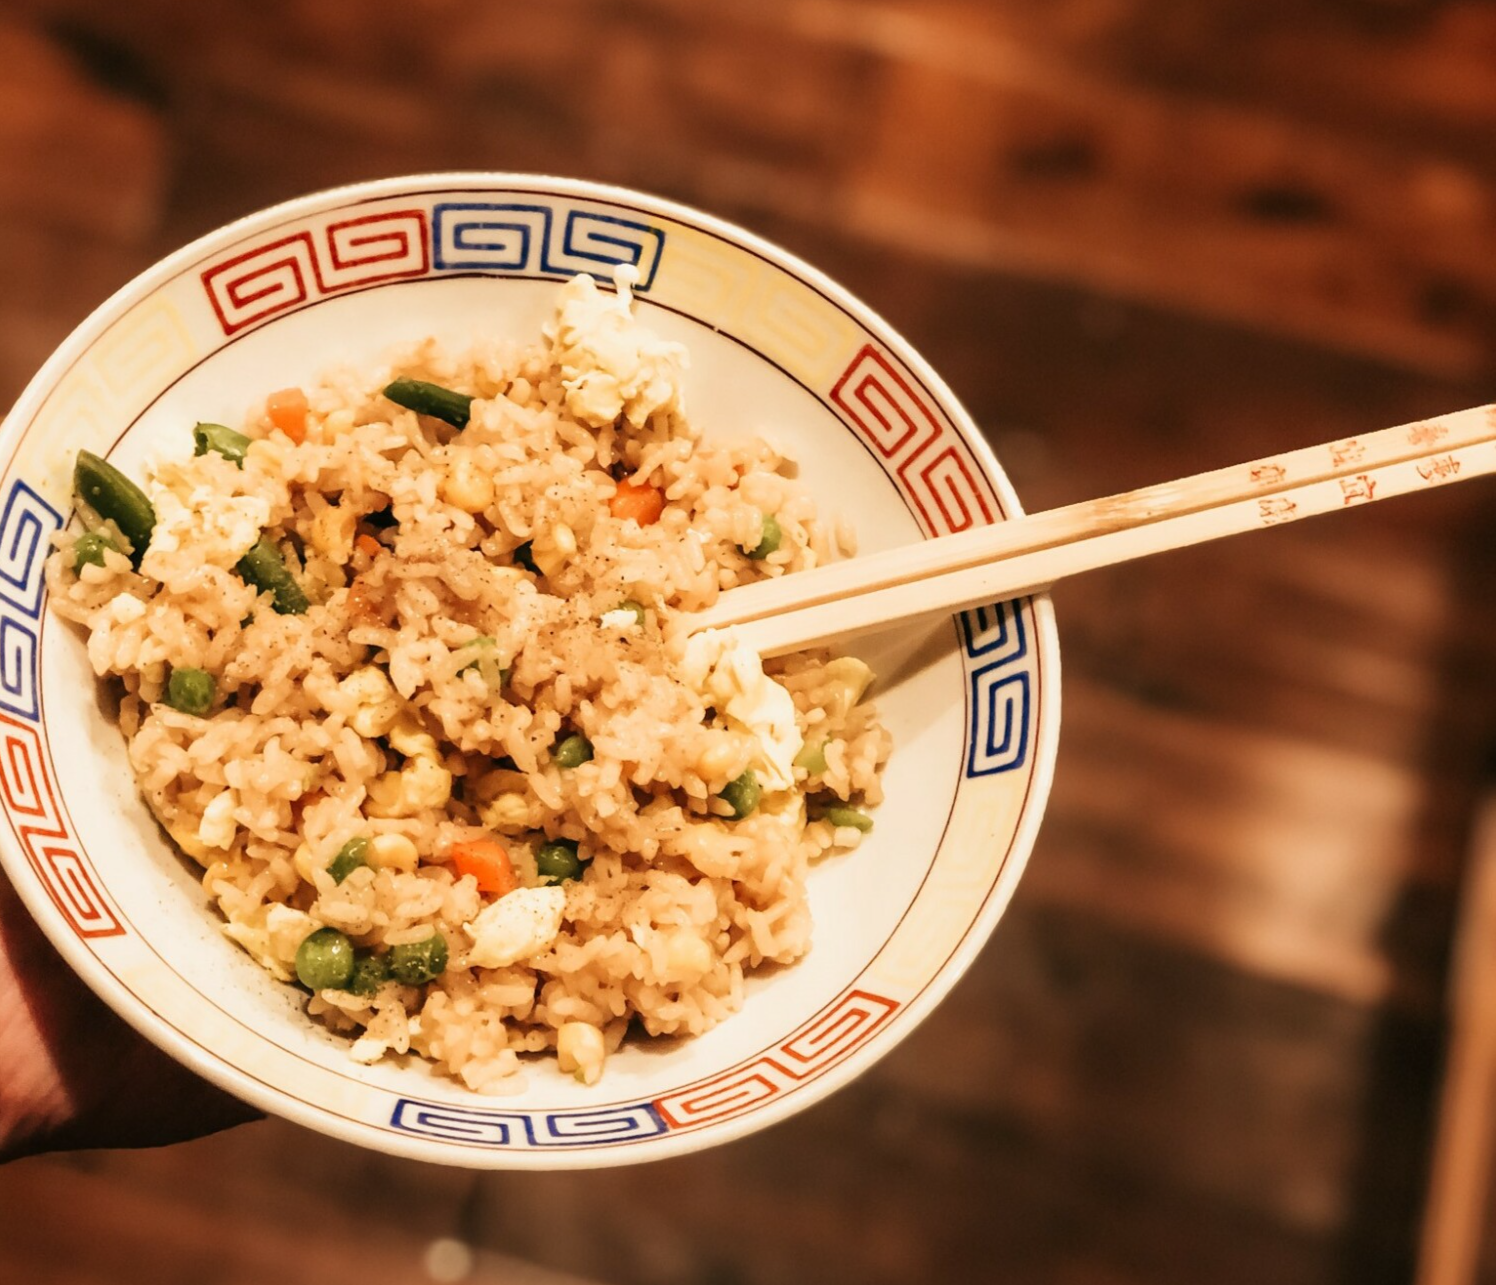
If you have been around here for any length of time, you know that I love to plan out my meals for the week. It helps keep me on track, out of the drive through line and it saves my sanity. I wrote a post all about it here. However, I am a real person and there are times that we get to thinking about dinner and I realize that I need to go to the store, but that is just not happening. I have a foolproof meal that I gravitate towards in just that situation...fried rice.
I am not known as a chef. I am a mom trying her best to feed her family over here. If I tell you that I have a recipe that I make over and over and I am able to improvise with, you know it is legit.
I have made this so many times, both planned and on the fly. I love that I can mix it up and use leftover proteins and veggies that I have on hand. I can also go simple with it and use what I’ve got. It works for the meat eaters in my life as well as for my daughter who is vegan. If I’m adding meat, I either toss it with my individual bowl or I pull out her portion first before I mix it all together. I don’t even measure anymore. I just add a little of this and a little of that and taste and adjust as I go.
How easy is this?
Whenever I decide to make fried rice, I start my rice going in the rice cooker, even if it is hours ahead. I actually prefer to use rice that is cooled off by the time I’m cooking with it. It seems to absorb the flavors better and it doesn’t stick together quite as much.
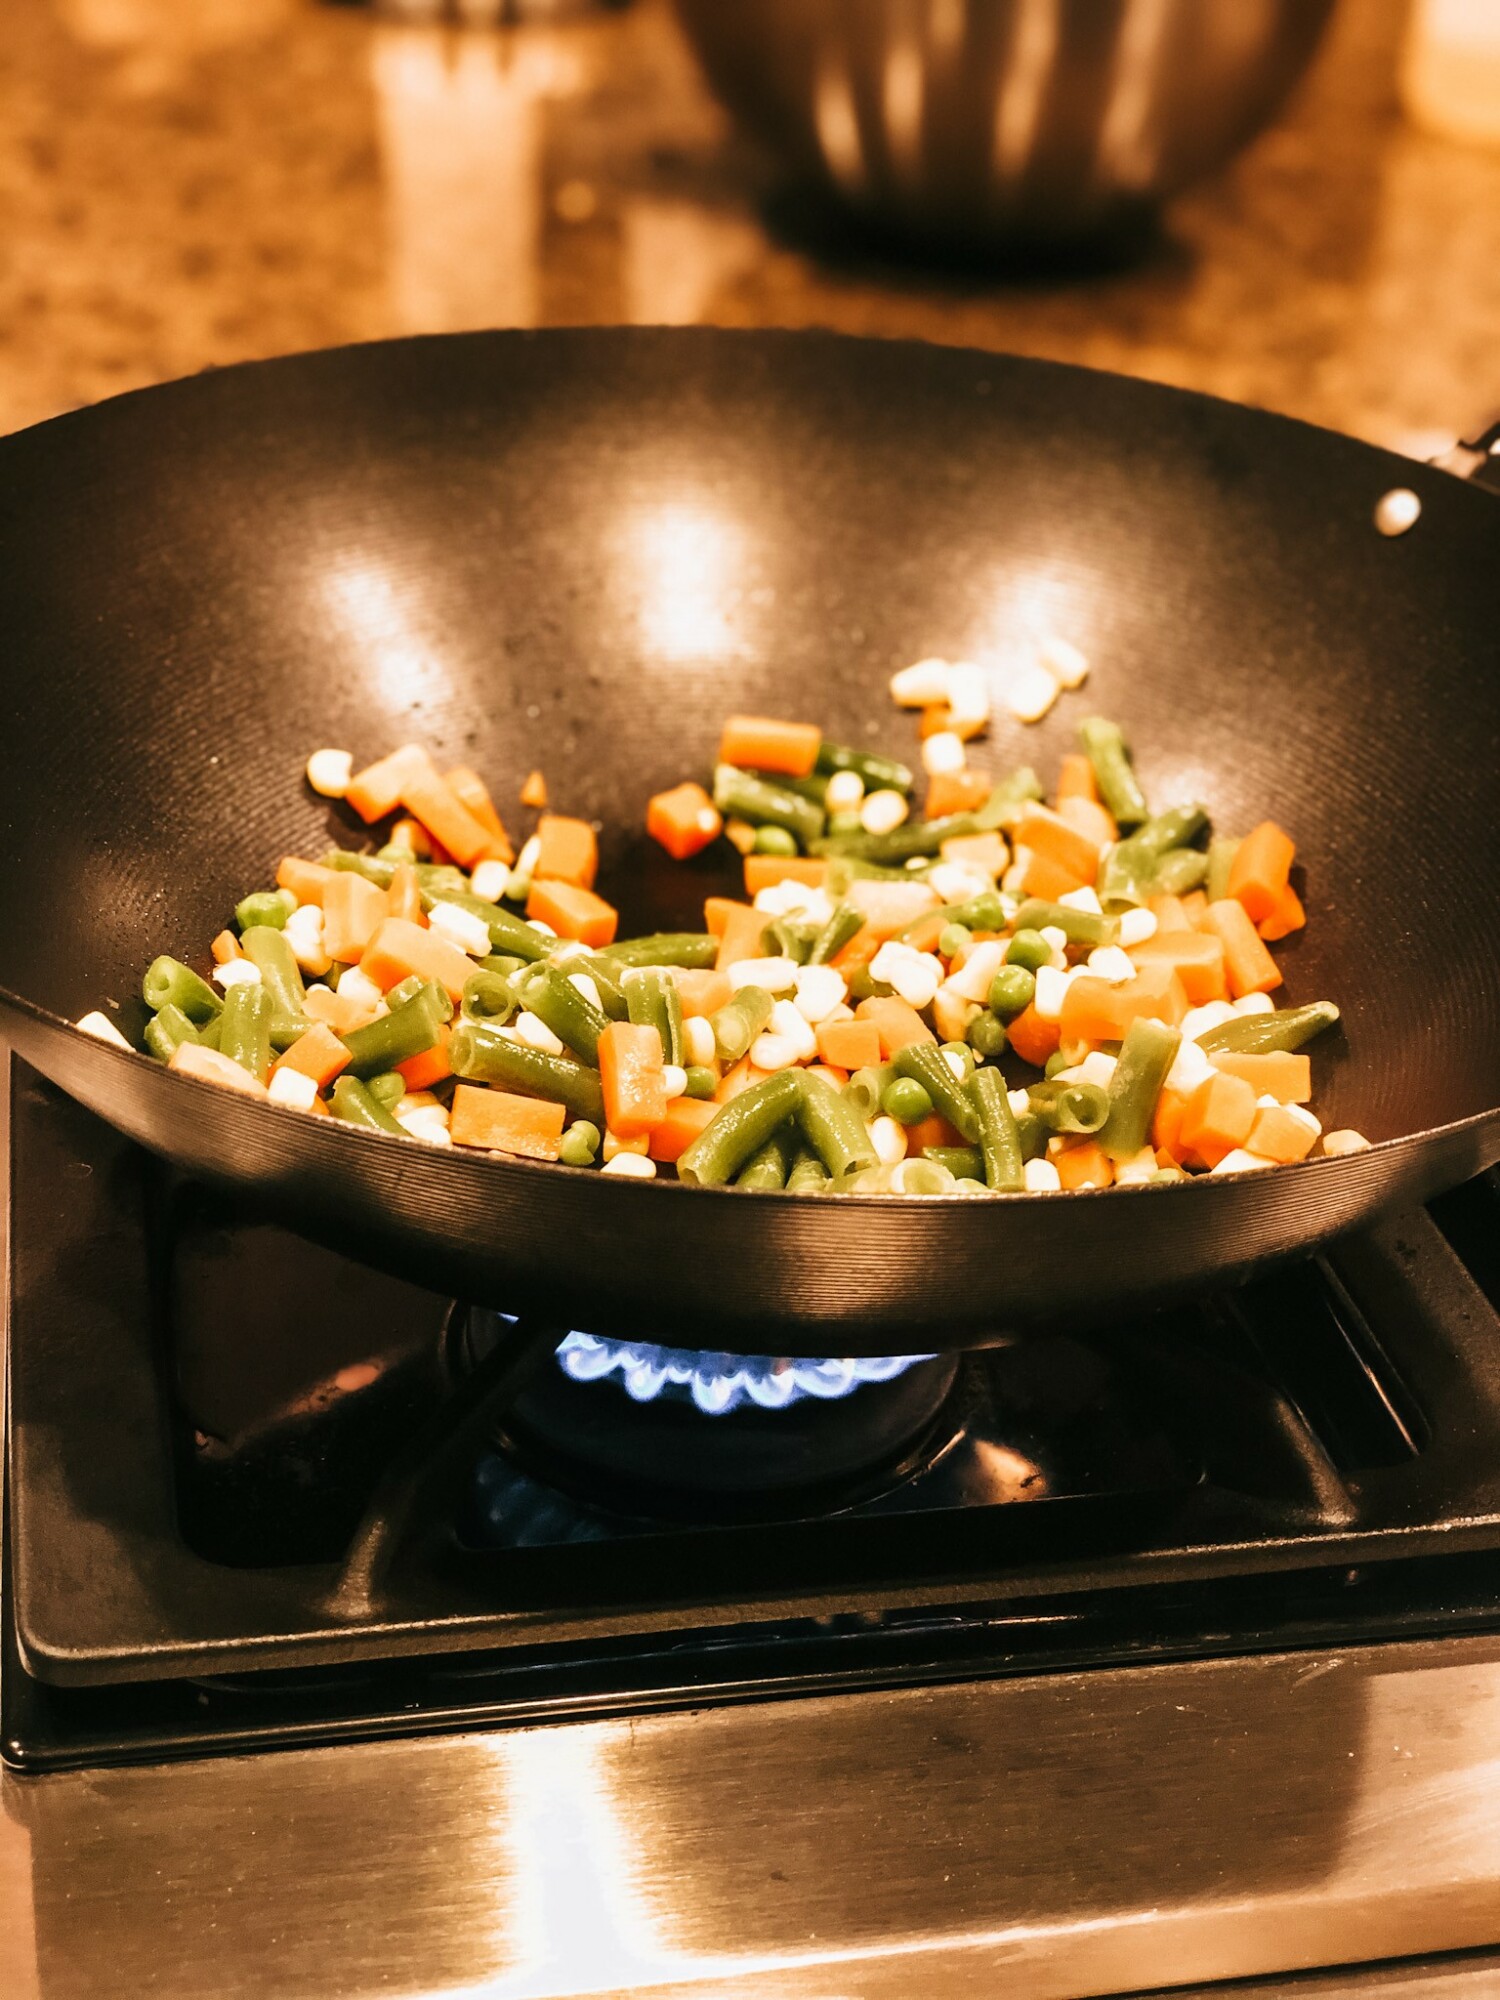
When I’m ready to cook, I put about 2 teaspoons of sesame oil into my wok pan and begin heating on medium. If you don’t have a wok pan, just use a larger frying pan. You want room to stir without losing ingredients off the sides. I add about a half of an onion, diced, and saute until it is starting to get translucent. You can adjust the onion amount to suit your family with more or less. There are times, I don’t even use onion. I just sub about a ¼ tsp of onion powder when I add the seasoning later on.
Next, I pour the frozen veggies right in the pan. If you are adding fresh veggies too, add them at this time. Saute those, stirring occasionally, until they are cooked through. While they are cooking, measure out about 4 cups of cooked rice. Add your desired protein to the pan so it can be brought up to temperature before adding the rice.
When the veggies and meat is nice and hot, add the rice to your pan. Also pour in your low sodium soy sauce, garlic powder and pepper. Mix completely and let cook together for about 5 minutes. If you are adding a scrambled egg, you can move your mixture to the side before dropping in an egg at the bottom of your wok pan. The heat of the pan should cook it up quickly. When the egg is cooked, mix it throughout your fried rice. (If you are adding the egg separately, cook it up in another pan while the mixture cooks.)
Taste your mixture and add more soy sauce, garlic powder, onion powder or pepper as needed to meet the tastes of your family.
Recipe Notes:
My favorite way to make fried rice is to plan it for the night after I will be cooking up some protein. For this week, I have grilled chicken planned one night and the next night, we are doing fried rice. That way, I can make sure we have some extra chicken cooked, and ready to dice into my rice. I’ve done the same with turkey and pork. It’s a fantastic way to use up some leftovers.
I generally use some frozen mixed veggies that are just a staple in our freezer. You pick your favorite and that makes the best fried rice. Even still, I will add in any other fresh veggies we need to use up soon.
When it comes to the soy sauce for this recipe, I will use low sodium or coconut aminos to try and control a bit of the sodium in our diets. I’ve used the real deal when I needed to, but it’s better with less sodium.
Some people like a little scrambled egg in their fried rice. Others, not so much. I love it, but my husband does not. You can choose to leave it out, or make it on the side to mix into your individual portions.
Fried Rice
Ingredients
4 cups cooked rice
2 tsp sesame oil
½ onion diced
1 package of frozen mixed veggies
Additional fresh veggies as desired
1 cup diced cooked chicken/pork/etc. (if desired)
⅓ cup low sodium soy sauce or coconut aminos
½ tsp garlic powder
¼ tsp onion powder (if not using diced onion)
Freshly ground pepper to taste
2 eggs (if desired)
Instructions
Cook rice and let cool.
Saute diced onion in the sesame oil until beginning to be translucent.
Add veggies to pan and stir occasionally until heated through.
Add meat if desired and heat through.
Add the rice to your pan along with the soy sauce and seasonings.
Mix completely and cook for another 5 minutes.
Scramble egg to add to the mixture if desired.
Serve up hot!
Want to subscribe to my blog so you don't miss a thing? Click here and I'll shoot you an email whenever a new blog post lands.
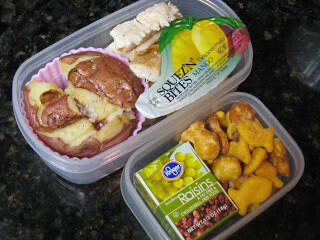
When my girls were little, packing lunches got old really fast. I mean, they wanted to eat lunch every single day. Sheesh! After finally getting the kids to bed at night, I would spend way too much time in the kitchen trying to pack up lunches for the next day. There had to be a way to make things easier. Here’s what I settled on that worked for me.
Bento Boxes
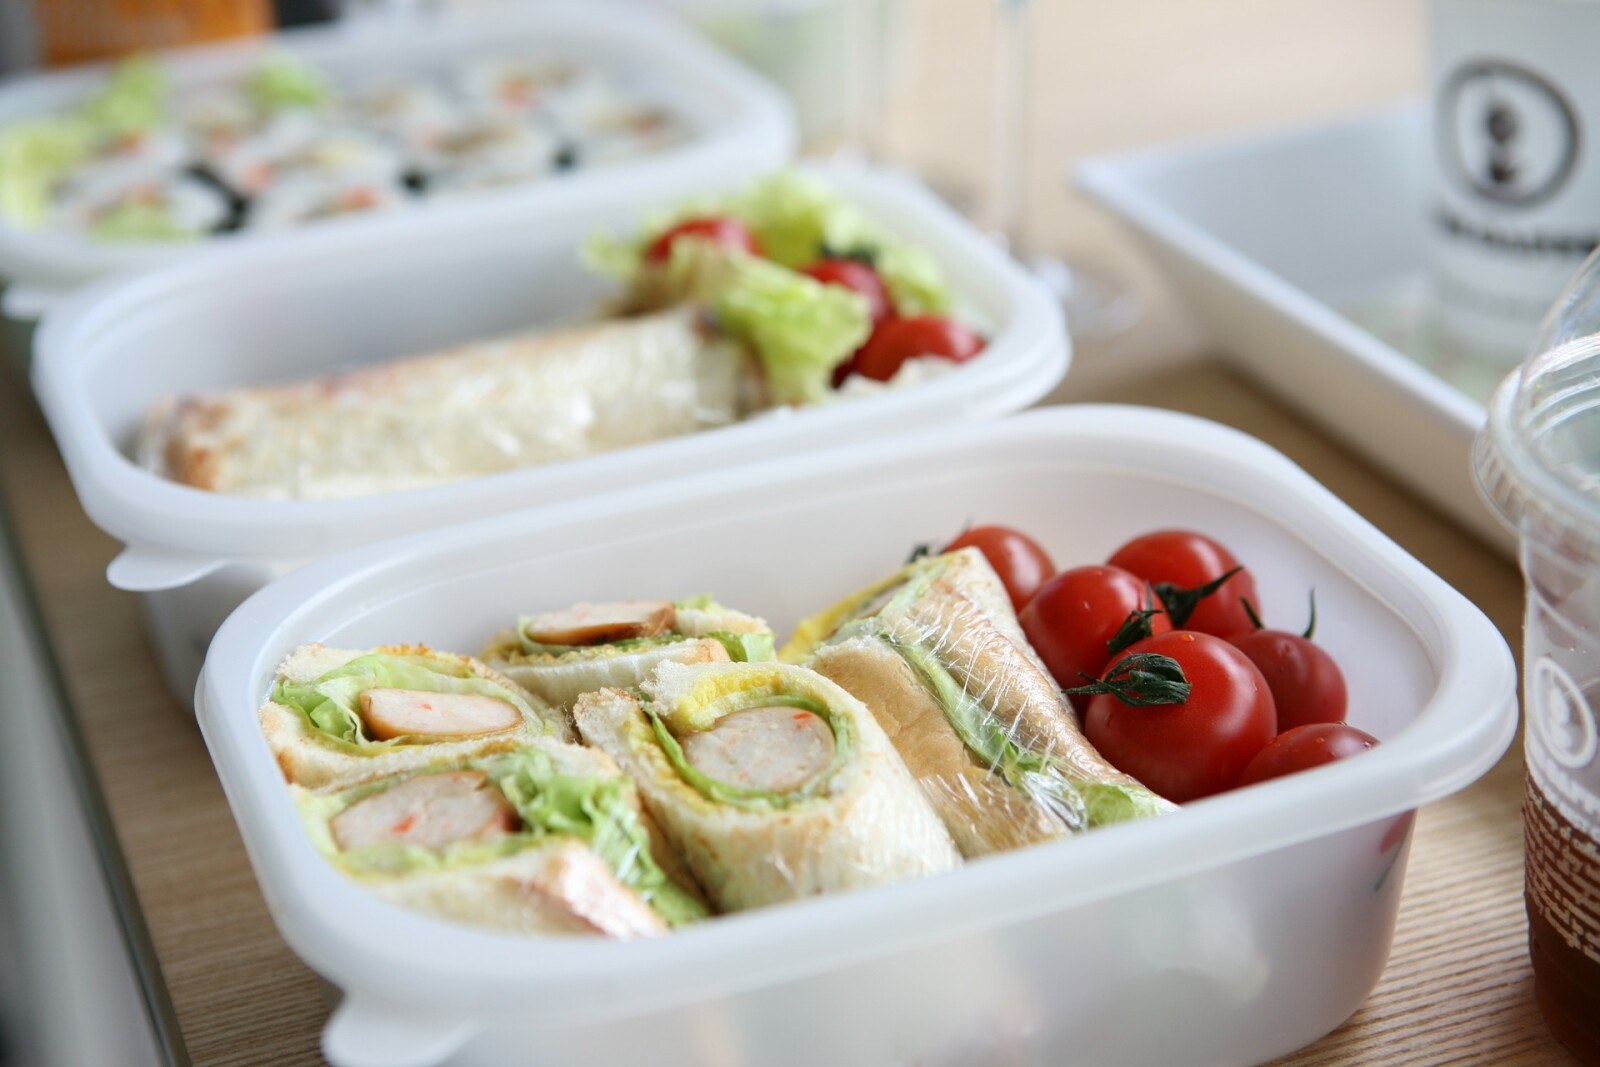
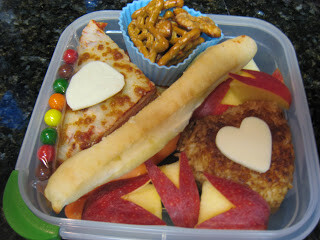
Now, if you go to Pinterest and search for this, prepare to be overwhelmed. There is an over the top insane way to do this and a real mom version way. I’m talking about the real mom version here. I loved being able to find little latching lid containers that were small enough that I could pack in the nutrition without lots of wasted food.
I loved packing a pretty lunch for my kids. They were proud to open their lunches and enjoyed seeing surprises inside. The usual items included: rolled up turkey, cheese sticks, grapes, baby carrots, apple slices, pretzels, snap peas, nuts, dried fruit, crackers, pasta, rice etc. To make it fun, I would cut out their initial out of a slice of cheese and place it on top. Super easy, but they loved it! Sometimes, I would make a fun shaped sandwich to include with the finger foods, but they were just as happy using the little toothpicks to eat their munchies most of the time. I think the novelty of having a lunch that was different than others but still held similar elements made them eat more. If I was feeling extra, I may even throw in a small wrapped candy for fun.
 |  |  |
Bento box packing tips:
Pack it tightly. If you are going for visually appealing, you want to pack in your ingredients, put the lid on and your child will see the same thing when they open their box at lunch. If there is too much open space, things will shift and you don’t get the same effect visually.
Watch out for moisture content. If you pack crackers next to the grapes, the crackers will likely lose their snap by lunchtime. You can avoid this by using sectioned containers and keeping dry ingredients in one section. I have been known to build a cheese “wall” to create the same effect. It was a matter of trial and error. My kids were never shy about reviewing my work, so I could improve.
Full disclosure here...I was really good at packing bento boxes when I was home full time. When I went back to full time, that was a lot harder for me to maintain. Mondays were the best day for me, because I could prepack most of it on Sunday night before the crazy of the week set in. Then, I transitioned to the next method of lunch packing.
Prepacked Bins
This method streamlined my efforts to pack not only two lunches for the kids, but my own lunch as well. It really changed how I organized my pantry/fridge space to minimize my time making lunches. I used to have all the cracker boxes together on one shelf and all the dried fruit in another area. I found that by pre-packing lunch size portions of our favorites into a few bins in the pantry, I could speed things along.
If I was making sandwiches, I could just grab a crunchy snack and a sweet snack from the pantry. Then I’d toss in a fruit or veggie snack bag from the fridge and the lunch was complete. I didn’t have to get out all the bags and package everything on a daily basis anymore. Switch out that main dish for pasta in a thermos and the same categories apply for a complete meal.
One of the added bonuses of this method was that when my kids got older and developed preferences of their own, they started using the same method to build their own lunches. I could feel better about them getting some semblance of nutrition while not losing my mind.
I loved being able to tailor our lunch ingredients to what worked for us at the time. Lunchables were expensive and not the best as far as nutrition went. They were a treat for an occasional lunch. I may have snickered a little when my children decided that the meat and cheese in those tasted funny to them. They preferred to do homemade lunchables instead. I preferred it too! I could control those ingredients with versions that were better for them. Sometimes, you have to let them discover those things for themselves.
Packing lunches doesn’t have to consume your every evening. By putting some simple systems in place, you can streamline your efforts and spend your time the way you want.
Another way I have organized my life is with meal planning. Check out my weekly meal planner here.
Want to subscribe to my blog so you don't miss a thing? Click here and I'll shoot you an email whenever a new blog post lands.
Want to subscribe to my blog so you don't miss a thing? Click here and I'll shoot you an email whenever a new blog post lands.
A few years ago, I went dairy free. Now, don’t get me wrong. I totally appreciate dairy. I have an affinity for cheese in particular. Here’s what happened… I got some blood work results back with less than desirable borderline results. I also was experiencing some inflammation. Knowing that inflammation often stems from the gut, and dairy is a huge culprit, I decided that I would go dairy free for a month to see how I felt.
If you know me, you know that dairy was a big part of my everyday diet. Cereal with skim milk, cheese on everything and milkshakes were regulars in my life. This was a huge shift for me. A good friend recommended that I try to eliminate dairy from just one meal a day at first and then ease into the change in other meals once I was successful with that. What I learned about myself in those first couple of days was that I will exploit any and all loopholes I can find. If I avoided dairy at dinner, then I was sure to have an overload of dairy in my lunch. This was silly and all mental. So, I decided that I had to just do it. You may find a stepped approach more successful for you, but for me, it wasn’t going to work.
Planning
I was challenged planning meals for my family. I was trying to make a change for me without thoroughly disrupting their lives. This meant finding alternatives to make those meals without dairy. We love to do baked potatoes for dinner. I found that there are great dairy free butter-like spreads available these days. This meant that I could have a baked potato, minus the cheese and feel okay about it. When we made burgers for the family, I just made mine without the cheese. This was one place where I actually didn’t have major feelings of regret. In most instances, the cheese on a burger is not a strong flavor, so I could handle that.
If I was going to eat out, I had to research and make a plan. Mexican restaurants are tricky to do non-dairy. My go-to order went from chicken enchiladas to tacos al carbon. Chips and queso gave way to chips and salsa. (Some money saving right there!) It’s totally manageable, but you have to do the mind shift.
Being dairy free meant that I was no longer making mac and cheese for the family, because plain macaroni just doesn’t satisfy like the original. I also stopped making grilled cheese sandwiches because there was not a suitable alternative to my tastebuds.
Substitutions
I learned to substitute various milk alternatives depending on what I was wanting. For example, I learned that unsweet coconut milk works great for cooking and baking. Vanilla almond milk is great for cereal or with cookies because of the little bit of sweetness. I found that cooking with the vanilla almond milk works if you are mindful of what you are making. It works great for pancakes, but not so well for a tater tot casserole. We could eat that casserole, but the sweetness threw the taste off much more than expected.
The Aftermath
I was happily surprised that I managed to make it through the month trial of being dairy free. I found that I was much more aware of ingredients listed on items. I had to decide at some point if I was going to be militant about labeling and avoid all things that had trace amounts of dairy or if I was ok with those amounts. For my sanity, I decided that since I didn’t have a legit allergy, I could handle items that were processed in a facility that also does dairy.
Some changes were permanent. I no longer buy cow’s milk for my family, even years later. We have all adjusted for the better. When I order my lattes, I use a milk alternative. Thankfully, these are readily available now. We use non-dairy butter that is olive oil based as our only butter in the house. We don’t notice the difference, so that’s an easy swap. There are amazing dairy free ice creams available these days too. The flavors are top notch! You can have treats without dairy, you just have to plan for it. One of my favorite things is that one of my local fast food places gives you a choice of dairy or non-dairy shakes. Wait, I can have that delicious treat and not pay for it later….yes, please!
Going dairy free also gave me skills for when my youngest daughter decided to be vegan. No meat is one thing, but no dairy and no eggs add a whole other layer of challenge in dining. Understanding where dairy is hidden in your food was key to her success.
Do I add cheese to things now? Yes, in moderation. Now, I still load up cheese where it matters, but I’m more mindful now. If it truly has an impact on the flavor, I’ll do it. If it’s just because the picture of that item usually has cheese, I may not add it. I actually have a better appreciation of cheese now that I am adding it more frequently. I’m not wasting my time or gut for unimpressive cheese!
How do I feel? I feel great! I know that I’m overdoing the dairy when I start to get achy joints or an upset stomach. I can better read my body’s signals now that I know what it feels like to feel great. I have a clear benchmark to reach for.
If you are looking to make a change for the better, you may want to try going dairy free for a month. It could be life changing!
Want to subscribe to my blog so you don't miss a thing? Click here and I'll shoot you an email whenever a new blog post lands.
Want to subscribe to my blog so you don't miss a thing? Click here and I'll shoot you an email whenever a new blog post lands.